iBoysoft DiskGeeker for Windows Help Document
Help Document
- Overview
- Supported Operating Systems
- Supported File Systems
- Supported Storage Devices
- How to Download & Install iBoysoft DiskGeeker for Windows?
- How to Activiate iBoysoft DiskGeeker for Windows?
- How to Clone an OS Disk, Partition, or Disk?
- How to Clean System Junk Files, Find Large Files on a Partition, or Analyze Disk Space?
- How to Download Windows/macOS Image & Create a Bootable USB Installer
- How to Encrypt a Partition with BitLocker on Windows Home Editions?
- How to Manage BitLocker Drives?
- How to Securely Wipe Data on a Disk, Partition, or Partition's Free Space?
- How to Wipe a Specific File or Folder?
- How to Test a Partition or Disk Speed?
- How to Resize a Partition?
- How to Recover a Lost Partition?
- FAQ
Overview
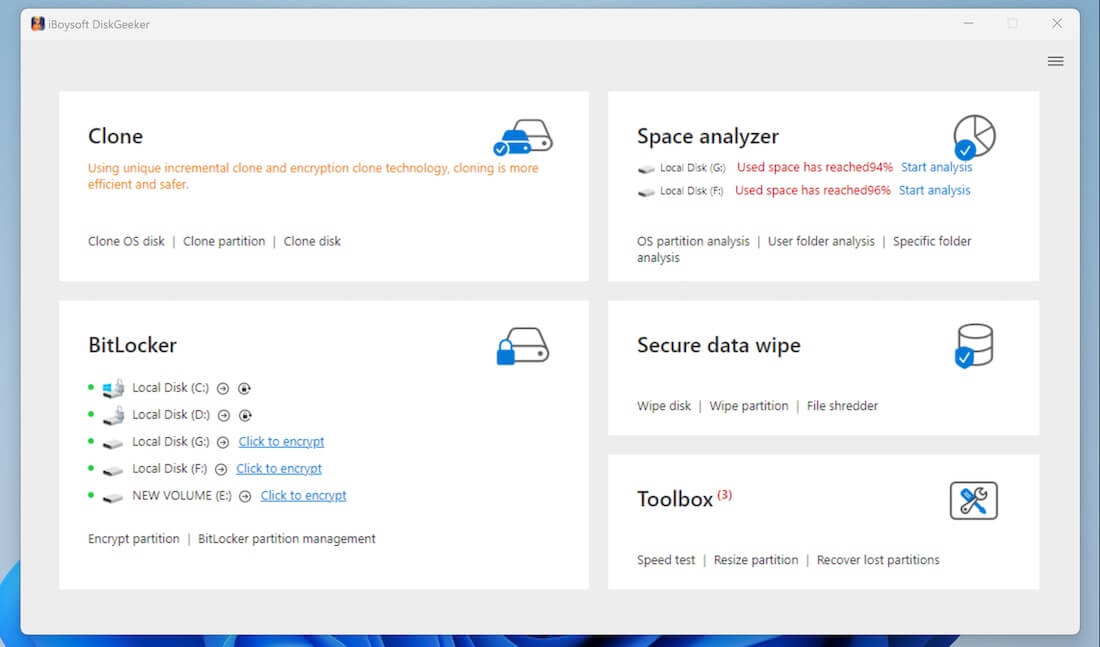
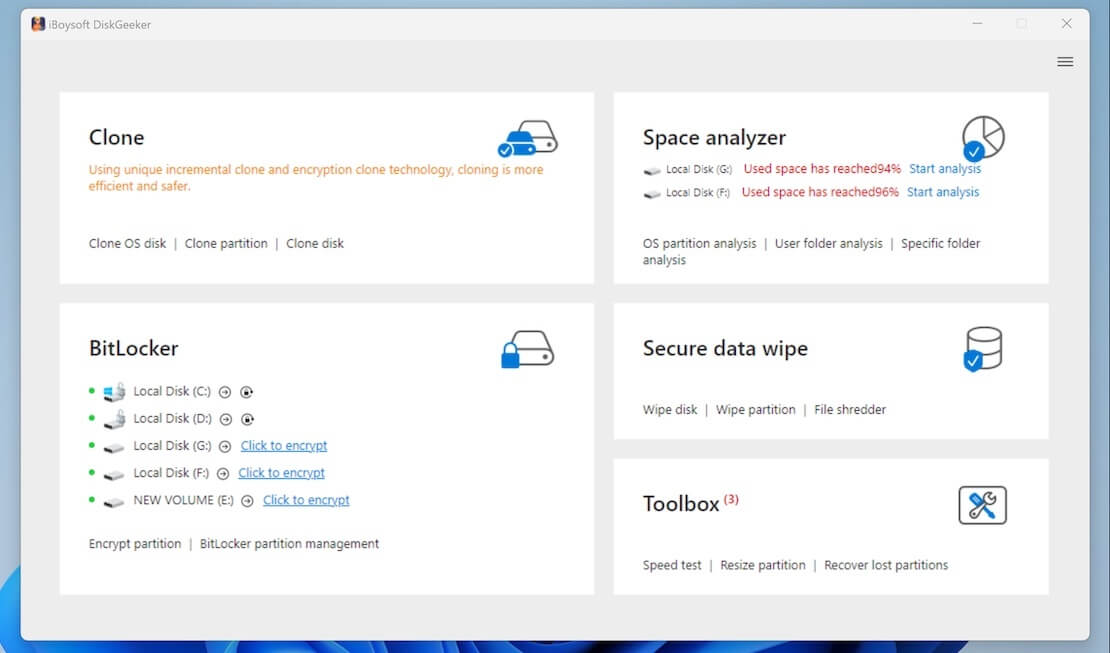
iBoysoft DiskGeeker is an all-in-one disk manager. It features disk cloning, system migration, space analysis, Windows and macOS OS image download, bootable USB installer creation, BitLocker encryption, BitLocker-encrypted drive management, secure data erasure, disk speed test, partition resizing, and lost partition recovery.
This disk management tool helps you take over and maintan your PC and external HDDs and SSDs in a simple way.
Supported Operating Systems
Windows 11, Windows 10, Windows 8.1, Windows 8, Windows 7 (64-bit processors)
Windows Server 2022, Windows Server 2019, Windows Server 2016, Windows Server 2012, Windows Server 2008 (64-bit processors)
Supported File Systems
NTFS, FAT32 and exFAT file systems.
Supported Storage Devices
Hard disk drives (HDDs), solid state drives (SSDs), USB flash drives, pen drives, flash drives, memory cards, SD cards, CF cards, and other storage devices. (formatted with MBR & GPT)
How to Download and Install iBoysoft DiskGeeker for Windows?
Step 1: Free download iBoysoft DiskGeeker for Windows from https://www.m3datarecovery.com/download/
Step 2: Double-click the installer to open it.
Step 3: Follow the on-screen instructions to finish installing iBoysoft DiskGeeker for Windows on your PC.
Step 4: iBoysoft DiskGeeker for Windows will be automatically opened.
How to Activiate iBoysoft DiskGeeker for Windows?
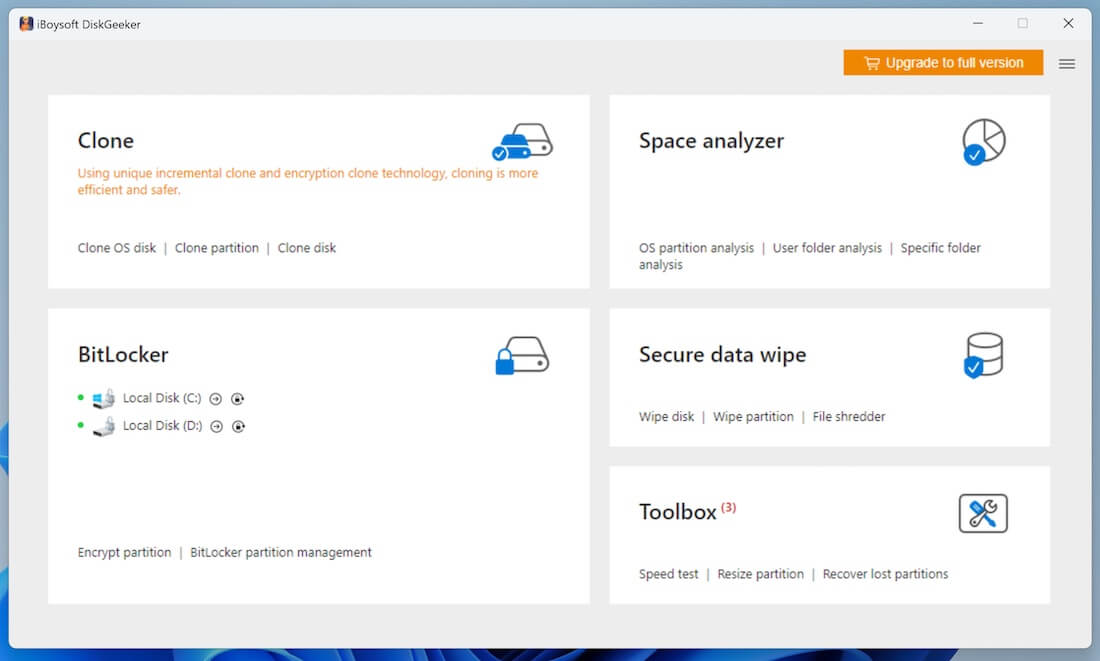
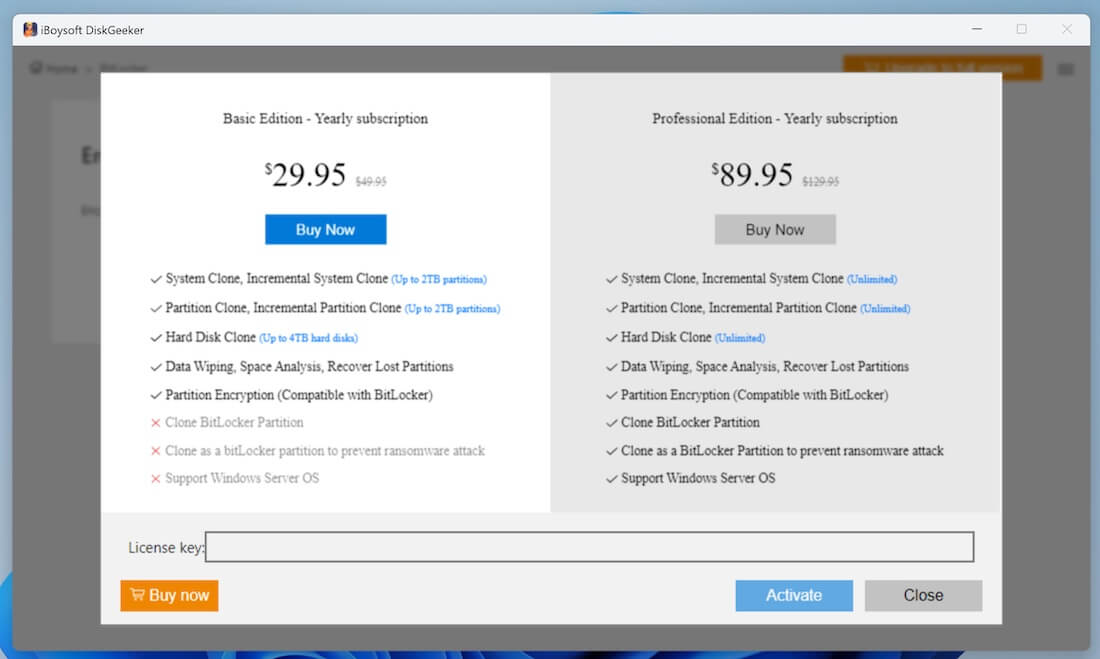
Basic features in iBoysoft DiskGeeker for Windows are free for all users. If you need to exprience the enhanced functions, please purchase a yearly subscription from our online store.
Step 1: Copy the license key from your order confirmation email.
Step 2: Open the main window of iBoysoft DiskGeeker for Windows.
Step 3: Click the yellow "Unlock to full version" button at the upper right corner.
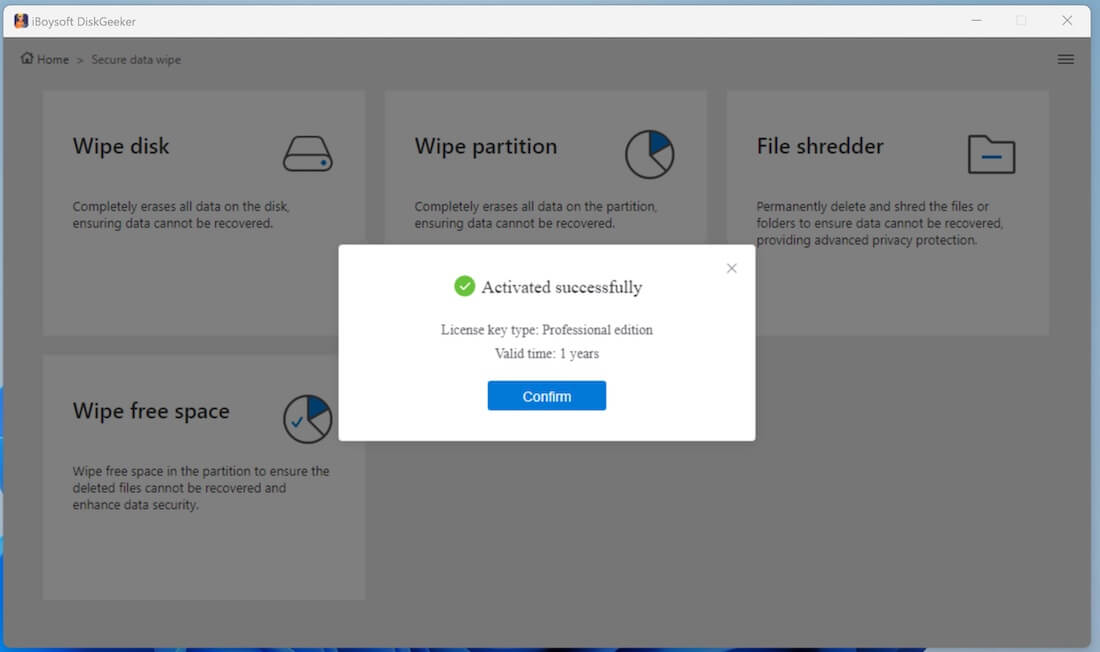
Step 4: Paste the license key and click "Activate."
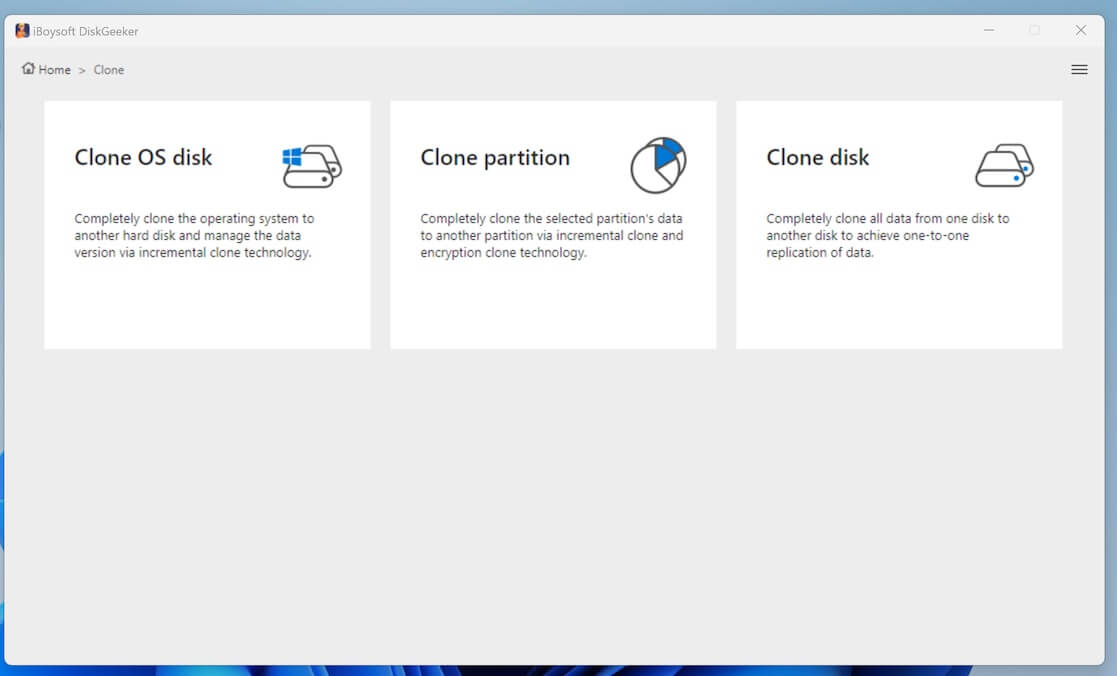
How to Clone an OS Disk, Partition, or Disk?
The Clone feature in iBoysoft DiskGeeker works to make a one-to-one copy of an OS disk, a non-system partition, or an entire disk to another.
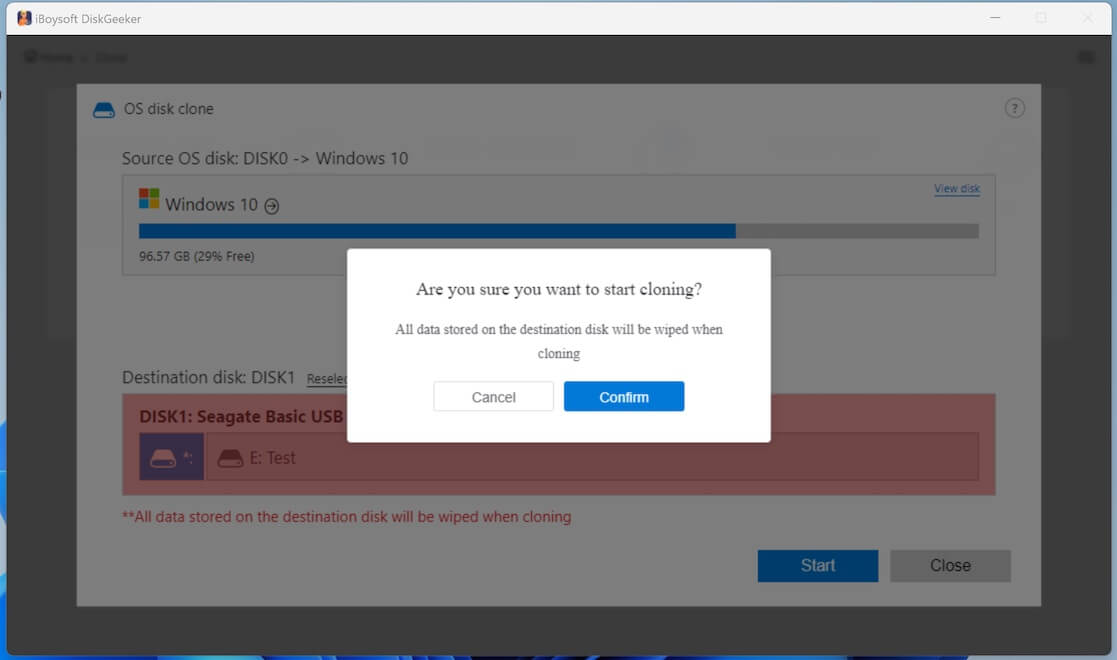
Warning: Cloning will erase all contents on the destination disk, so back up your essential files before starting cloning. Or else, you'll face irrecoverable data loss.
Quick Navigation:
- Clone an OS disk
- Clone an partition
- Clone a disk
- Incremental clone a partition
- Encryption clone a partition
Clone an OS disk
This is to help you make a bootable system copy on a hard drive for system migration, storage device upgrade, or system file backup.
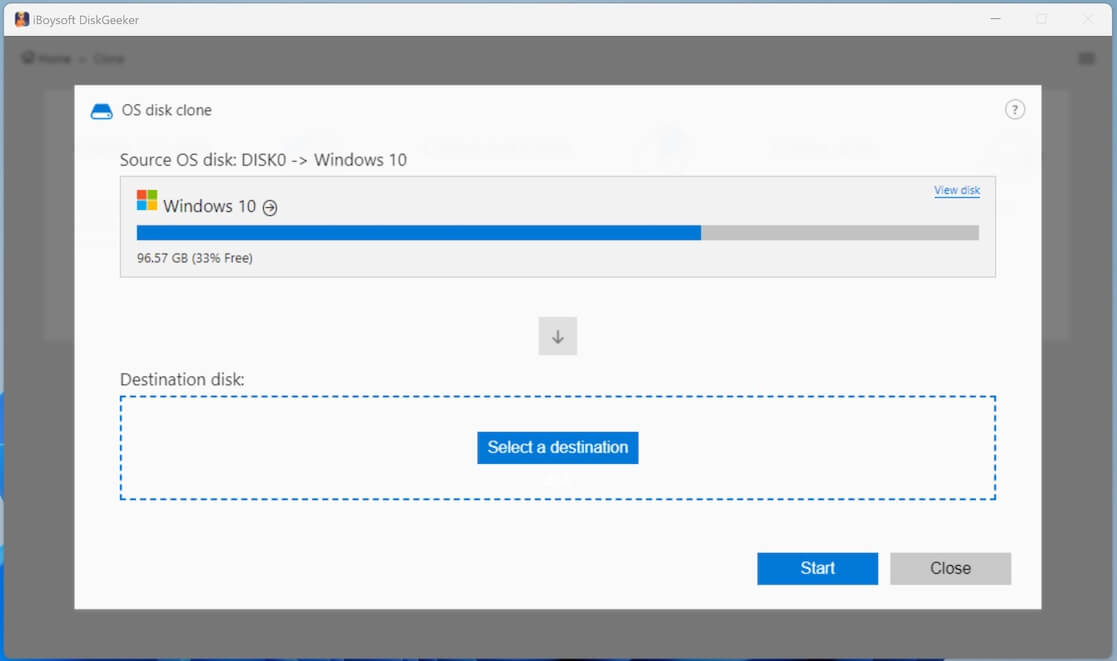
Step 1: Click "Clone OS disk" from the Clone module to directly open Clone OS disk window. Or, you can click "Clone" > "Clone OS disk."
Step 2: Check the source disk from the Source OS disk section.
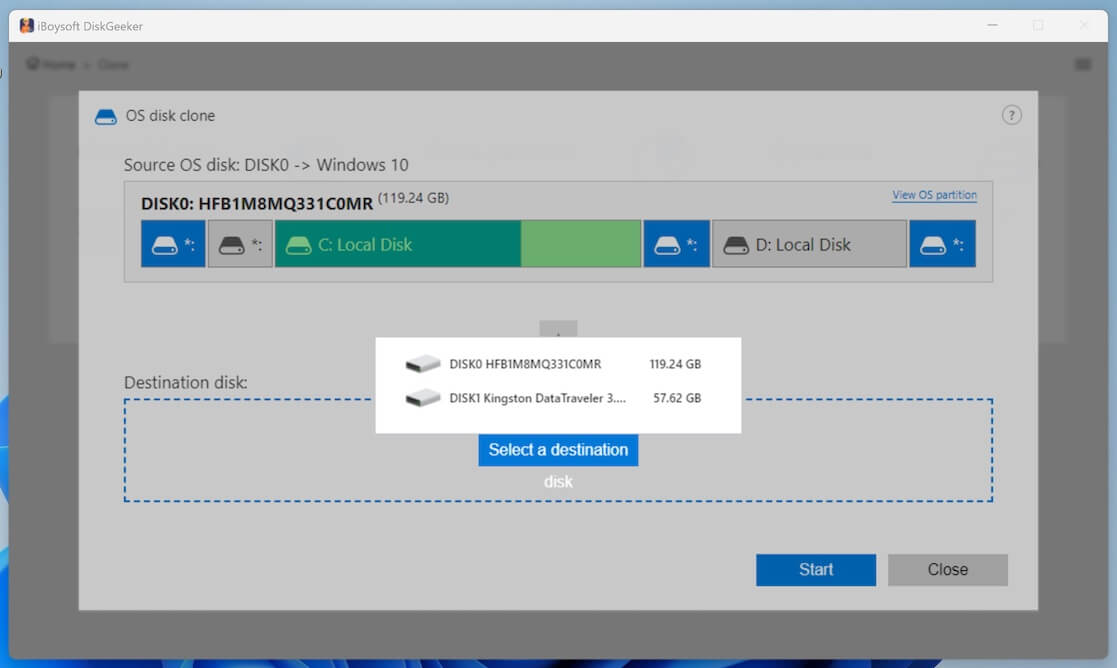
In the Source OS disk section, the software will automatically list the system partition it found and also show the system version and the partition condition.
You can click "View disk" to check the distribution of the disk where the system partition resides, so to verify if the system partition is selected correctly. Here, the selected system partition will be marked green.
Note: If the BOOT and SYSTEM partitions in your system are separated (that are the C drive and the EFI system partition in Disk Management), even if the Source OS disk section only shows the BOOT partition, both the BOOT and SYSTEM partitions will be cloned to the target disk to guarantee the cloned system partition bootable.
Step 3: Choose the destination disk. Hover on the "Select a destination disk" button and you'll see a list of available target disks.
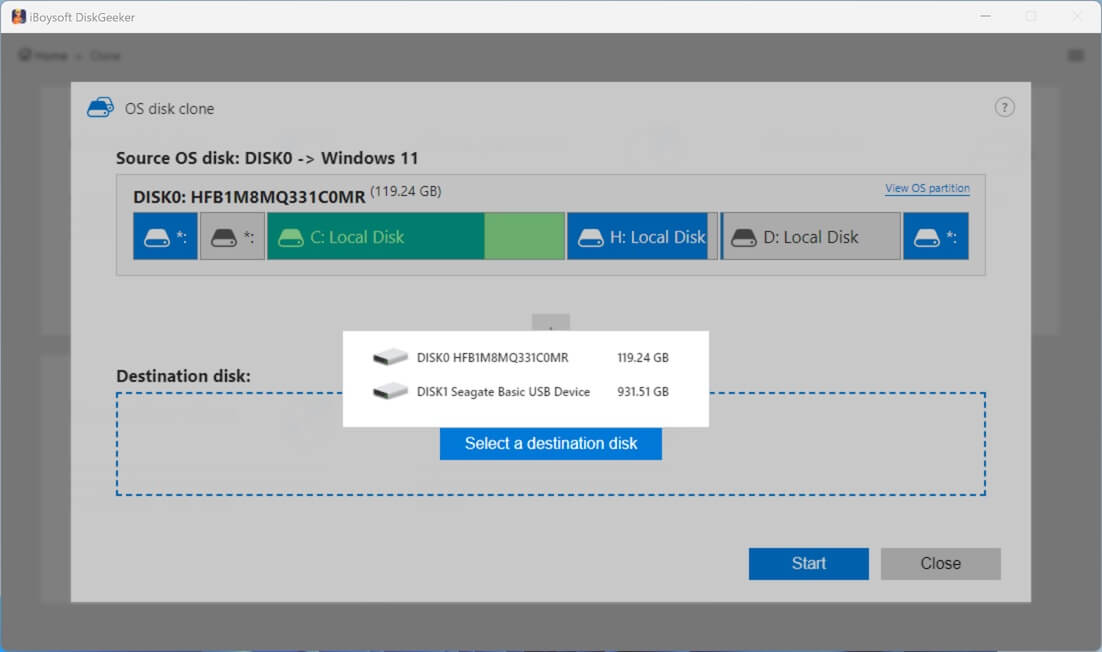
The storage capacity of the destination disk must be larger than the source disk's. Or else, the one-to-one disk clone will fail. For example, the source disk is 200GB, so the destination disk must be larger than 200 GB.
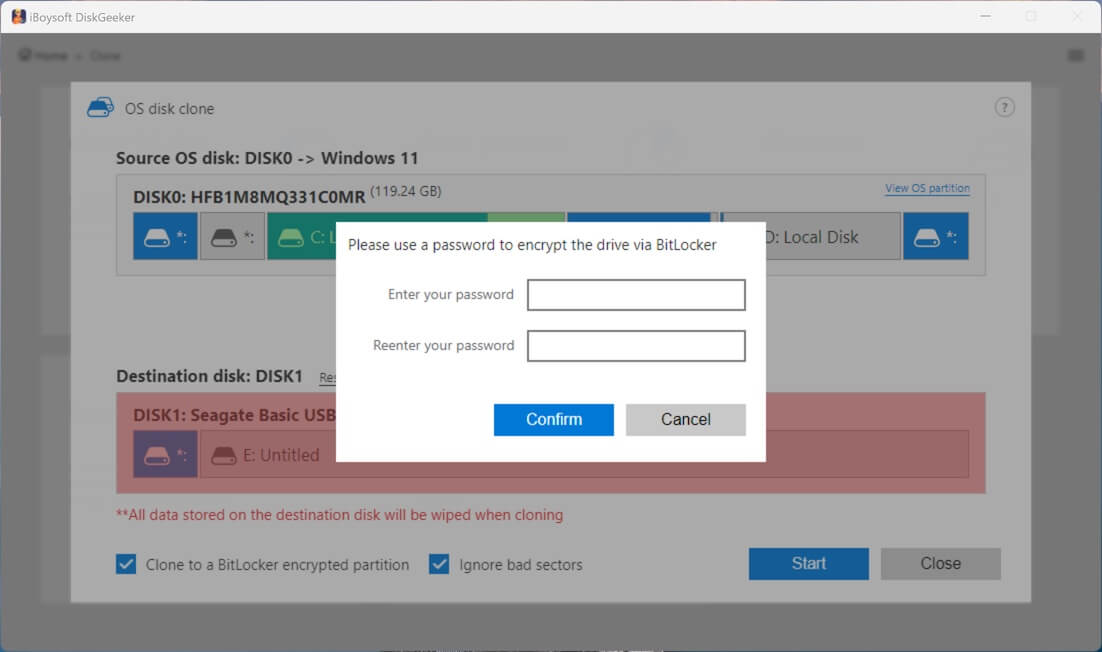
You can clone the OS partition as a BitLocker-encrypted one. To do so, tick the "Clone to a BitLocker encrypted partition" option. Then, you'll be asked to set a password.
If you worry that the bad sectors on the source partition interrupt the cloning process, check the "Ignore bad sectors" option.
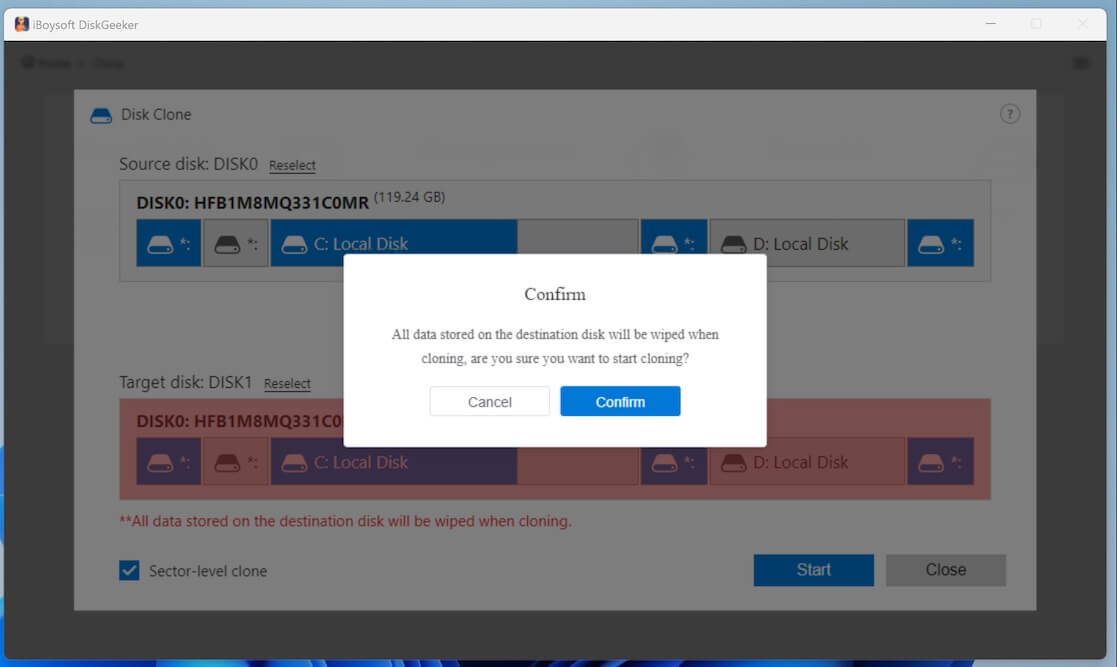
Step 4: Confirm if you have chosen the right destination disk and have backed up data on it, and then click "Start" > "Confirm."
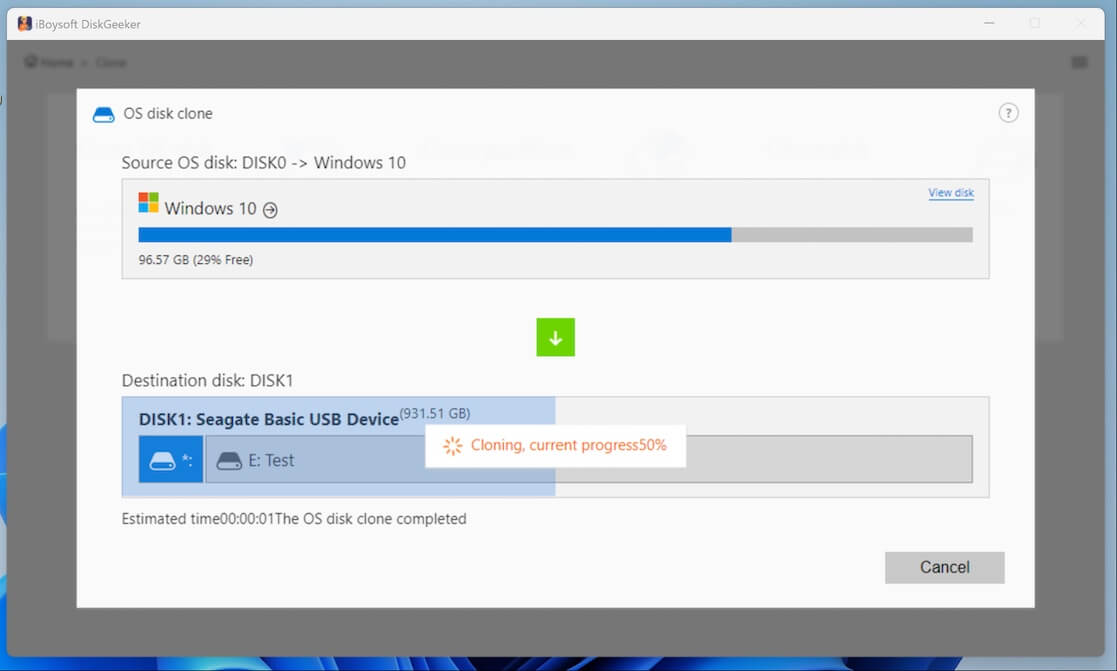
Step 5: Wait for the cloning process to complete.
When cloning starts, the disk distribution map of the target disk will be displayed as a visual progress bar.
Tips:
• You can cancel the system partition cloning task at any time during the process.
• You can conduct incremental system cloning (or called incremental backup) but not in the OS disk clone module. Switch to the "Incremental clone" module after finishing a system partition clone, and then choose your system partition as the source partition and the cloned system partition on the destination disk as the target partition.
Clone a partition
Partition clone helps you create a copy of any partition (including a BitLocker-encrypted partition) so as to make an exact backup.
Only allocated partitions with over 500 MB in size can be cloned.
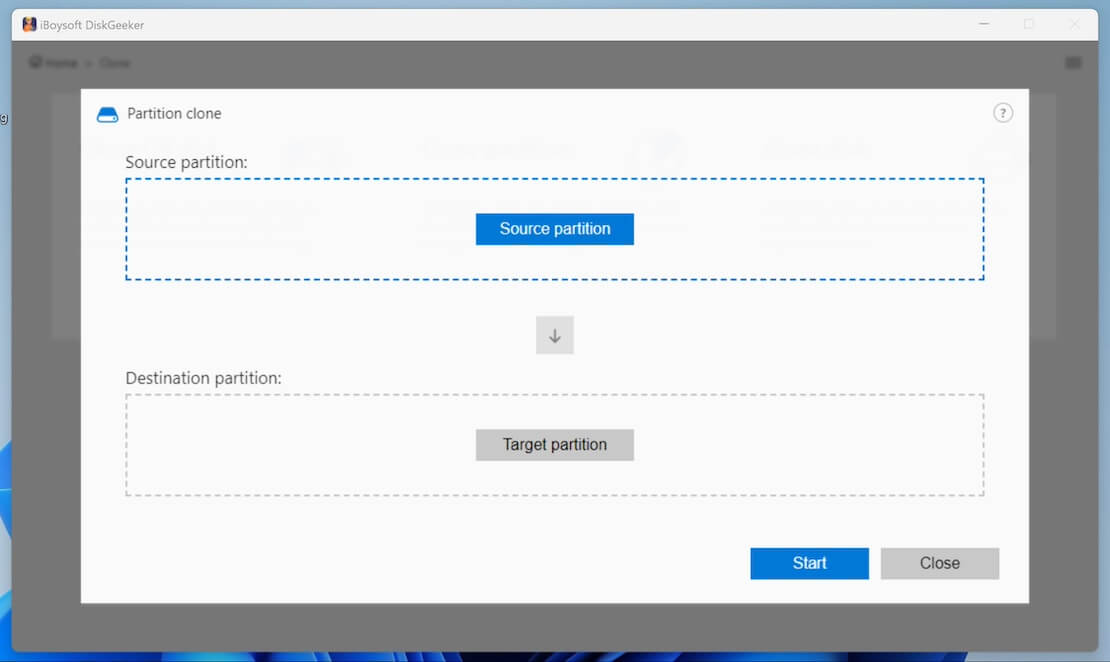
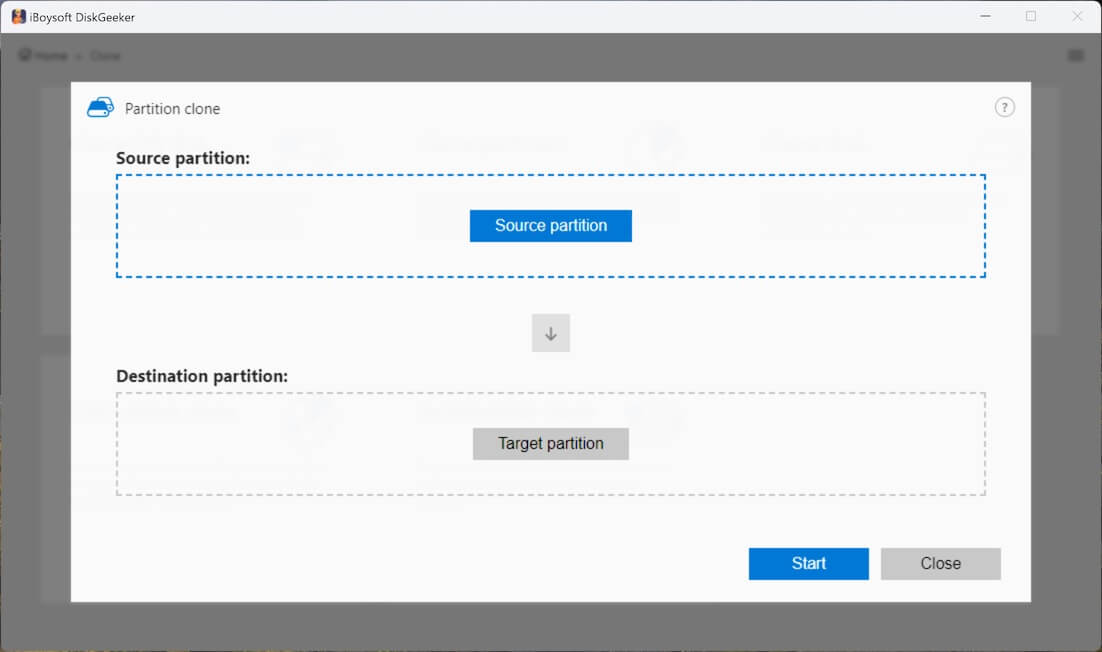
Step 1: Select "Clone partition" from the Clone module to enter the Clone partition window. Or, you can click "Clone" > "Clone partition."
Step 2: Click "Source partition" to choose the partition you want to clone.
You are allowed to choose a BitLocker-encrypted partition as the source partition.
After selecting the source partition, you'll see the basic info of the partition, such as partition label, drive letter, total capacity, available space, etc. You can click "View disk" to view the disk condition where the selected partition resides. The selected partition will be marked green here.
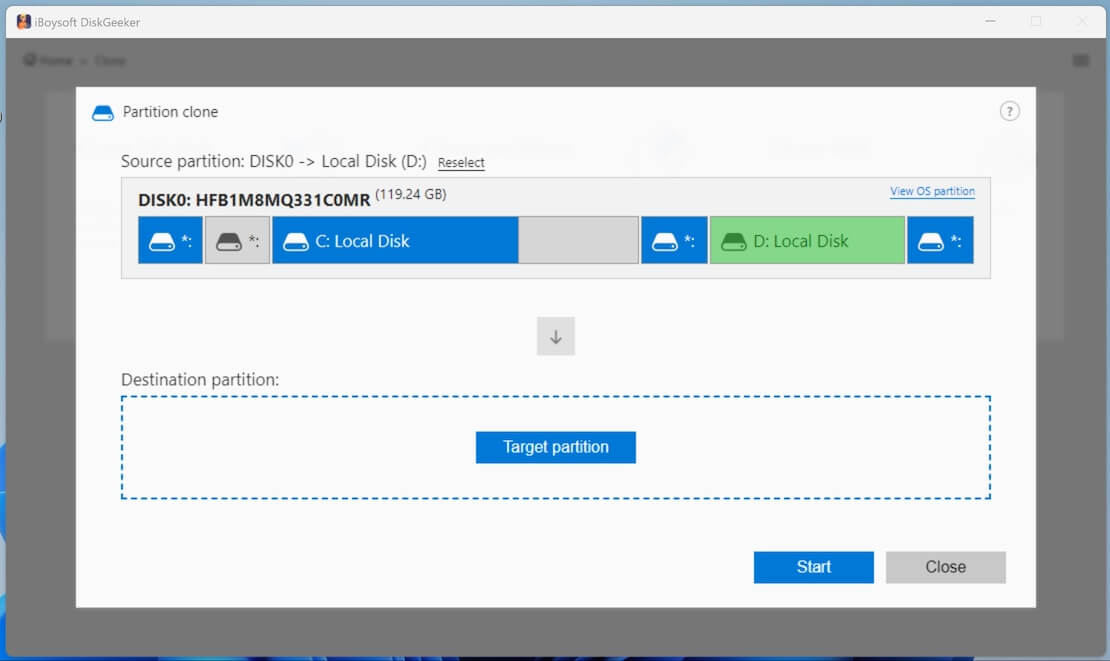
If you want to change the source partition, click the "Reselect" button for a change.
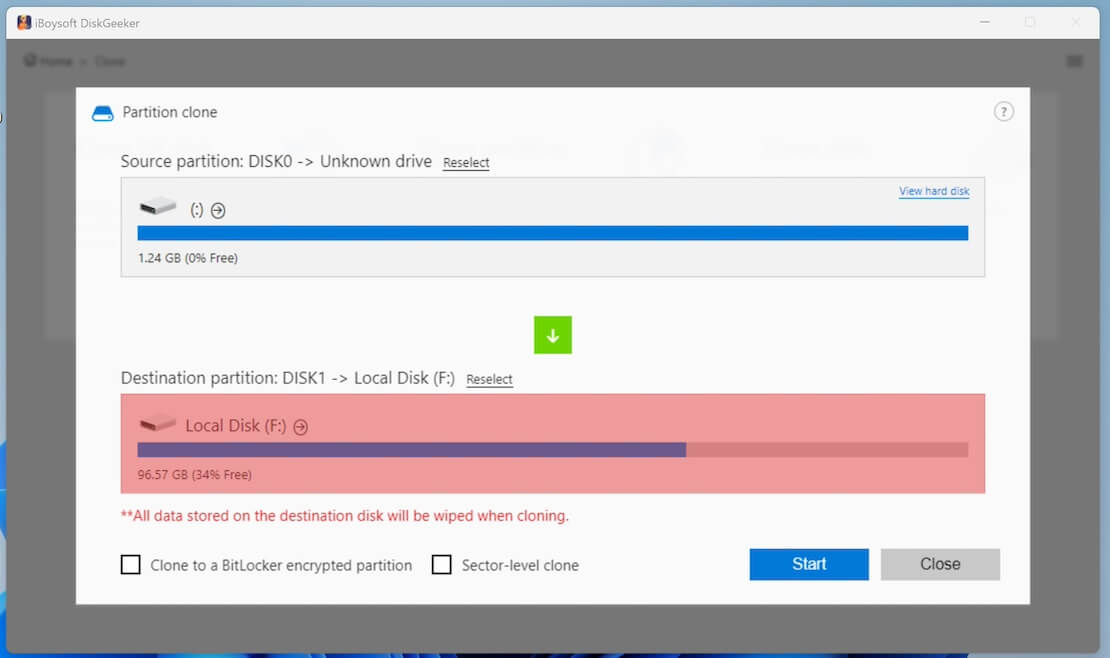
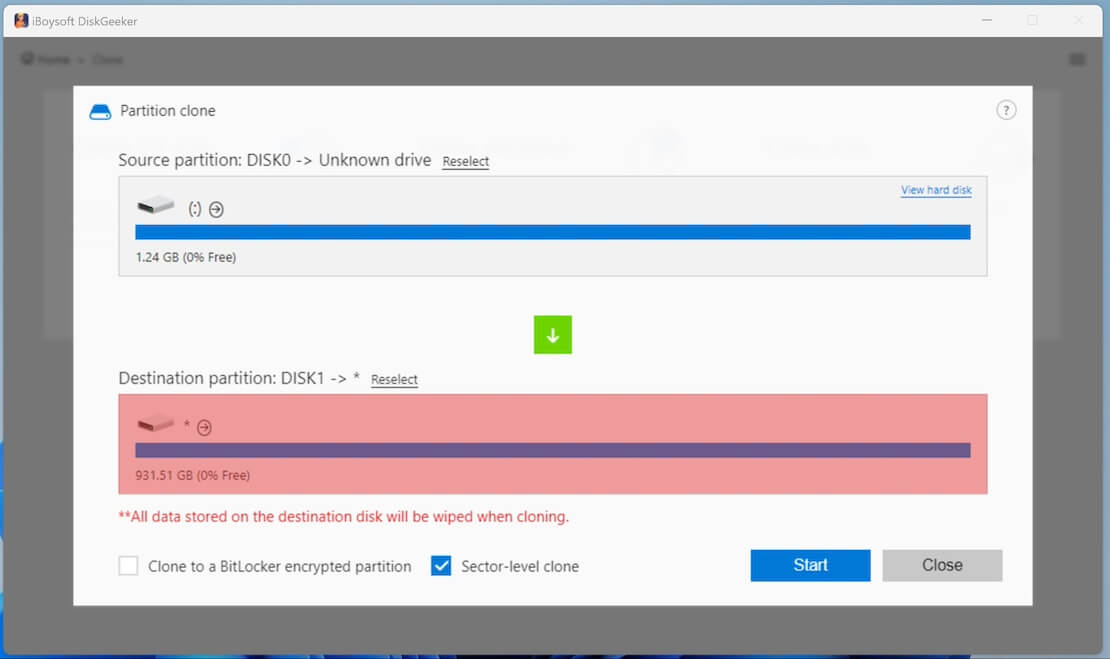
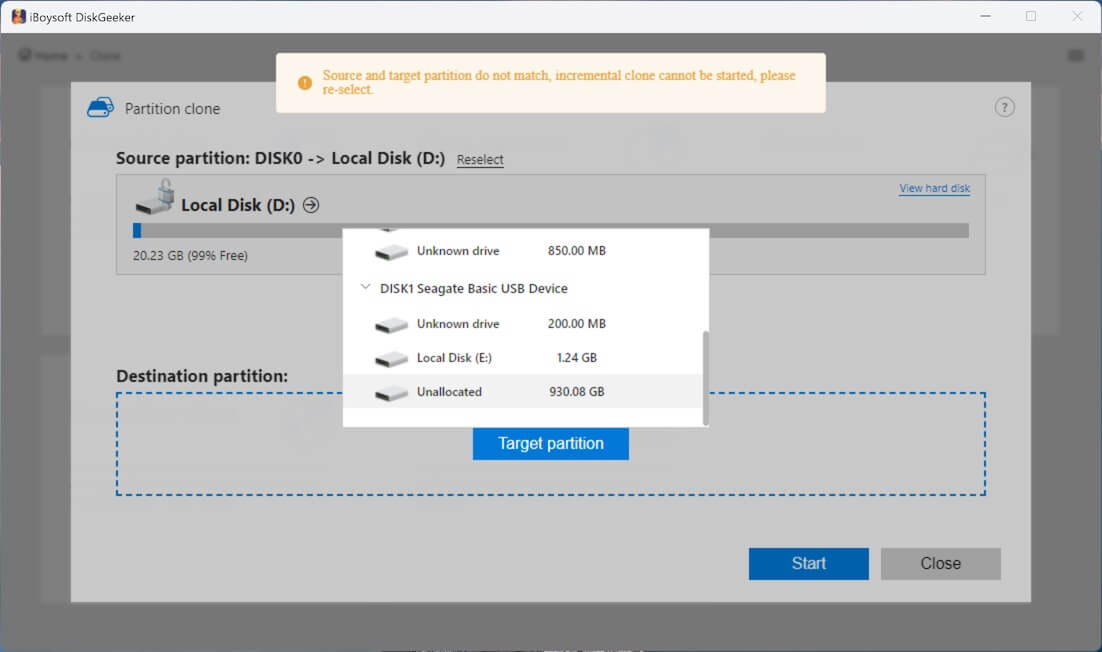
Step 3: Move your cursor to "Target partition" and select your destination partition from the list.
The Target partition button is available only after you choose the source partition.
Step 4: Set up your cloning preferences.
• Clone to a BitLocker encrypted partition: clone the partition to be a BitLocker-encrypted.
• Sector-level clone: exactly clones all existing data on the source partition and all available space to the target partition. The sector-level clone mode considers all space of the source partition, including the available space, as valid data storage space.
• Ignore bad sectors: bypass the bad sectors on the source partition to prevent the cloning process from being interrupted by them.
Note: Partition clone in iBoysoft DiskGeeker contains two modes - full clone and incremental clone.
After choosing the target partition, you are in full clone mode by default. Full clone enables you to copy all data from the source partition to the target partition one by one.
If you've completed a full clone on the selected source and target partitions, you'll automatically enter the incremental clone mode. You can click the "Switch to Full clone mode" button to change to the full clone mode if you'd like.

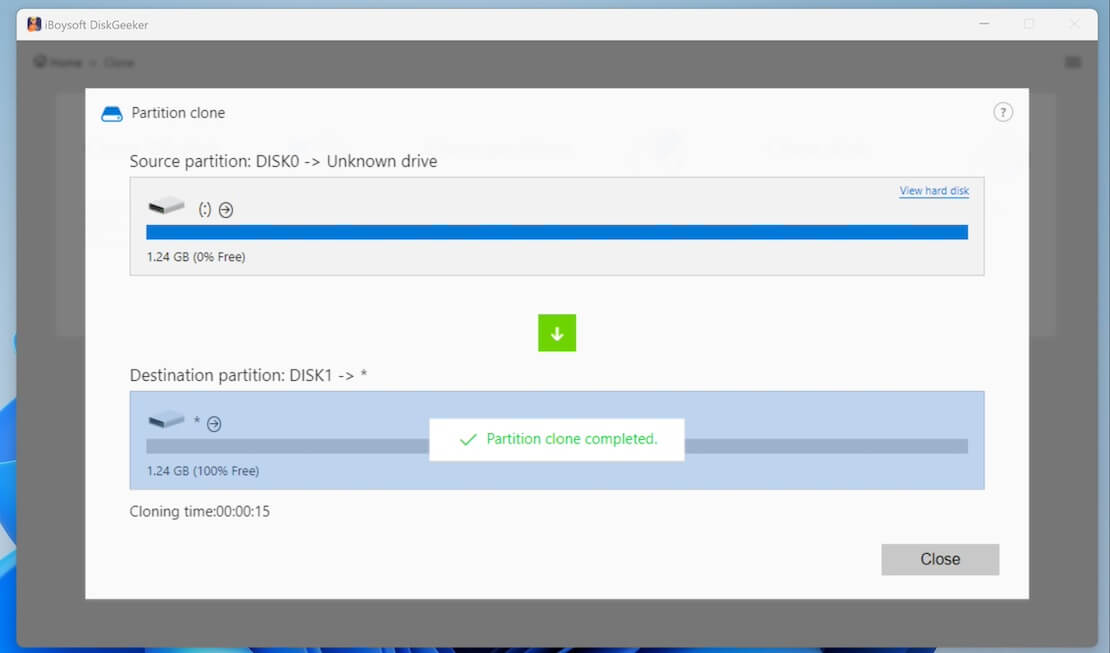
Step 5: Click "Start."
The full clone usually takes a relatively long time, especially if you select "Sector-level clone."
Step 6: Confirm to start clone.
Step 7: Wait for the cloning to end.
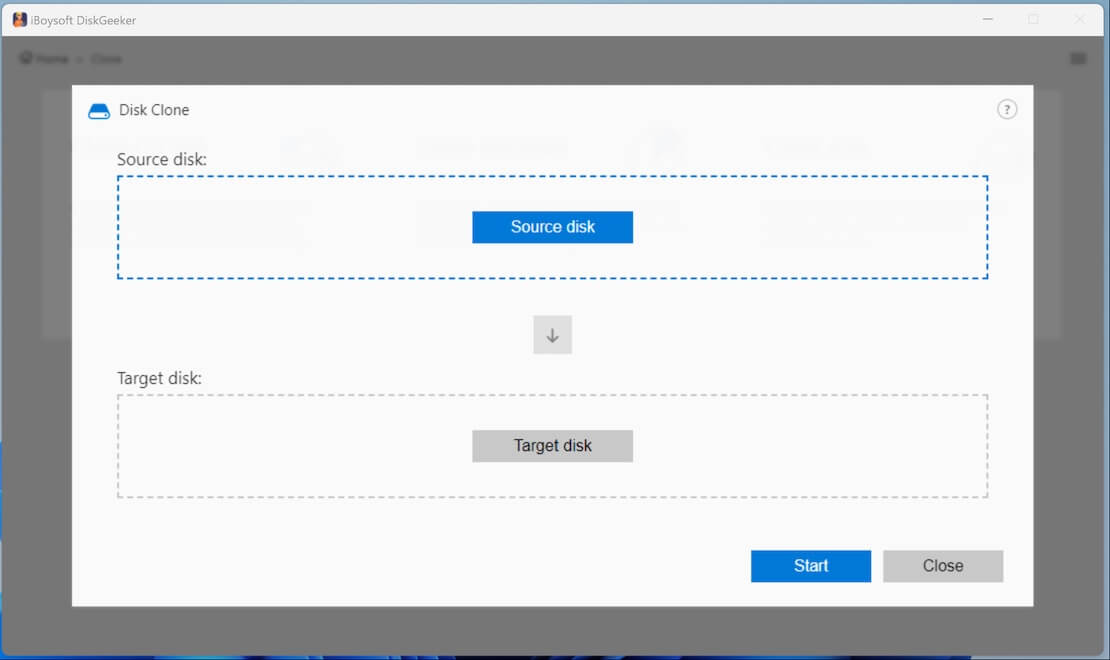
Clone a disk:
Disk clone makes an exact copy of all partition information and data on each partition on the target disk to a destination disk with the same sectors.
It also allows you to clone a disk with some partitions excluded.
Step 1: Click "Clone disk" from the Clone module to open the Clone disk window. Or, you can click "Clone" > "Clone disk."
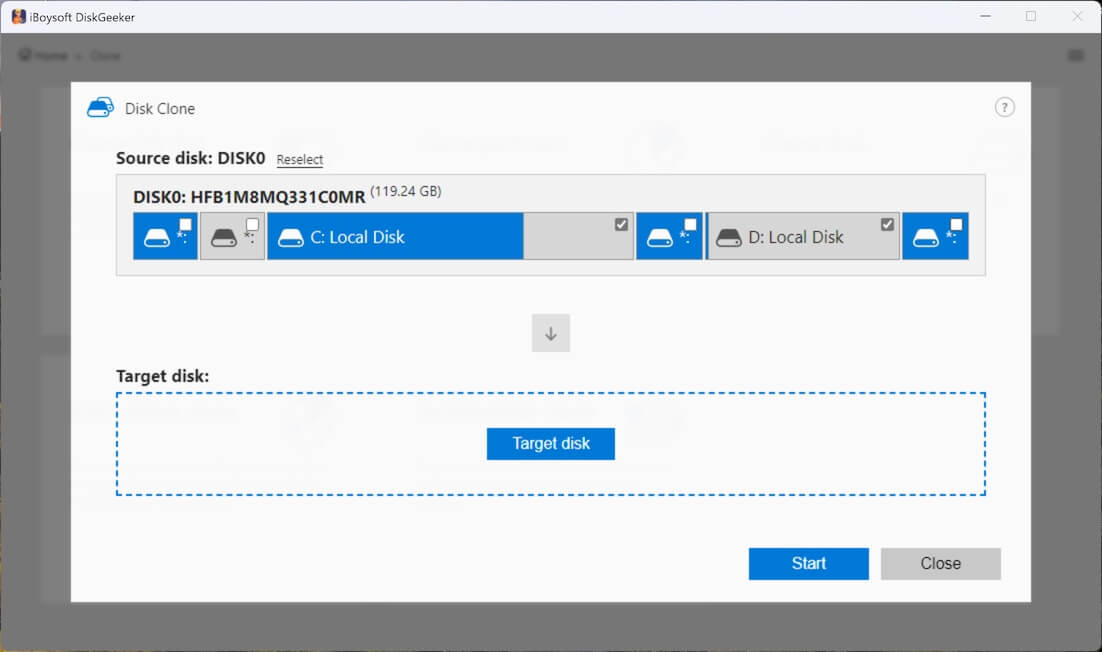
Step 2: Click "Source disk" to choose the source disk from the list.
The selected source disk will be listed in the Source disk section. You can see all its partitions and their basic info here. If you want to change the source disk, click the Reselect button for a change.
There is a selection button on each partition of the disk. You can uncheck those you don't want to clone.
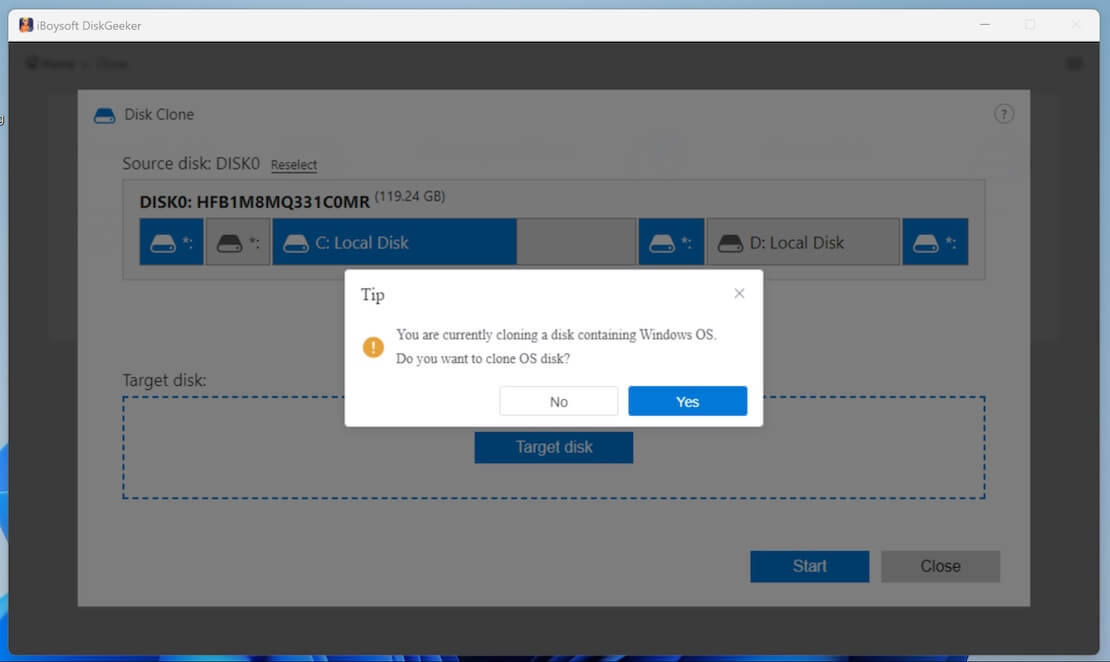
Note: You'll see the confirmation message below if you choose a hard drive containing Windows OS. As it describes, if you need to clone an OS disk as a bootable system disk, click Yes to switch to the OS disk clone mode. If not, click No to continue.
Step 3: Hover your cursor on "Target disk" to select the destination disk.
The storage capacity of the target disk must be larger than the source disk's.
Step 4: Confirm the target disk and your settings.
If you want to make a 1:1 copy of the source disk rather than only copy the files, check "Sector-level clone." A sector-level clone will take longer time than a normal full clone.
If you don't want the bad sectors on the source disk to interrupt the cloning process, choose "Ignore bad sectors."
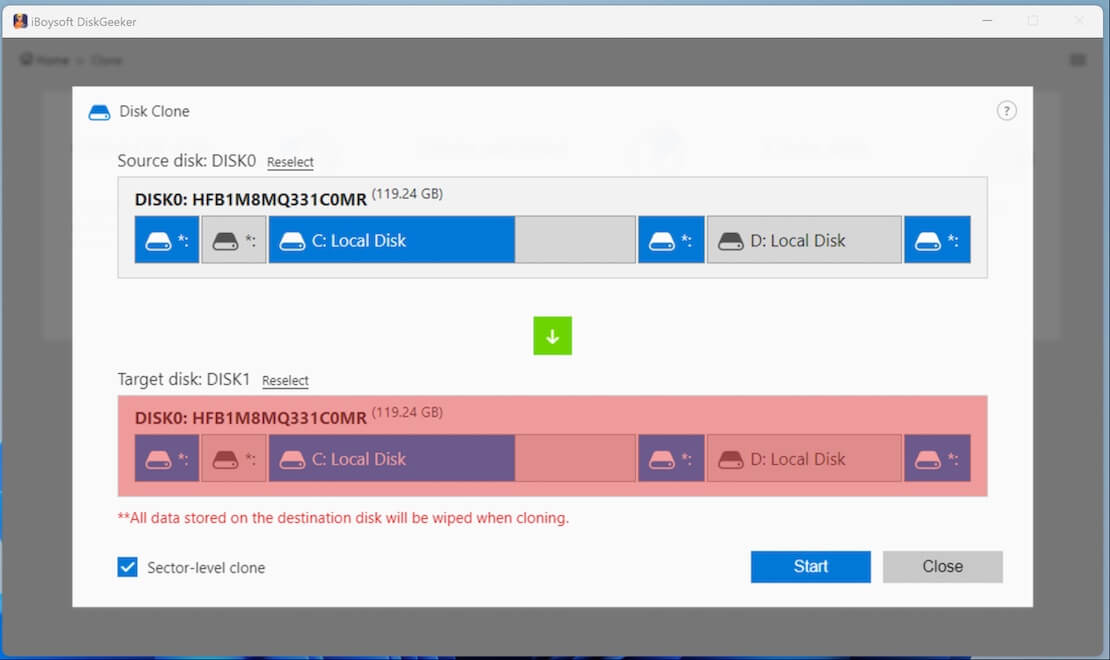
Step 5: Click "Start" > "Confirm" to start a disk clone.
Step 6: Wait for the disk clone to finish.
Incremental clone a partition
The exclusive incremental clone feature compares the data on the source partition and the target partition first. It then syncs only the inconsistent parts of the data between the source partition and the target partition, which saves a lot of time consumed by full disk cloning.
Incremental clone only applies to clone an NTFS partition.
Step 1: Click "Clone" from the Clone module and select "Incremental clone."
Step 2: Choose the source partition.
Step 3: Hover over the Target partition area to select your destination partition.

Tick "Ignore bad sectors" if you want to bypass the possible bad sectors on the source partition.
If the destination partition doesn't match the source partition (in other words, it is not the cloned one of the source partition), the incremental clone won't start.
Step 4: Click "Start" and make a confirmation.
Step 5: Wait for the incremental clone to complete.
Encryption clone a partition
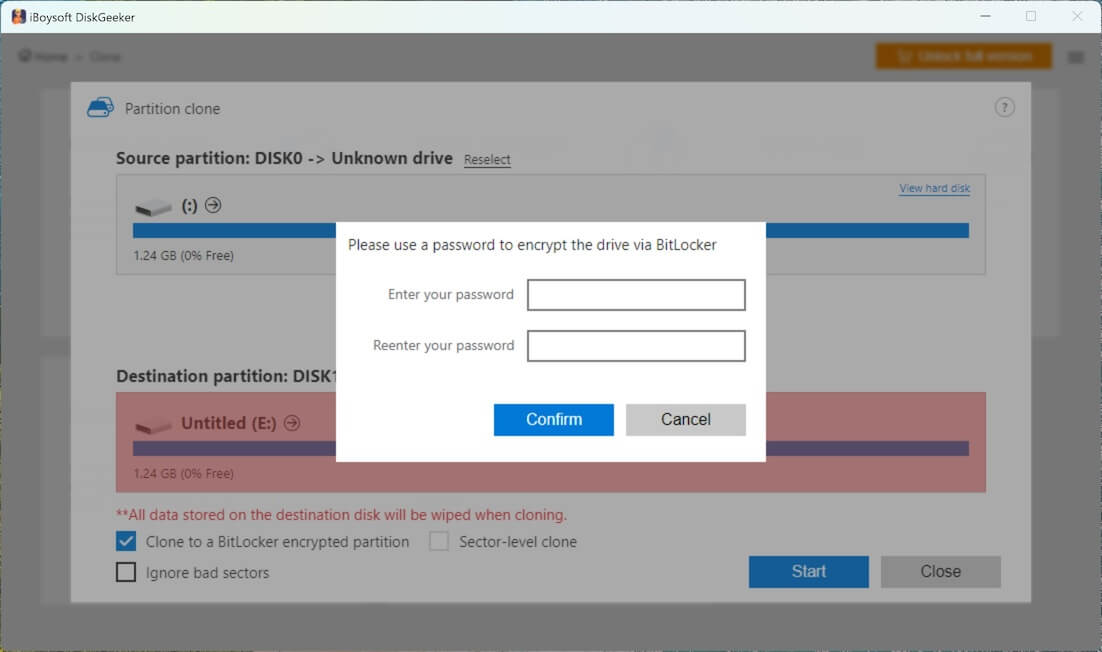
Encryption clone enables you clone the source partition to be a BitLocker-encrypted for data protection and avoid ransomware attacks.
You can clone a source partition as a BitLocker partition with full clone mode but can't do that with the incremental clone.
Step 1: Click "Clone" from the Clone module and select "Encryption clone."
Step 2: Select a source disk and a target disk.
Step 3: Enter a password for the BitLocker-encrypted partition and confirm it on the pop-up window.
Step 4: Set up your cloning preferences.
Sector-level clone: exactly clones all existing data on the source partition and all available space to the target partition. The sector-level clone mode considers all space of the source partition, including the available space, as valid data storage space.
Ignore bad sectors: bypass the bad sectors on the source partition to prevent the cloning process from being interrupted by them.
Step 5: Click "Start" and make a confirmation.
Step 6: Wait for the cloning process to finish.
Learn more about iBoysoft DiskGeeker for Windows's Clone feature
How to Clean System Junk Files, Find Large Files on a Partition, or Analyze Disk Space?
AI smart disk cleaner can search for and clean up junk files from the system, scan the large files on disk partitions, and analyze the space usage in a system partition, user folder, or any other specified folder. It is designed to speed up a PC or optimize the space usage of an external hard disk.
Clean up junk files from the system
Find and delete junk files from the system to boost PC performance, including items in the Recycle Bin, temporary directory, thumbnail cache, Windows update patch, Windows prefetch file, user temporary folder, and Windows system log.
Step 1: Click "System cleanup" from the AI smart disk cleaner module, or you can click "AI smart disk cleaner" > "System cleanup."

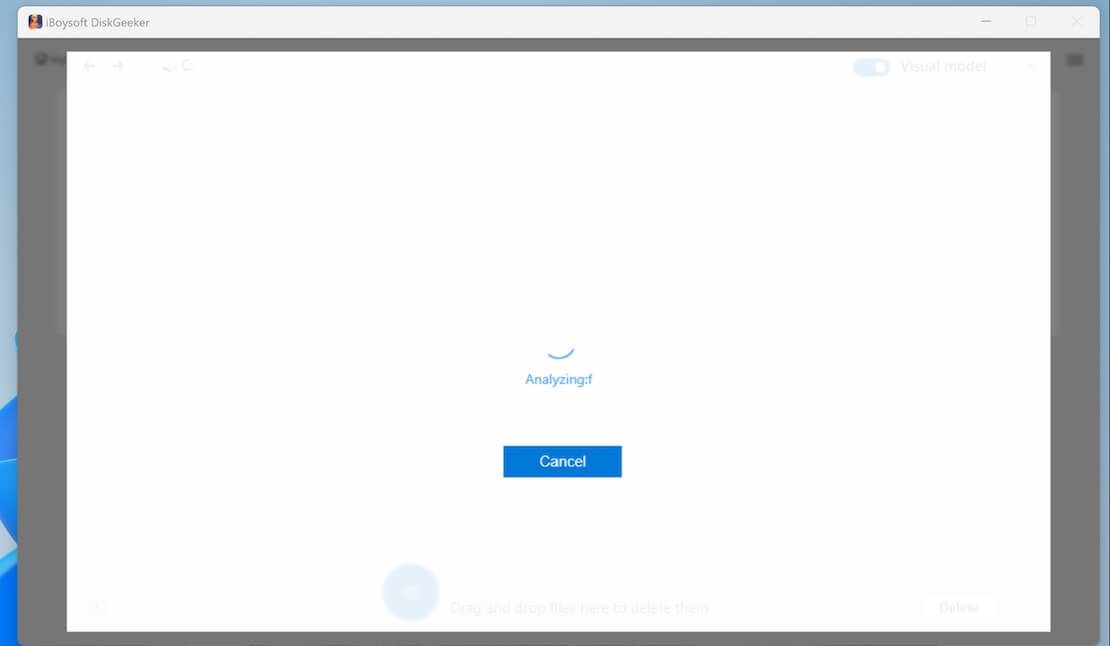
Step 2: iBoysoft DiskGeeker will immediately search for junk files from the system.
For the initial scanning, the process may take a moment. Just wait for the process to end.
Step 3: Check the scanning results and select the junk files you don't want.
You can click the view button next to each junk file to check where it is located and view its content.
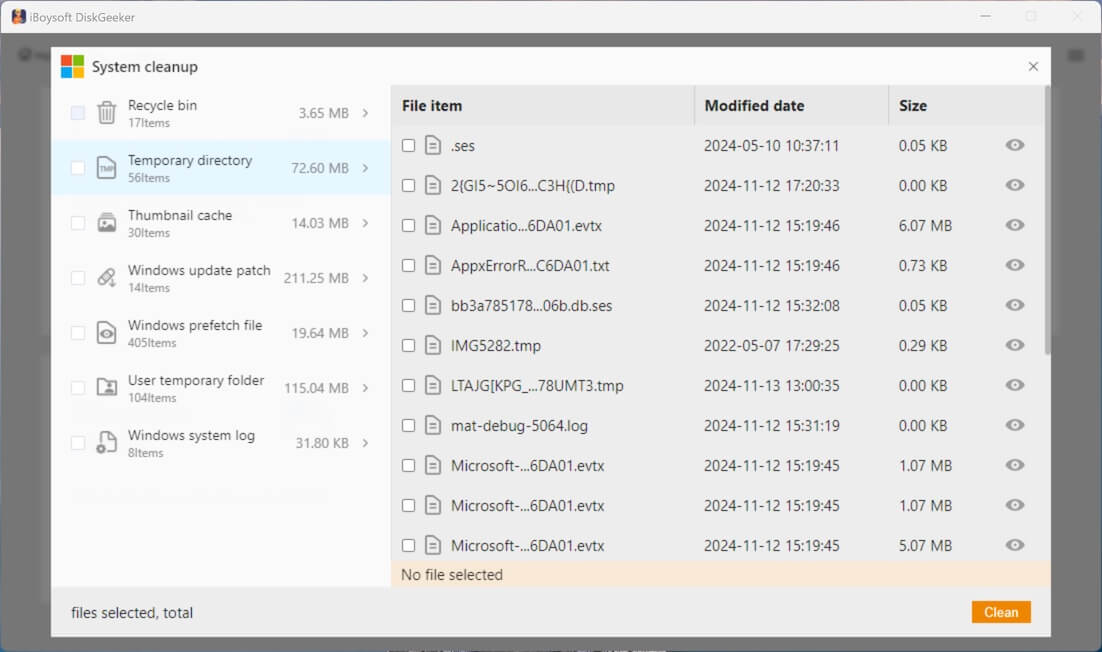
Step 4: Click the Clean button to directly delete them from your computer.
Search for large files on the disk
Analyze large files on partitions to optimize disk space usage and make room for incoming files.
Step 1: Click "Search for large files" from the AI smart disk cleaner module, or you can click "AI smart disk cleaner" > "Search for large files."
Step 2: Select a Partition to scan for large files.
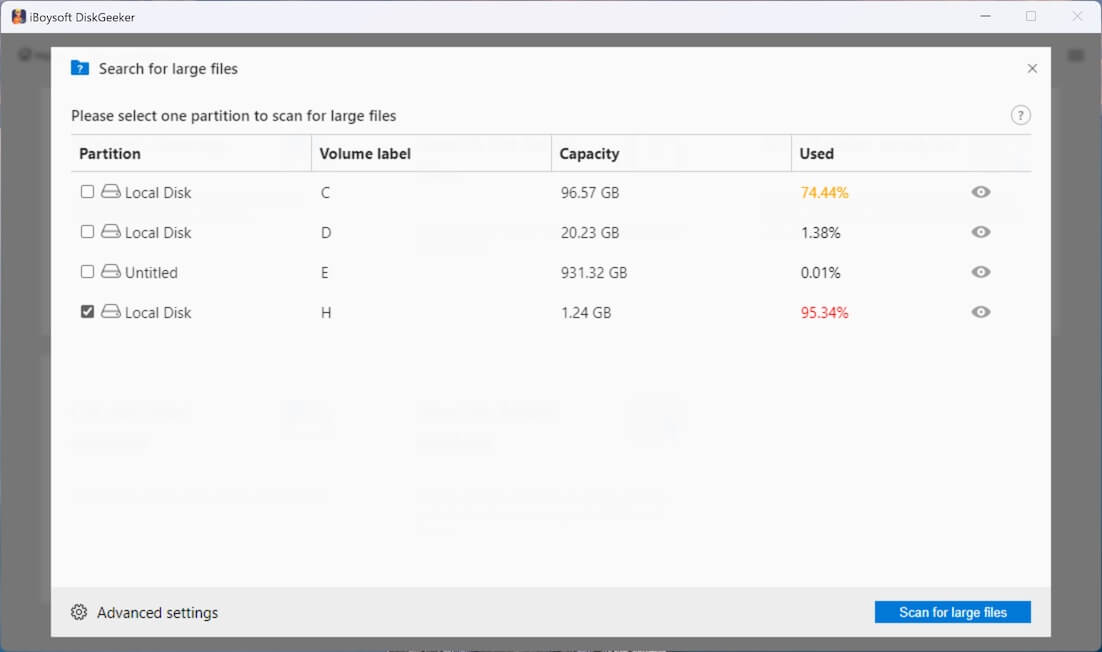
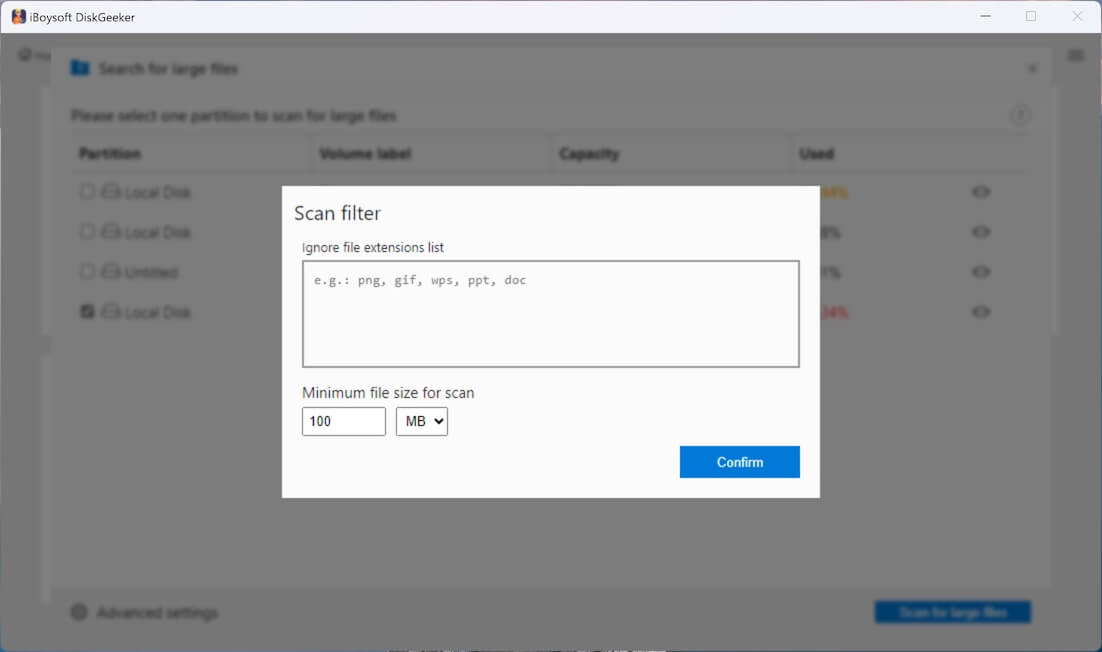
For the initial large file searching, you need to go to "Advanced settings" at the bottom left corner to set the minimum file size for scanning. Here, you can also add the file extension to prevent the tool from searching for certain files.
Step 3: Click "Search for large files" to start scanning.
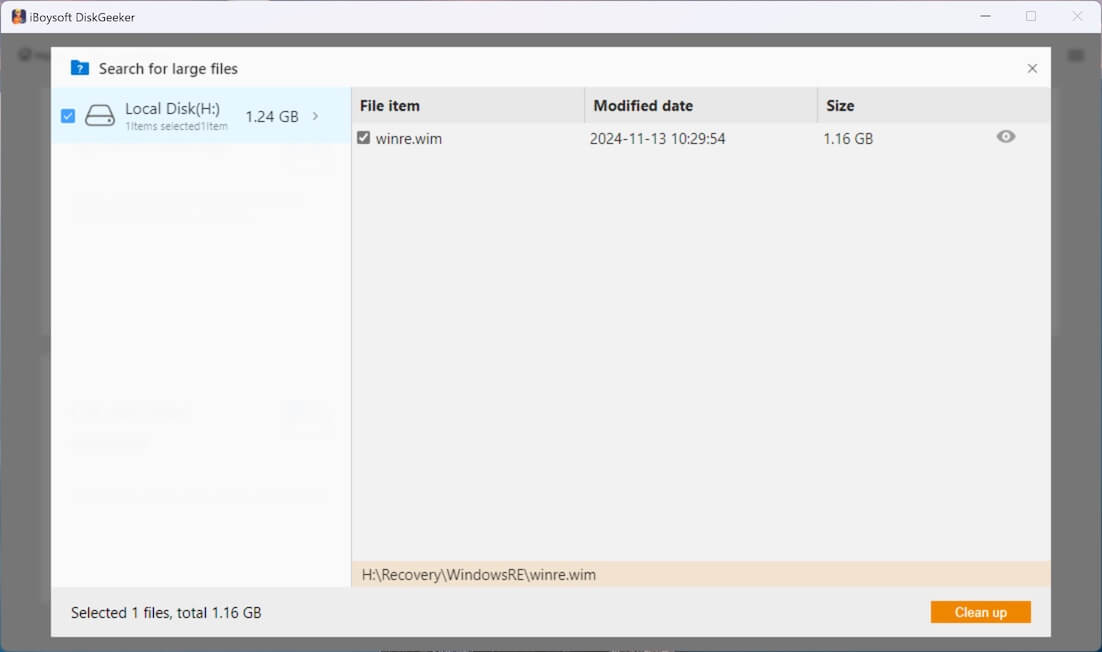
Step 4: Click the view button to check the searched large files, choose those you want to delete, and click "Clean up."
Analyze the space usage of the OS partition, user folder, or a specific folder
Analyzing the space usage of your system partition, user directory, or a specific folder by displaying all files, helps you more conveniently manage space.
Step 1: Click "AI smart disk cleaner" and select a space analysis feature you want.
You can directly click "User folder analysis" in the Space analyzer section. Or click "Space Analyzer" to find the other two features - "OS partition analysis" and "Specific folder analysis."
User folder analysis: Analyze the storage usage of the current user folder.
OS partition analysis: Analyze the storage usage of the system partition.
Specific folder analysis: Analyze the storage usage of any folder you choose.
Step 2: iBoysoft DiskGeeker for Windows will automatically analyze the files in the selected location.
It will take a relatively long period to scan the files in OS partition and user folder as it stores a huge amount of your data.
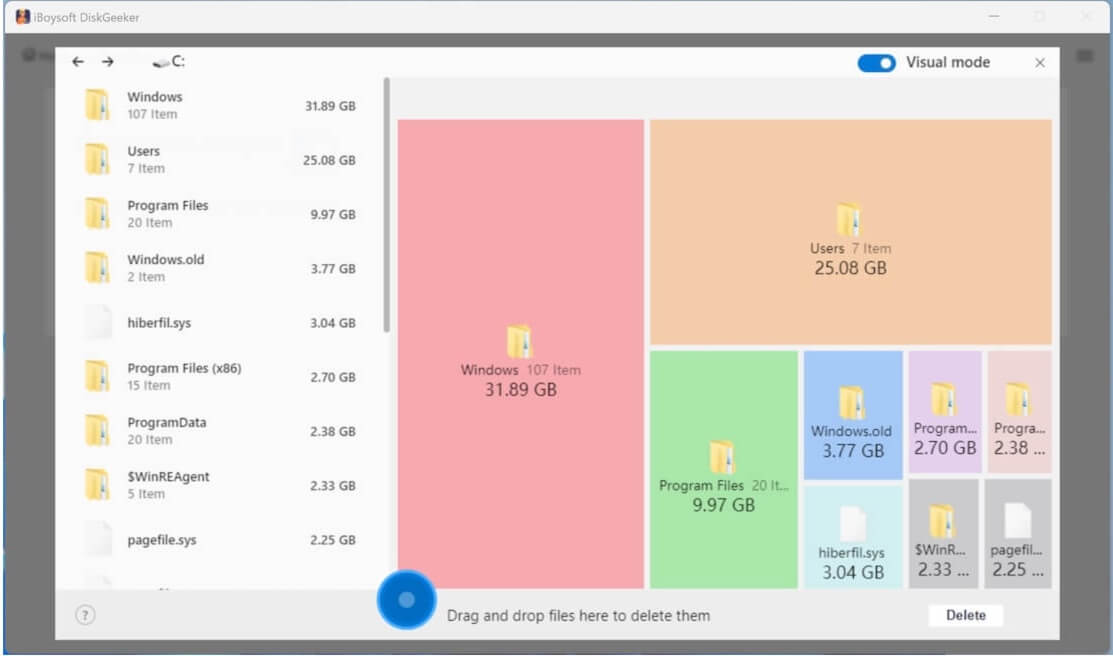
Step 3: Check the scanned results by clicking the listed folders.
The scanned results can be displayed in two modes: Visual mode and Non-visual mode.
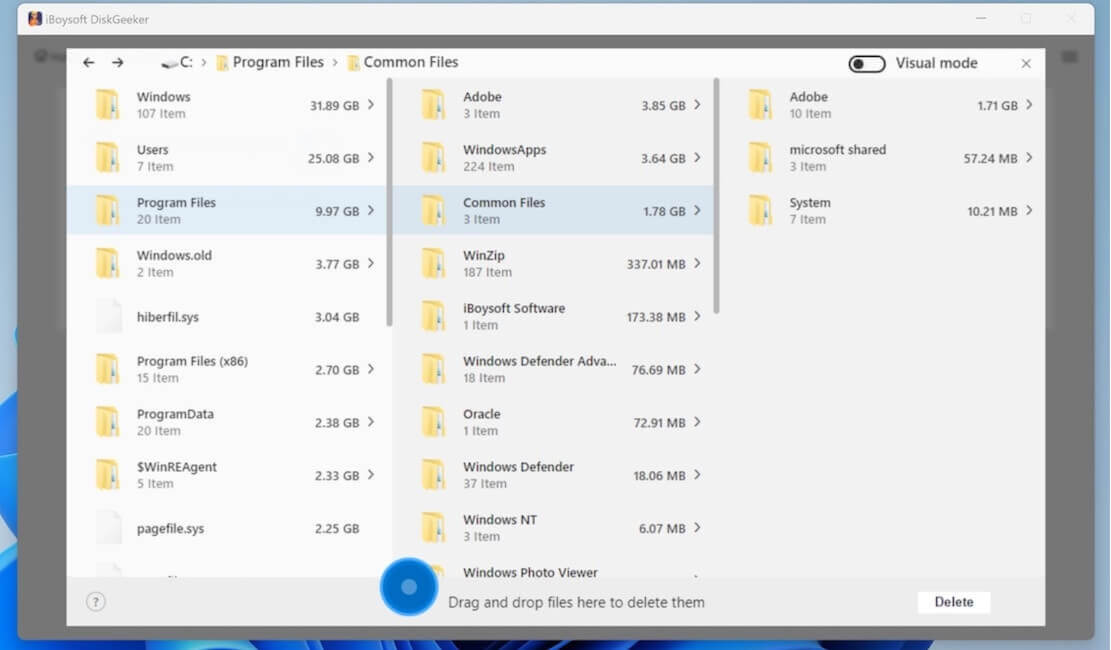
In visual mode, the left and right views are the same level directories, and the right view is a visual presentation of the files in the left view. Turn off the Visual mode button in the upper right corner, you can only see the text table of contents.
In non-visual mode, the software displays the preceding and following levels of directories of the current path (a total of three levels of directories). When there are less than three levels of directory structure, it displays all path structures.
Step 4: Select your unwanted files and drag and drop them to the Trash Bin at the bottom of the window (a blue circle).
This is to collect all the files you prepare to delete, and the Trash Bin will show the total size of these files.
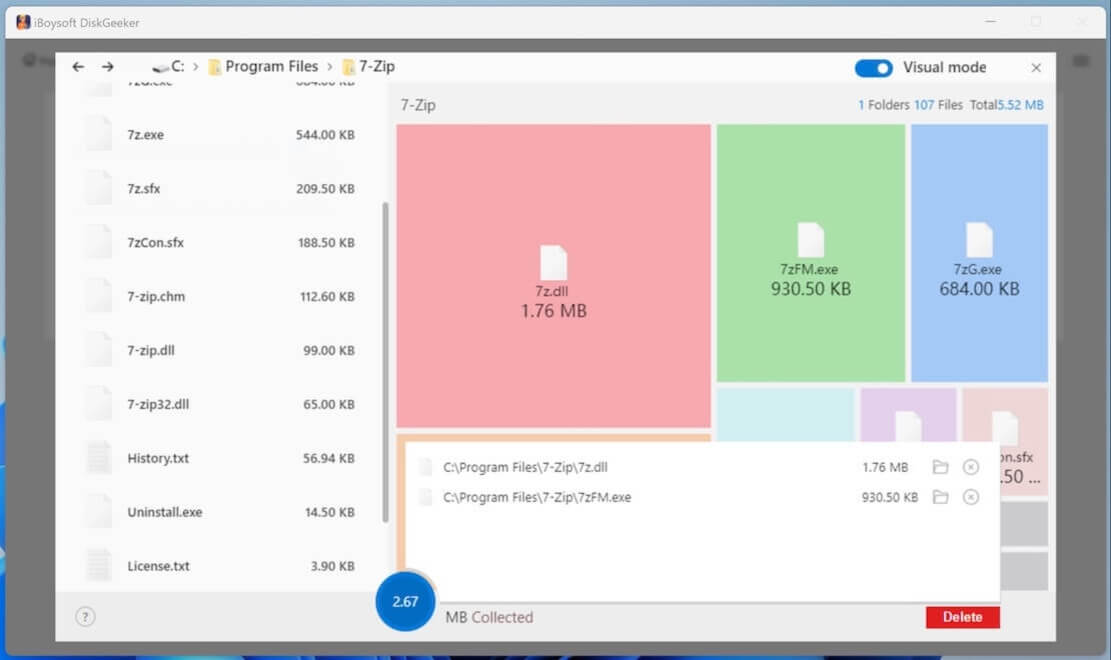
If you regret moving a certain file to the blue Trash Bin, you can click on the Trash Bin and then click the Remove button next to the file to move it out from there.
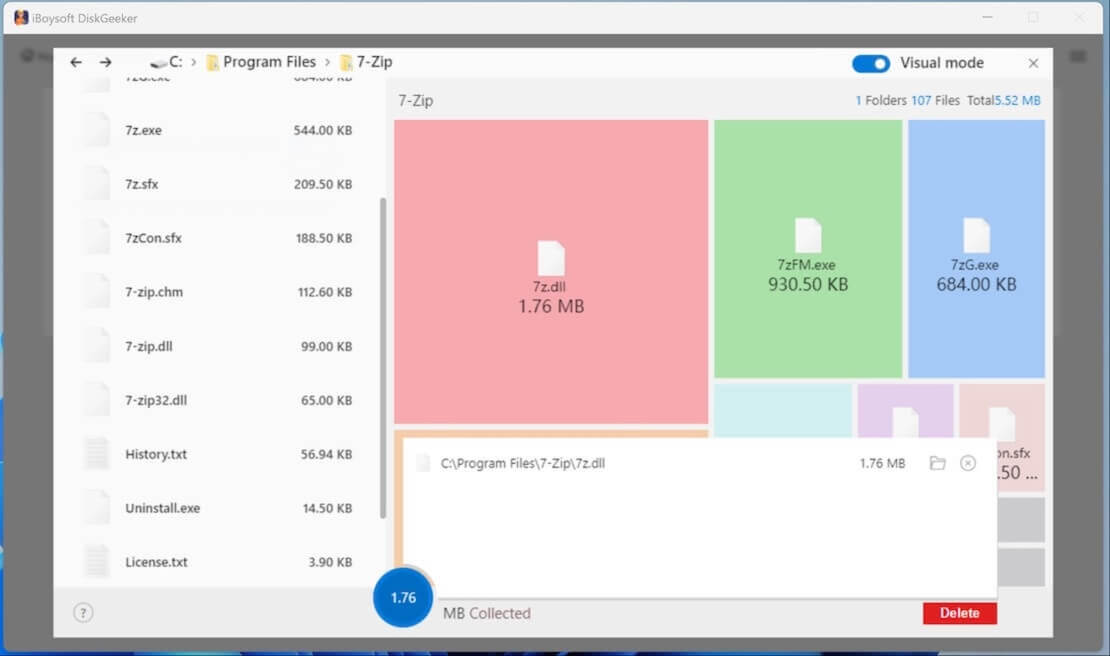
Step 5: Click "Delete" to permanently remove the files you put in the blue Trash Bin.
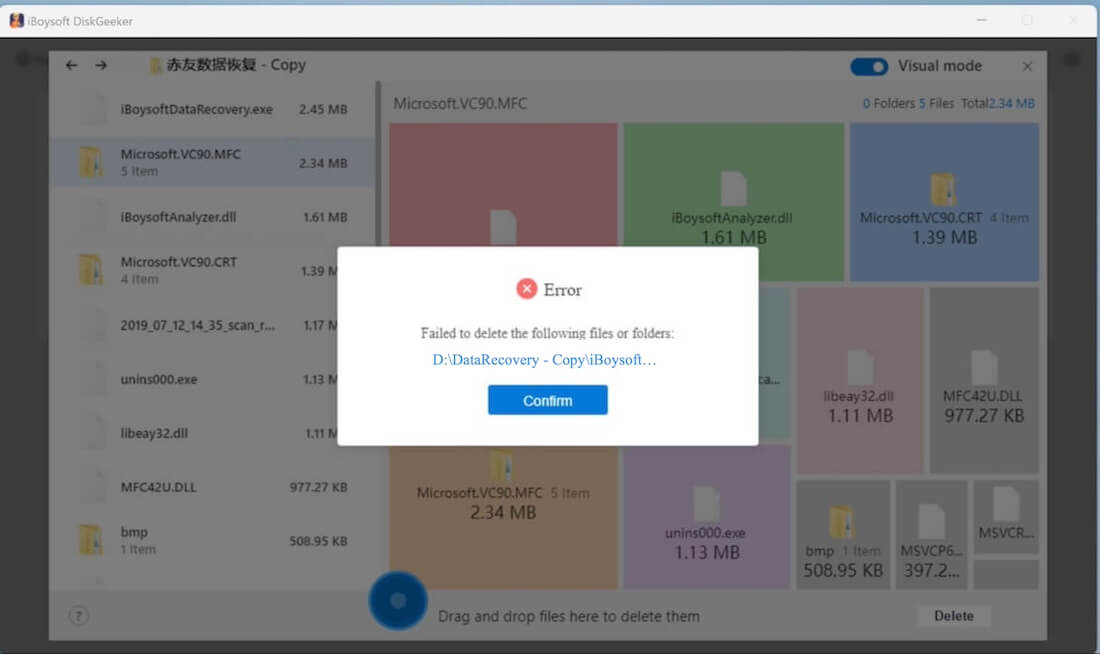
A prompt will appear if the deletion is successful. Remember to refresh that folder to show the latest state.
Also, it will notify you when a deletion failure happens. You can click the file path on the pop-up to open the file and find the reasons. Usually, a read-only file and file being used cannot be deleted.
Learn more about iBoysoft DiskGeeker for Windows's Space Analyzer
How to Download System Images & Create Bootable USB Installers
"Download and create boot disk" in iBoysoft DiskGeeker for Windows allows you to create Windows and macOS bootable USB installers and download Windows ISO files, macOS DMG files, and macOS ISO files.
Windows versions we supported for creating a bootable USB installer and downloading:
Windows 11 (24H2, 23H2, 22H2, 21H2)
Windows 10 (22H2, 21H2, 21H1, 20H2, 2004, 1909, 1903, 1809, 1803, 1709, 1703)
Windows Server (2025, 2022, 2019, 2016, 2012 R2, 2008 R2)
Windows 8 (SP1)
Windows 7 (SP1)
macOS versions we supported for creating a bootable USB installer and downloading:
macOS 26 Tahoe, 15 Sequoia, 14 Sonoma, 13 Ventura, 12 Monterey, 11 Big Sur, 10.15 Catalina, 10.14 Mojave, 10.13 High Sierra, 10.12 Sierra
OS X 10.11 El Capitan, 10.10 Yosemite, 10.9 Mavericks, 10.8 Mountain Lion, 10.7 Lion
Mac OS X 10.6 Snow Leopard
Quick Navigation:
- Create a Windows Bootable USB Installer
- Download a Windows System Image (ISO)
- Create a macOS Bootable USB Installer
- Download a macOS System Image (DMG & ISO)
Create a Windows Bootable USB Installer
This feature lets you create a bootable USB installer for Windows 11, 10, 8, 7, and Windows Server 2025, 2022, 2019, 2016, 2012 R2, and 2008 R2 in different languages, system architectures, and system editions.
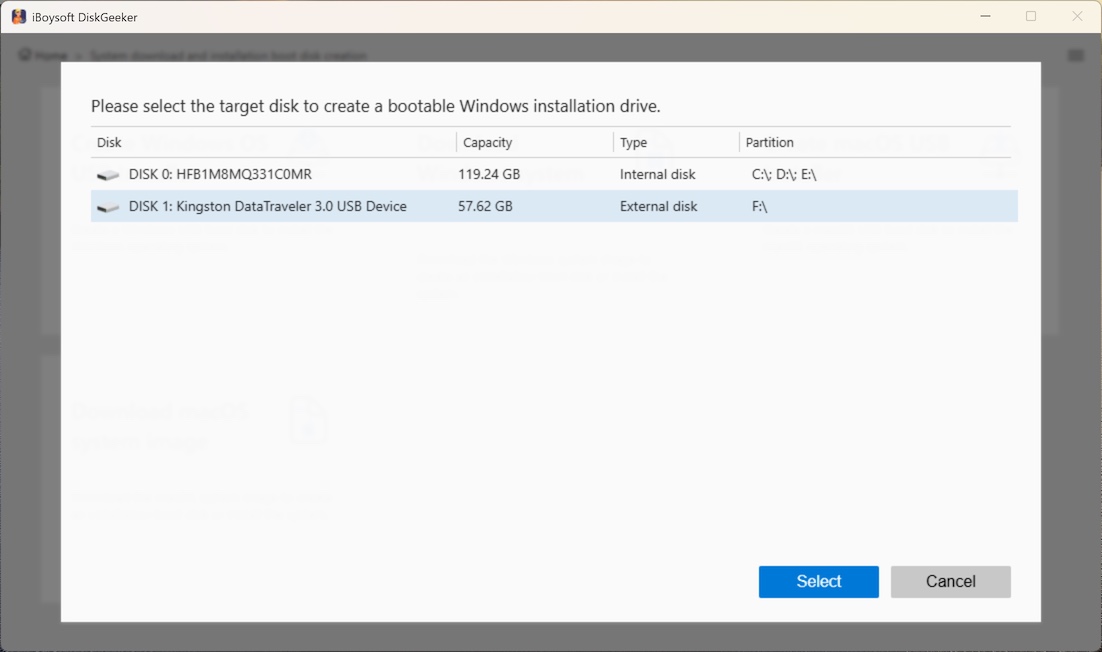
Step 1: Prepare an external hard drive or USB drive with at least 32 GB of free space and connect it to your computer.
All data on the drive will be erased when you create a bootable installer. So, back up data on it in advance.
Step 2: Click "Create Windows OS USB Installer" from the Download and create boot disk module.
Step 3: Choose the target disk from the list and click "Select."
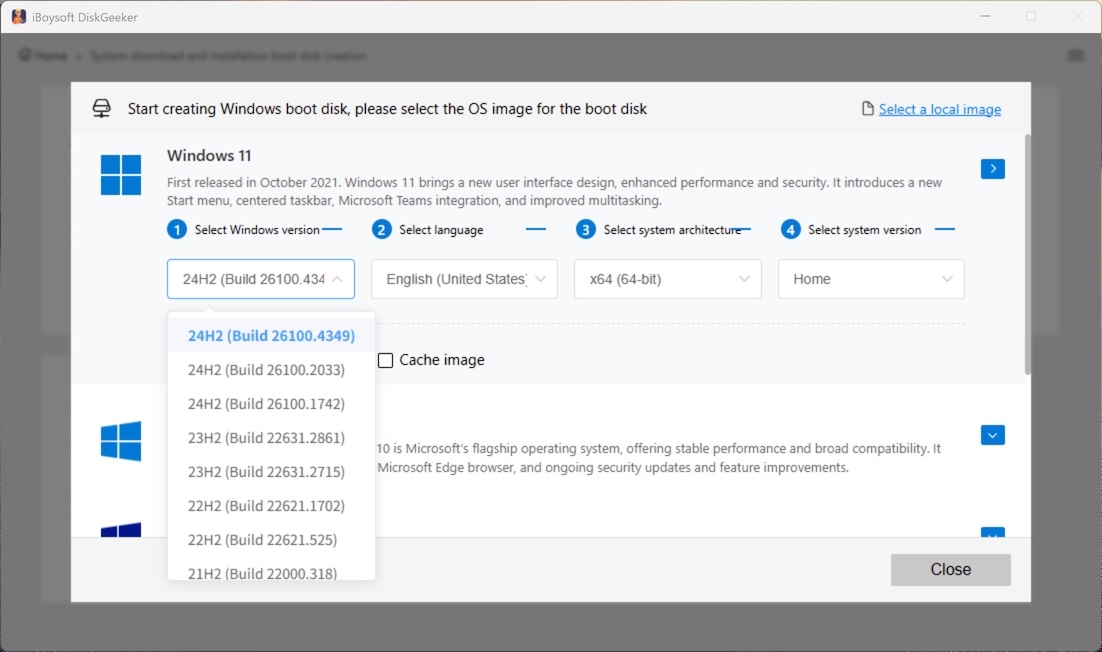
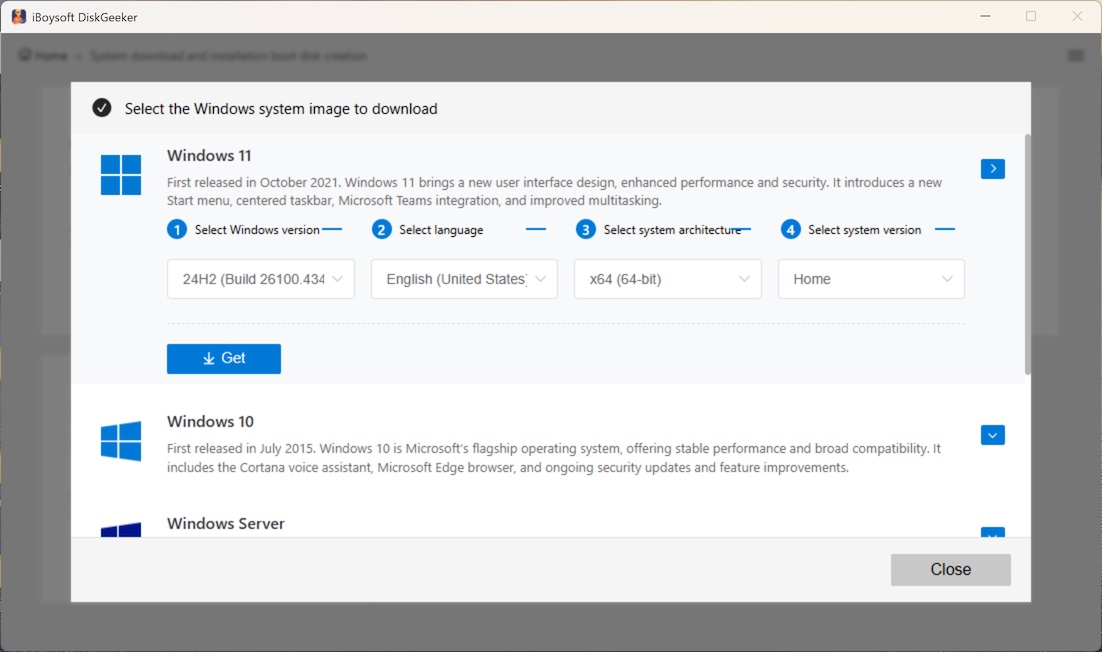
Step 4: Click on the desired Windows version to expand its detailed info.
Step 5: Select your desired major update, language, system architecture, and system version for the target Windows.
⚠️ Note:
• The bootable USB installer creation consists of two phases: downloading the Windows image and creating a bootable installer.
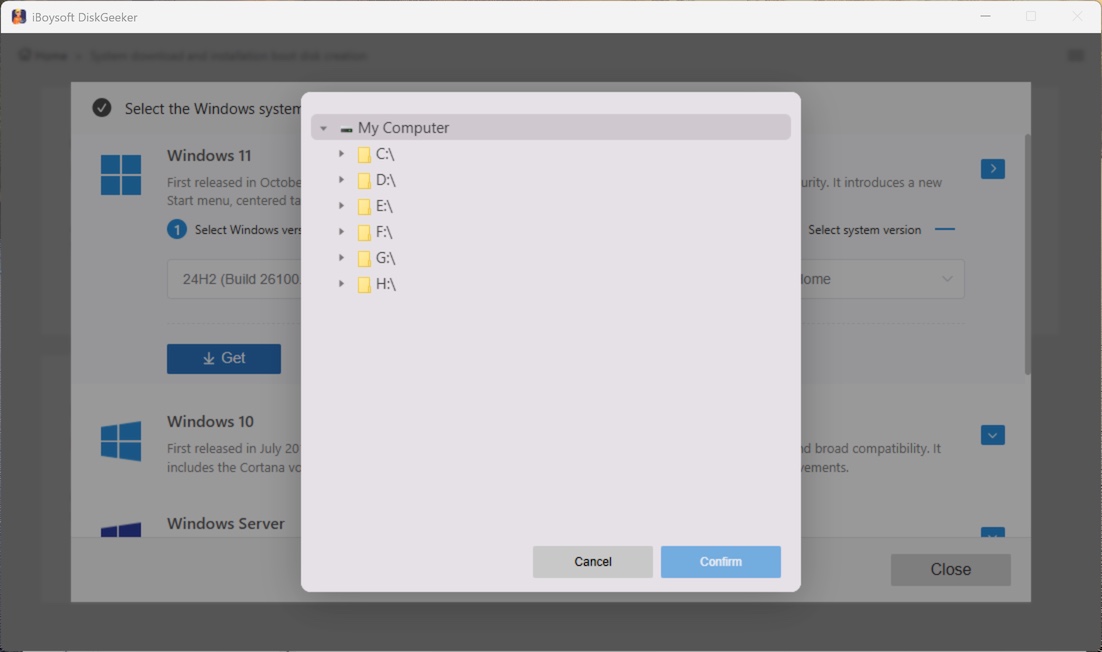
• By default, the Windows image will be downloaded to the same place where this tool is located. If you need to save it to a different destination, check "Cache image" and choose your desired location.
• The Windows image file can't be stored on the disk you'll use for the bootable disk.
• If you've ever paused a downloading process, check "Cache image" and find the folder where the interrupted OS image is stored. This tool will automatically detect it and continue finishing the download.
• If you have an complete Windows ISO, you can click the Select a local image button in the upper-right corner. Then, select and upload it to directly start the bootable USB creation.
Step 6: Click "Start creating boot disk" > "Yes."
The tool will start downloading the Windows ISO file immediately. Once downloaded, it will automatically begin creating the bootable USB installer.
⚠️ Note:
If you see the error saying "Not enough disk space," it means the storage of the location you chose is insufficient. Please click "Cache image" to change to a different one.
Download a Windows System Image (ISO)
The Download Windows system image function gives you an entrance to directly download the complete Windows ISO files.
Ensure the location you'll store the ISO file has enough free space before starting. If you need to download the Windows image to an external disk, connect it to your PC.
Step 1: Click "Download Windows system image" on the Download and create boot disk module.
Step 2: Choose your desired Windows, including selecting its Windows version, language, system architecture, and system version.
Step 3: Click "Get" and select a location.
Step 4: Wait for the downloading process to complete.
How long the system image takes to download depends on your internet condition. During the process, ensure your computer is connected to the power source.
Create a macOS Bootable USB Installer
This lets you create a macOS bootable USB installer on a Windows PC to install or reinstall macOS on a Mac when the Mac won't turn on or is not working properly.
Step 1: Prepare an external hard drive or USB drive with at least 32 GB of free space and connect it to your PC.
All data on the drive will be erased when you create a bootable installer. So, back up data on it in advance.
Step 2: Click "macOS" on the Download and create boot disk module.
Step 3: Click "Create macOS USB Installer."
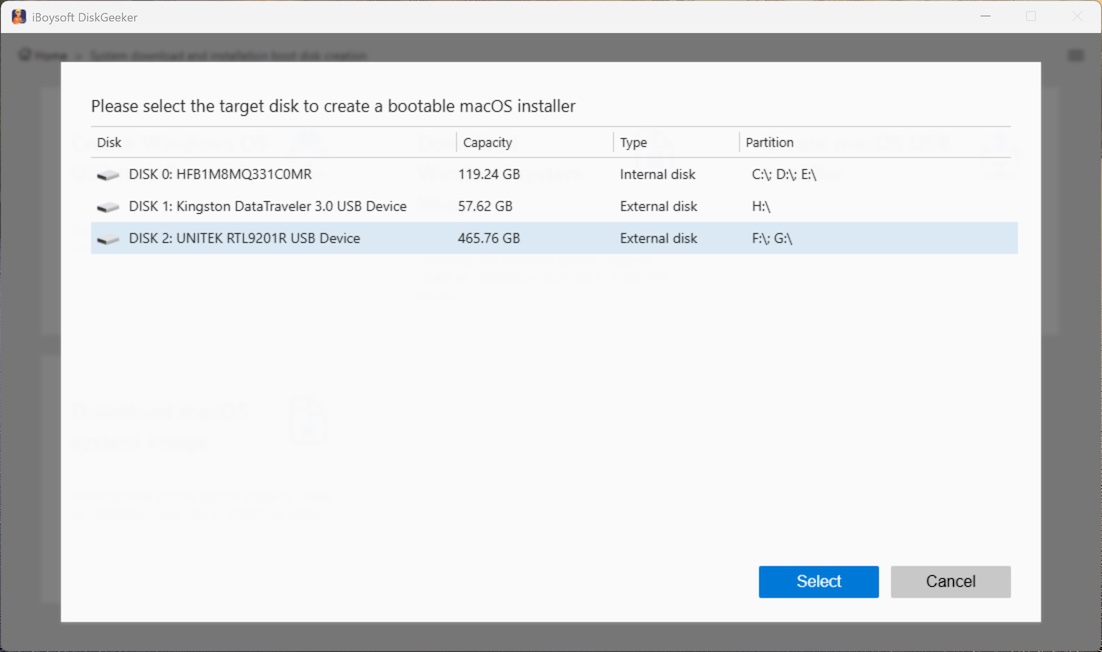
Step 4: Select the target disk and click "Select."
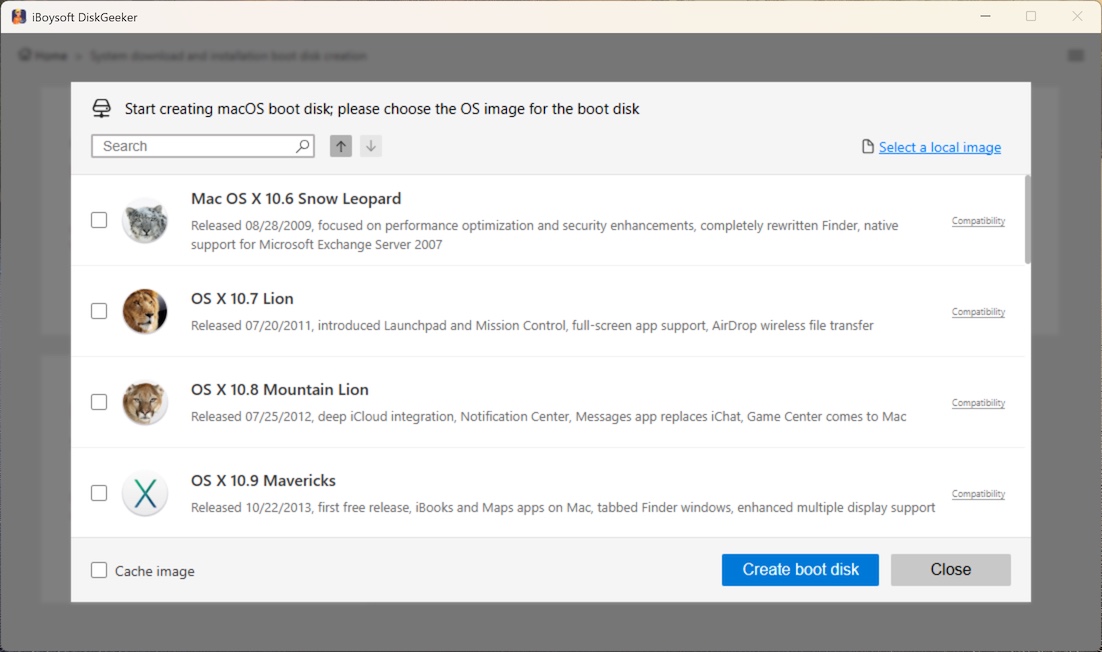
Step 5: Choose a desired macOS version and click "Create boot disk."
The tool will start downloading the Windows ISO file immediately. Once downloaded, it will automatically begin creating the bootable USB installer.
During the process, keep your internet connection well and ensure your computer is connected to the power source.
⚠️ Note:
• The bootable USB installer creation consists of two phases: downloading the macOS image and creating a bootable installer.
• By default, the macOS image will be downloaded to the same place where this tool is located. If you need to save it to a different destination, check "Cache image" and choose your desired location.
• The macOS image file can't be stored on the disk you'll use for the bootable disk.
• If you've ever paused a downloading process, check "Cache image" and find the folder where the interrupted macOS image is stored. This tool will automatically detect it and continue finishing the download.
• If you have a macOS image, you can click the Select a local image button in the upper-right corner. Then, select and upload it to directly start the bootable USB creation.
• If you see the error saying "Not enough disk space," it means the storage of the location you chose is insufficient. Please click "Cache image" to change to a different one.
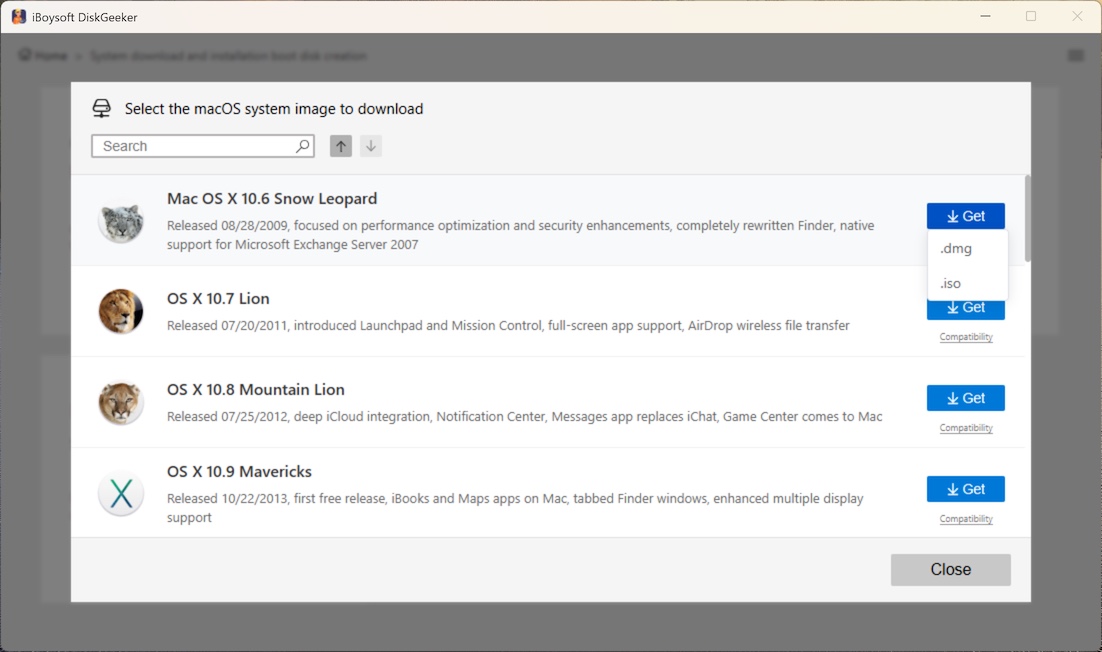
Download a macOS System Image (DMG & ISO)
This tool enables you to directly download macOS in DMG and ISO formats (from the latest macOS 26 Tahoe to the old Mac OS X 10.6 Snow Leopard).
Step 1: Click "macOS" on the Download and create boot disk module.
Step 2: Click "Download macOS system image."
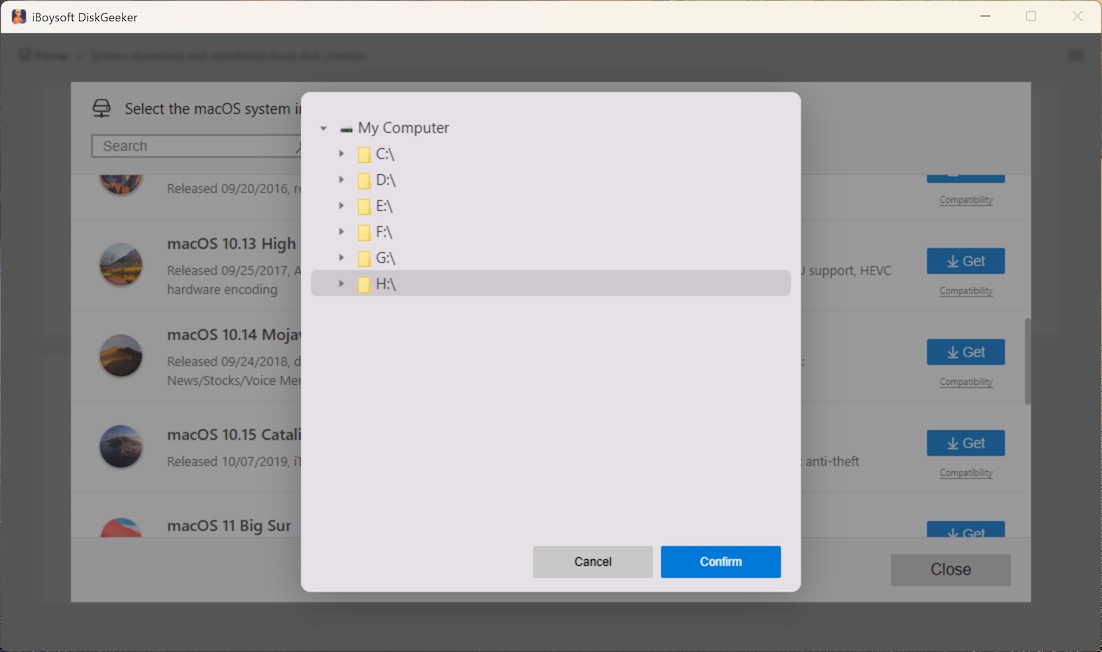
Step 3: Scroll down to find your desired macOS version and click "Get."
Step 4: Select which format you want, DMG or ISO.
Step 5: Choose a destination to save this macOS image and click "Confirm."
Step 6: Wait for the process to complete.
How to Encrypt a Partition with BitLocker in Windows Home Editions?
This drive manager enables the missing BitLocker drive encryption in Windows 11/10/8.1/8/7 Home editions and Windows 7 Professional edition.
It allows you to encrypt NTFS, exFAT, and FAT32 partitions with BitLocker drive encryption. However, you can't encrypt the system partition as your OS is running and consistently writes data to it, making the system partition cannot be locked for BitLocker encryption.
Step 1: Click the "Click to encrypt" button next to the partition from the BitLocker module. Or, you can click "BitLocker" > "Encrypt partition" and choose your target partition and click "Next."
Step 2: Enter a password and click "Next."
Your password should between 6 to 47 characters and contain at least one letter or figure.
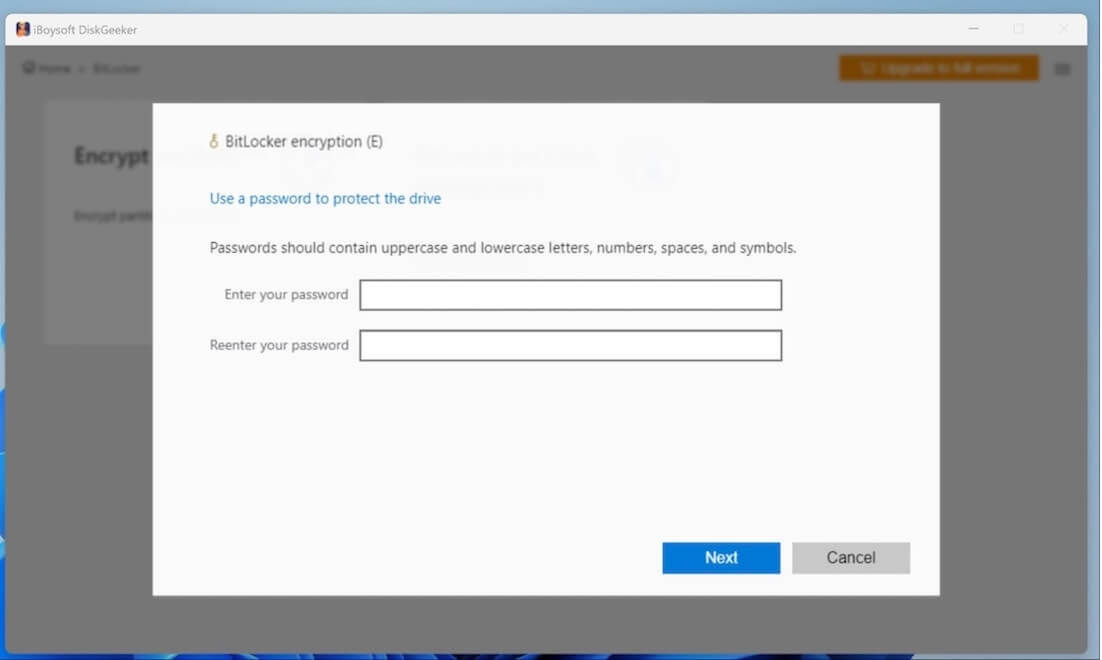
Step 3: Save your recovery key and click "Next."

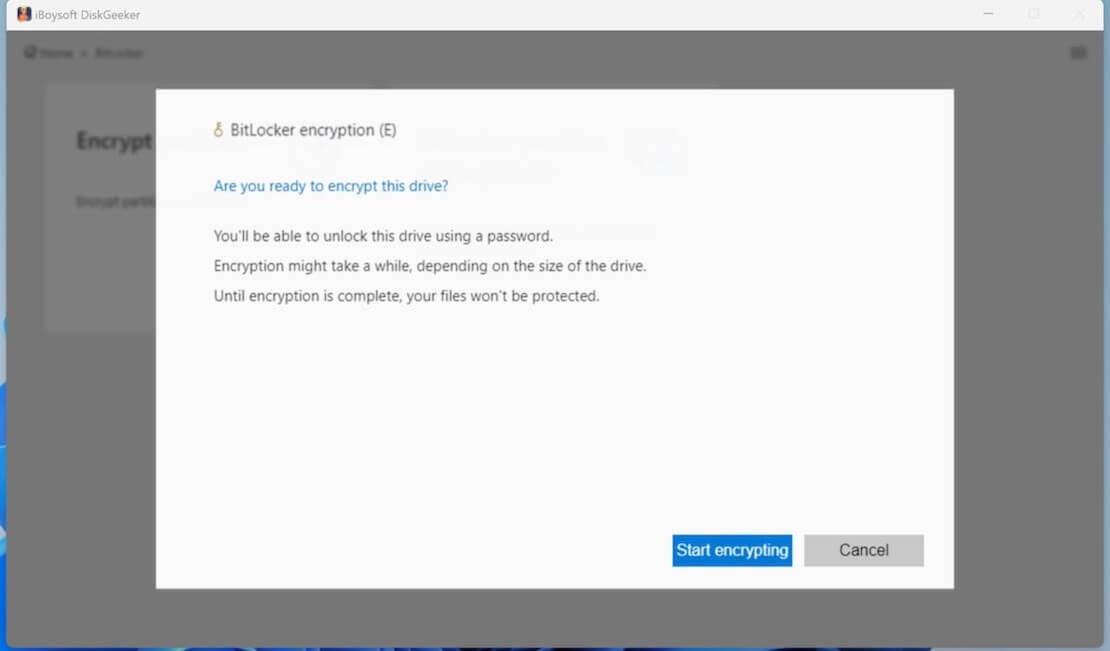
Step 4: Click "Start encrypting" if you are ready.
Tips:
• Confirm if you want to start the encryption, and once the encryption begins, you cannot cancel it.
• The target partition will be locked before encryption to prevent data inconsistency resulting in encryption errors. If the software can't lock the partition, the encryption will fail. Please contact with: [email protected].
• If your PC powers off or the target disk is ejected suddenly, you can relaunch iBoysoft DiskGeeker and resume the encryption or rollback the drive to the original state in "BitLocker partition management."
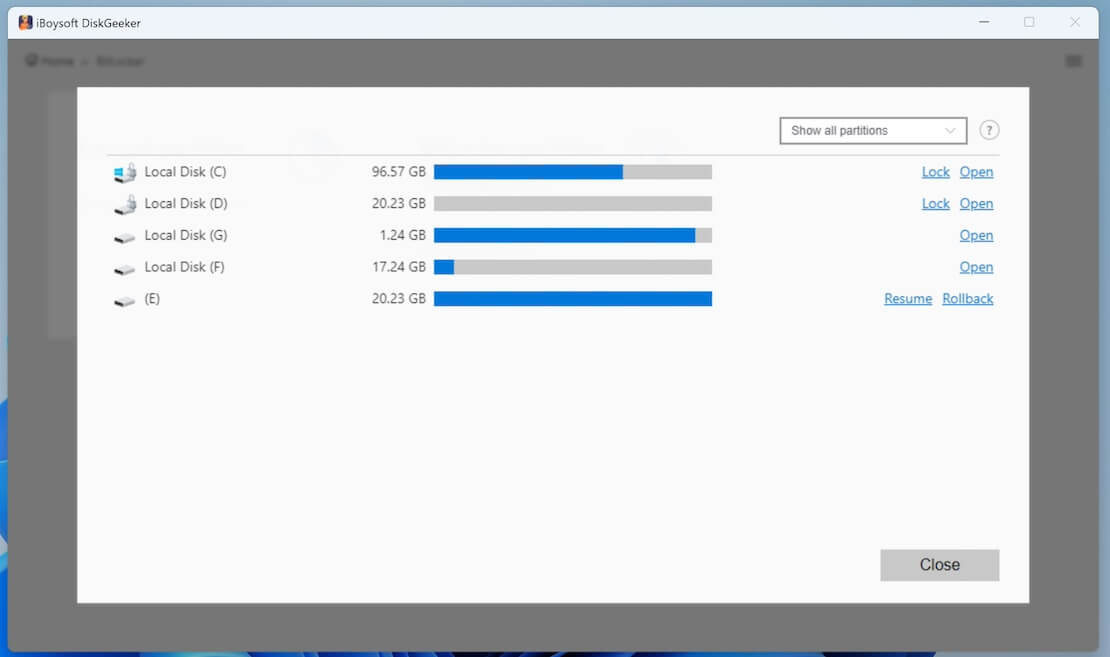
1. Click "BitLocker partition management" from the BitLocker module.
2. Click "Resume" next to the partition to continue encryption. Or, click "Rollback" to restore your partition to the original state.
Step 5: Complete BitLocker encryption.
After encryption, the partition is in an unlocked state. You can access and write to it.
You don't need third-party software to unlock and access the BitLocker-encrypted partitions every time you connect them to your PC as iBoysoft DiskGeeker can help you manage them.
How to Manage BitLocker Drives?
The BitLocker partition management mode in BitLocker module contains following features:
Resume: resume an uncompleted BitLocker encryption.
Rollback: restore the partition to the original state when the encryption is interrupted.
Backup key: back up the recovery key of the BitLocker-encrypted drive.
Query key: view and copy the recovery key of the BitLocker-encrypted drive.
Lock: lock a BitLocker encrypted partition to make it inaccessible.
Unlock: enter the BitLocker password to unlock the partition and make it in an accessible state.
Open: directly open a partition on your PC.
Click the option box on the upper right corner, you can choose to show all partitions, only show encrypted partitions, and only show unencrypted partitions.
Learn more about iBoysoft DiskGeeker for Windows's BitLocker feature
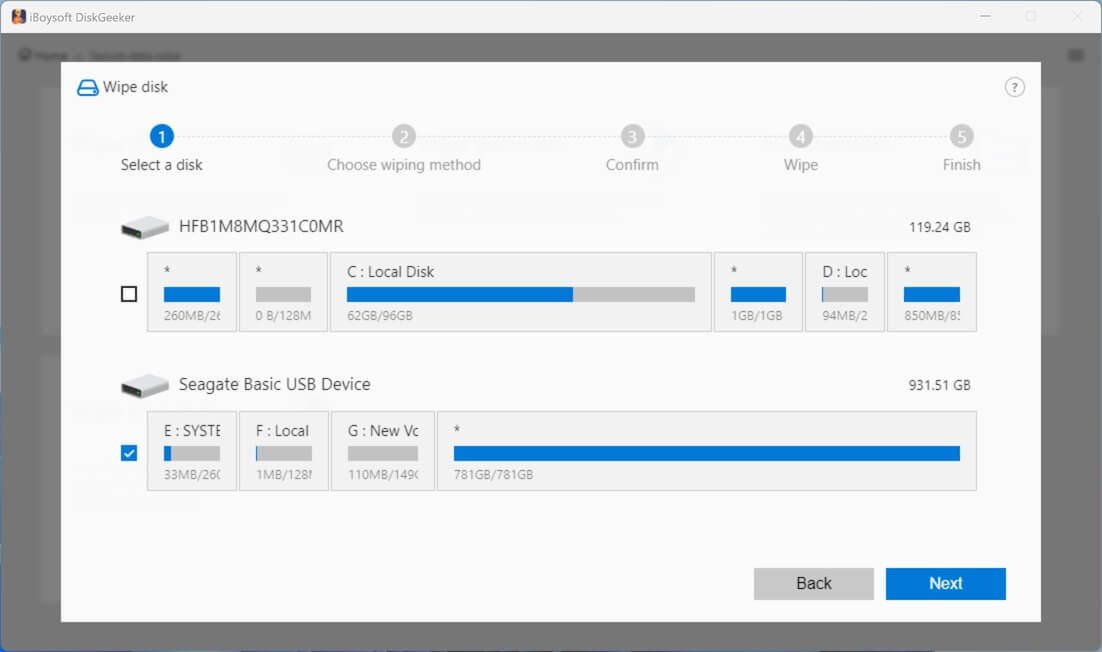
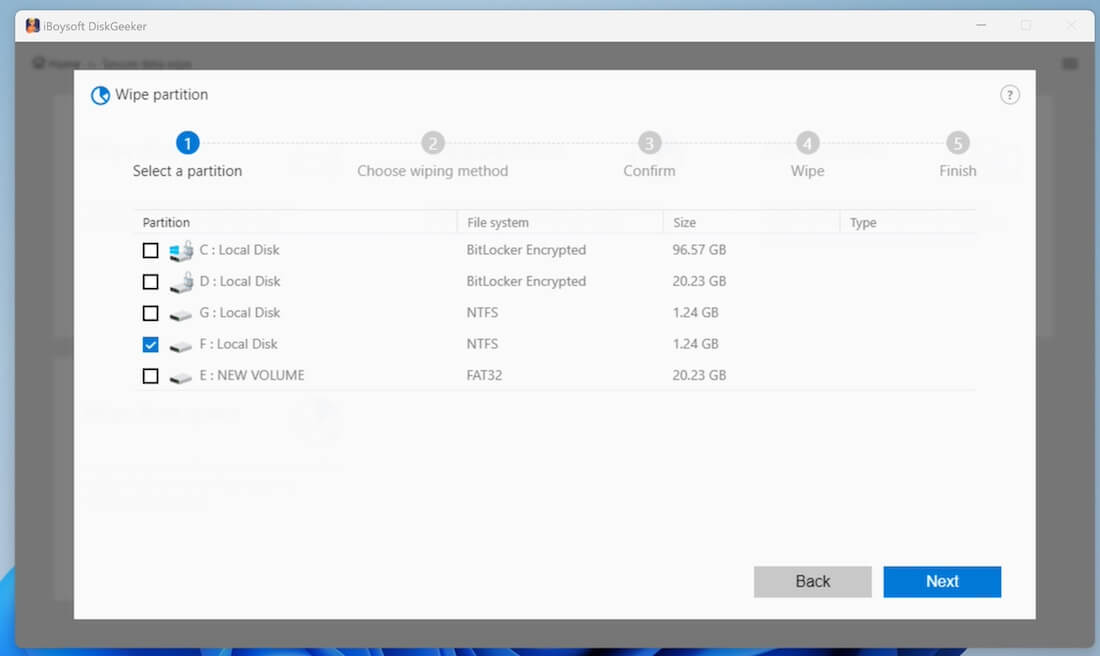
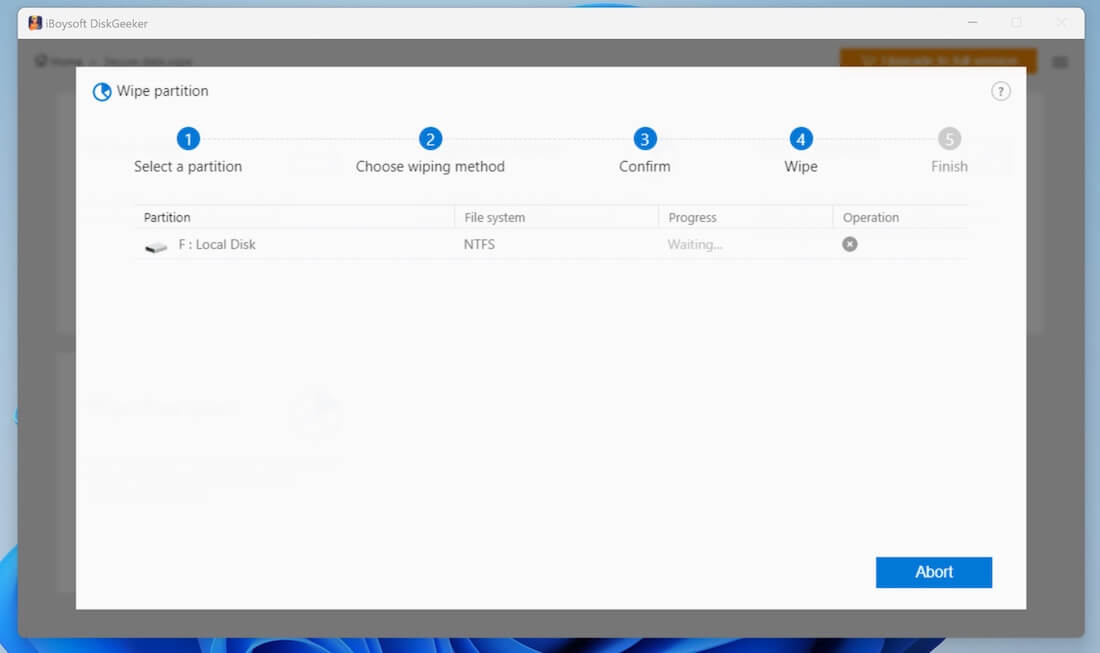
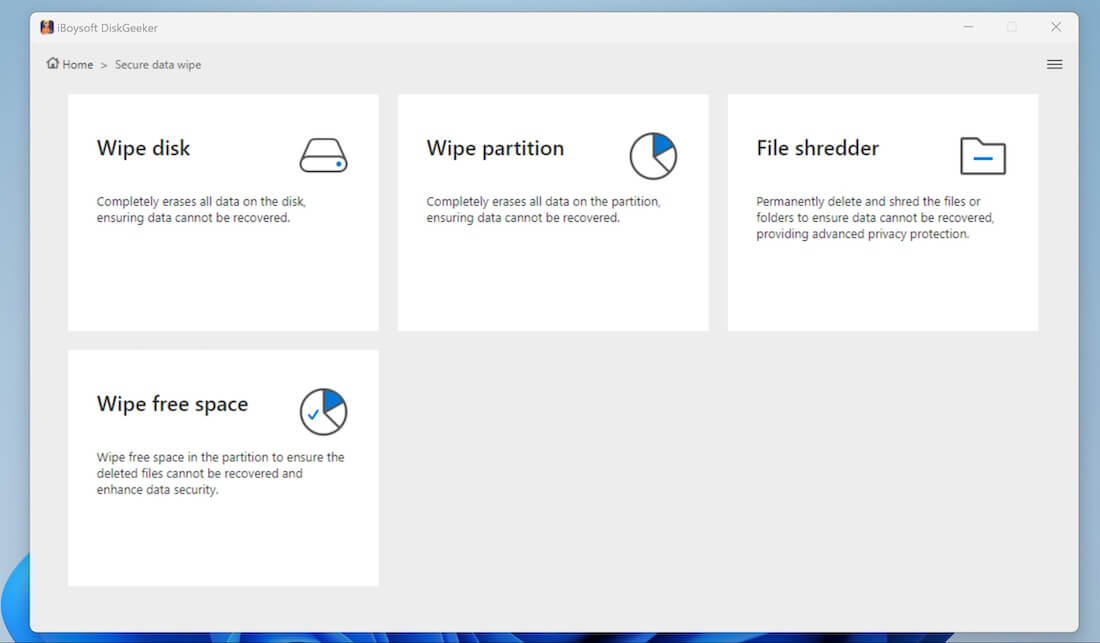
How to Securely Wipe Data on a Disk, Partition, or Partition's Free Space?
This disk manager enables you to securely wipe the secret and private data you no longer use and make it unrecoverable. You can wipe data on a disk, partition, or free space of a partition.
Step 1: Click "Toolbox" and then select a desired wiping mode.
Wipe disk: Wipe all sectors of the entire disk according to the specified algorithm, and the data cannot be recovered.
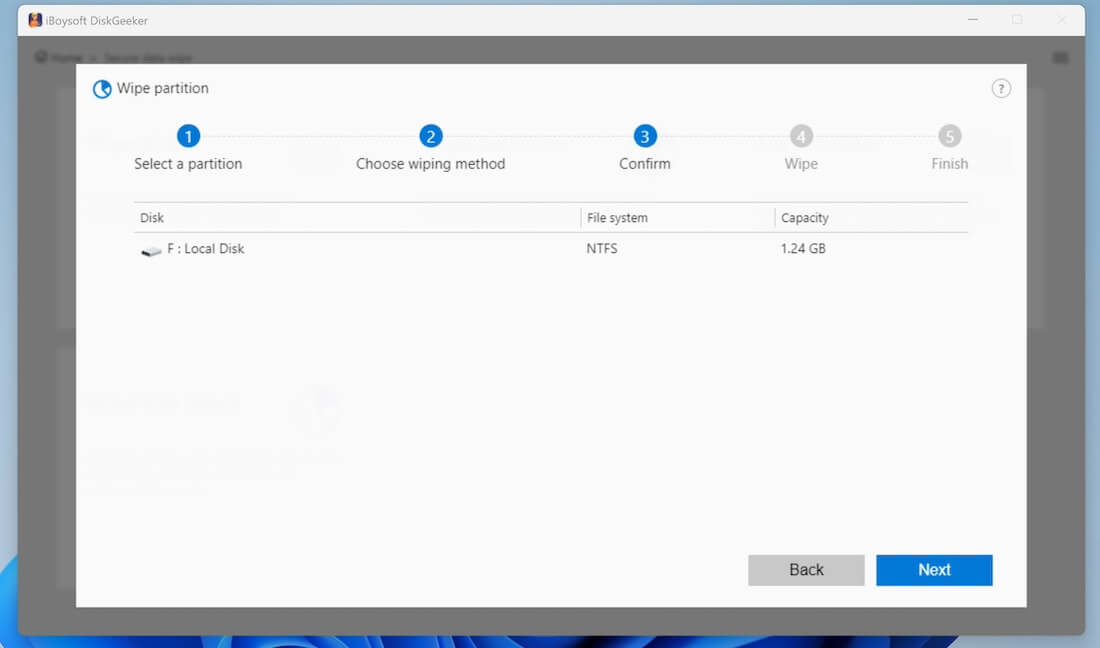
Wipe partition: Wipe all sectors of the entire partition with the specified algorithm, and the data cannot be recovered. It does not affect the data on the other partitions on the disk.
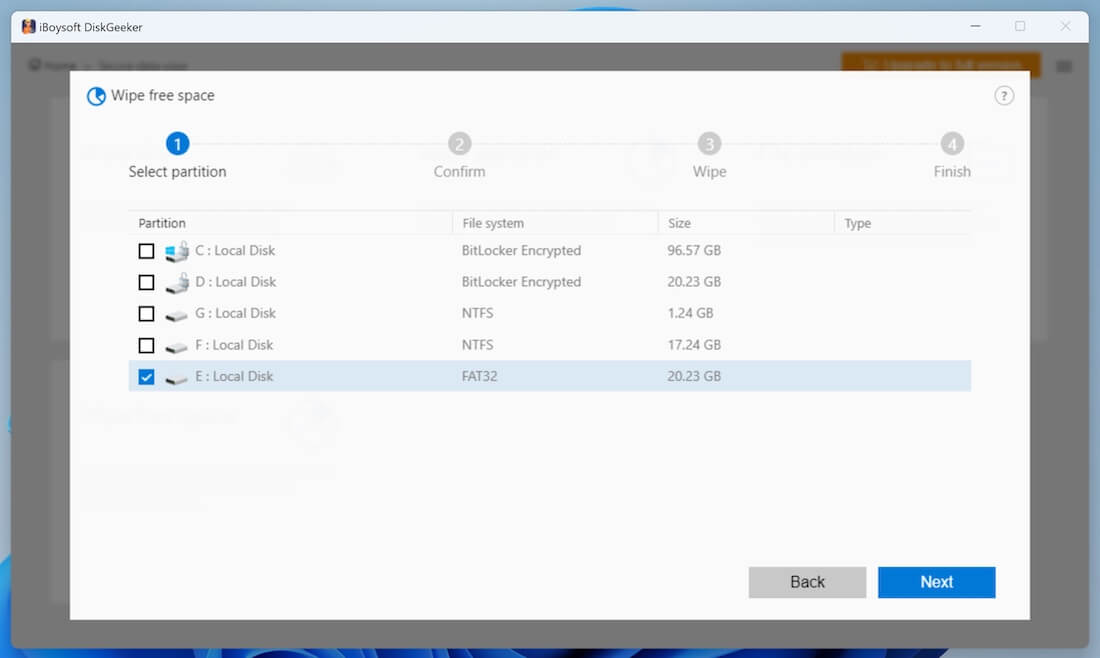
Wipe free space on a partition: Wipe the data traces and leftovers in the free space of the specified partition. It will completely erase the remaining information of all deleted data in the available space and make it unrecoverable. It only wipes the information on the free space of the partition and won't affect the data on the used space of the partition.
Step 2: Select the disk, partition, or free space you want to wipe.
Wiping an entire disk:
Wipe a partition:
Wipe free space:
Step 3: Confirm the disk, partition, or free space you want to wipe and click "Next."
You'll see the "Clear indexes" option at the bottom when wiping free space. Check it to clear the properties of the deleted or lost files on the free space, including their names, locations on the disk, and others, to completely wipe them.
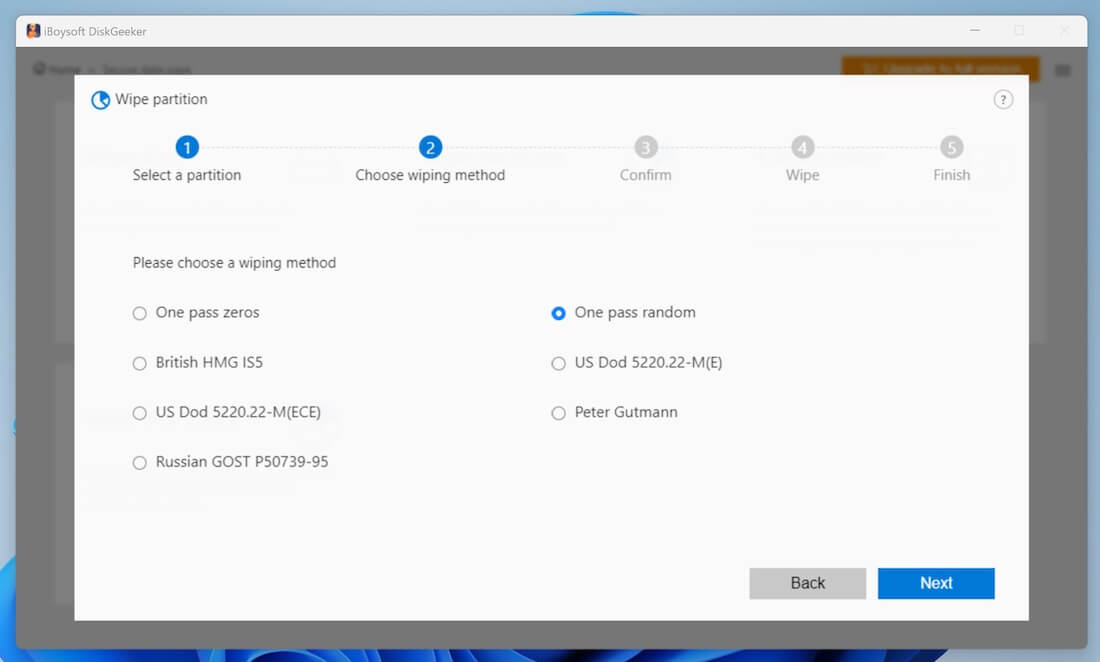
Step 4: Choose a wiping method and click "Next."
For free space wiping, you don't need to choose a wiping method.
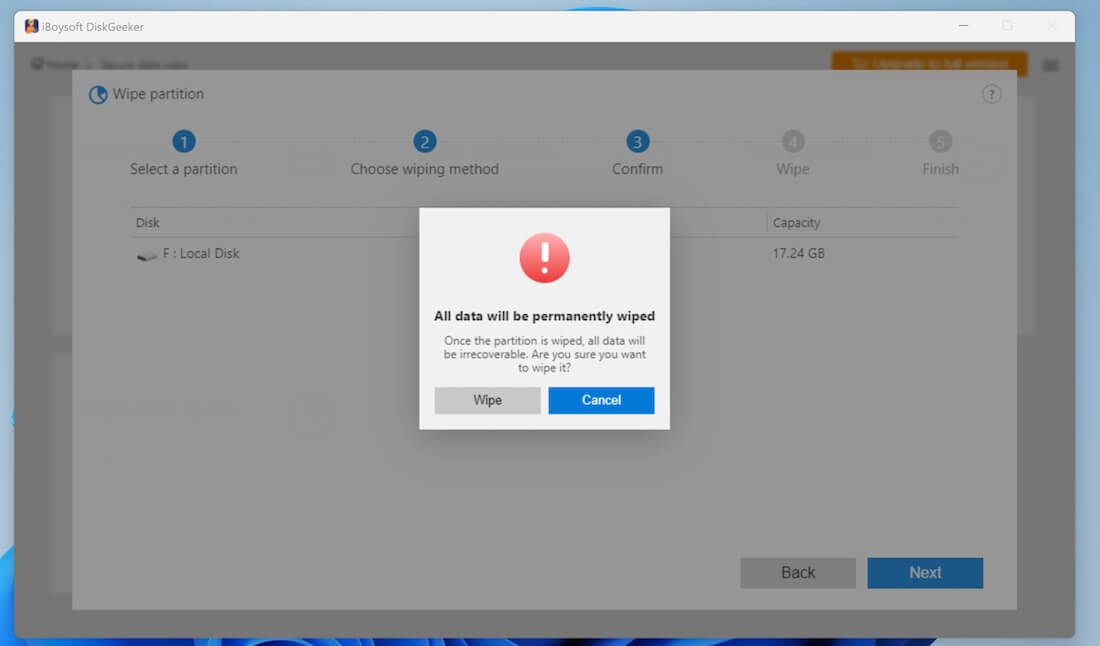
Step 5: Click "Wipe" on the confirmation window to start wiping data.
Step 6: Wait for the secure data wipe process to complete.
How to Wipe a Specific File or Folder?
You can also shred a specified file or folder without affecting other files on your PC or a disk.
Step 1: Click on the "Toolbox" module and then select "File shredder."
Step 2: Click the add button (+) to add your unwanted file or folder.
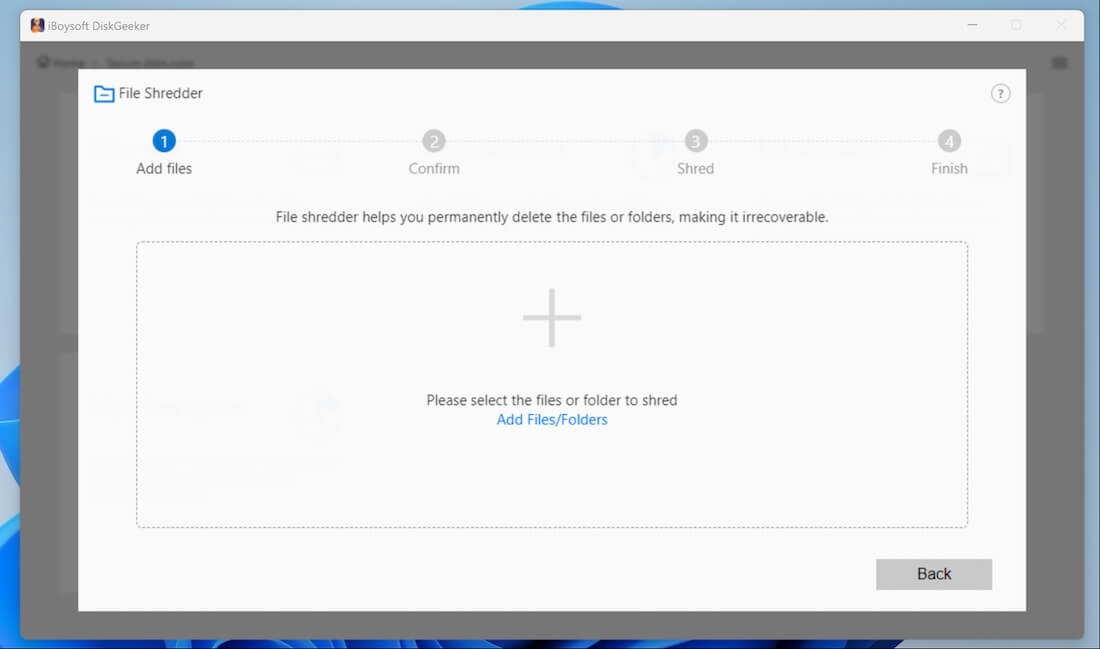
On the popup, tick in the file or folder you no longer use and click "Yes" to add it.
Check "Clear indexes" if you want to wipe the properties of this file or folder on the disk so as to completely erase it including its file name, location on the disk, or other metadata.
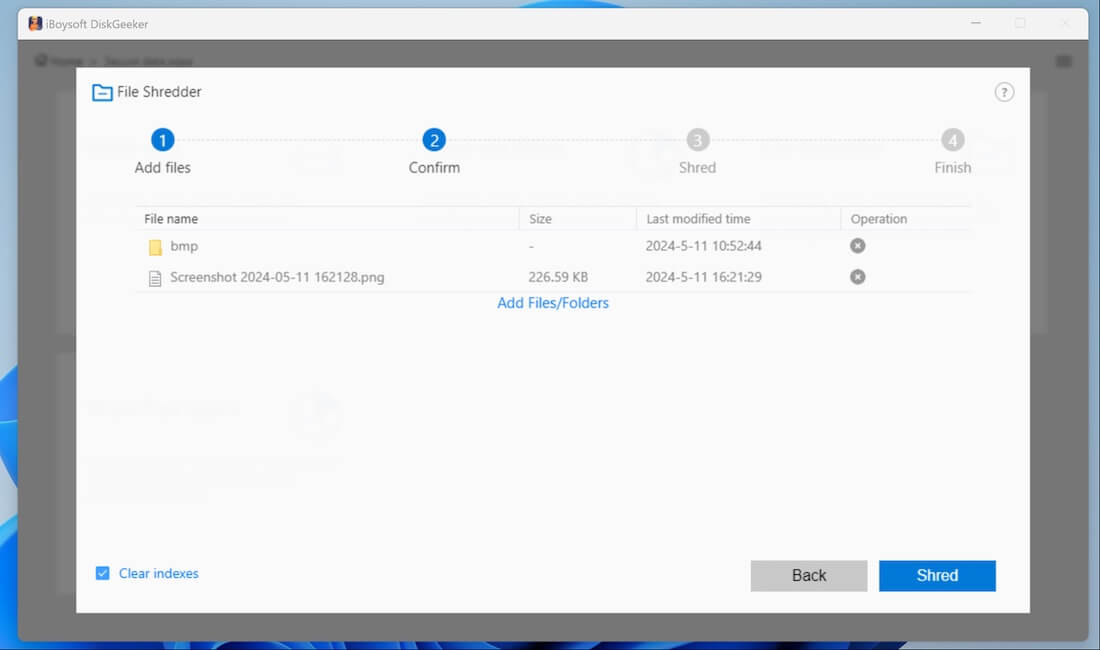
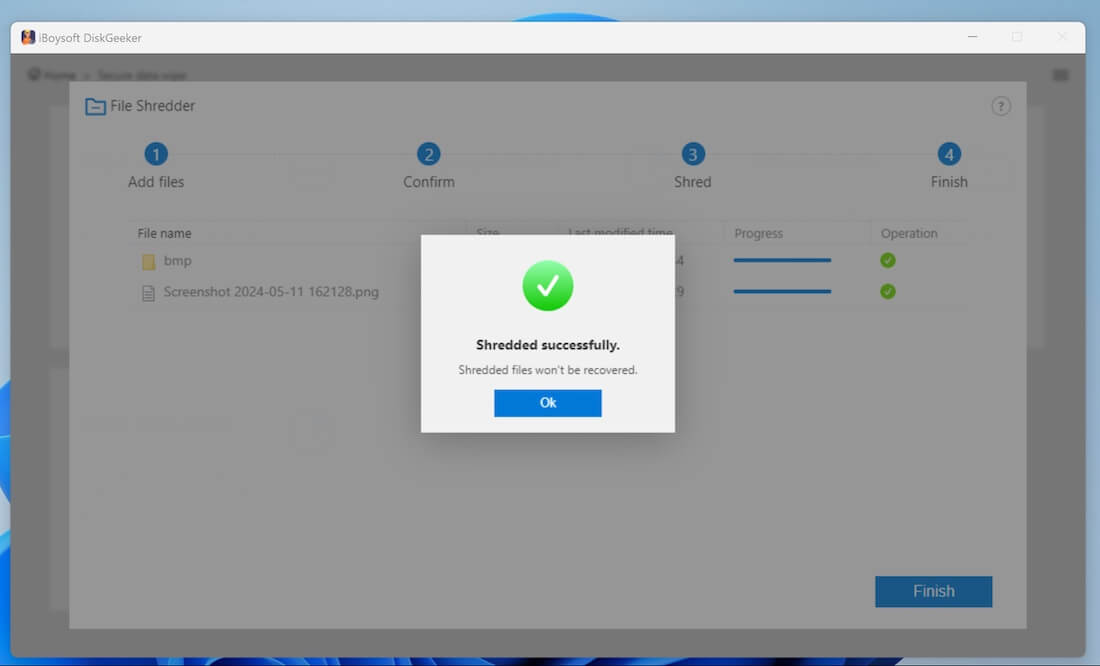
Step 3: Confirm the file or folder you add and click "Shred."
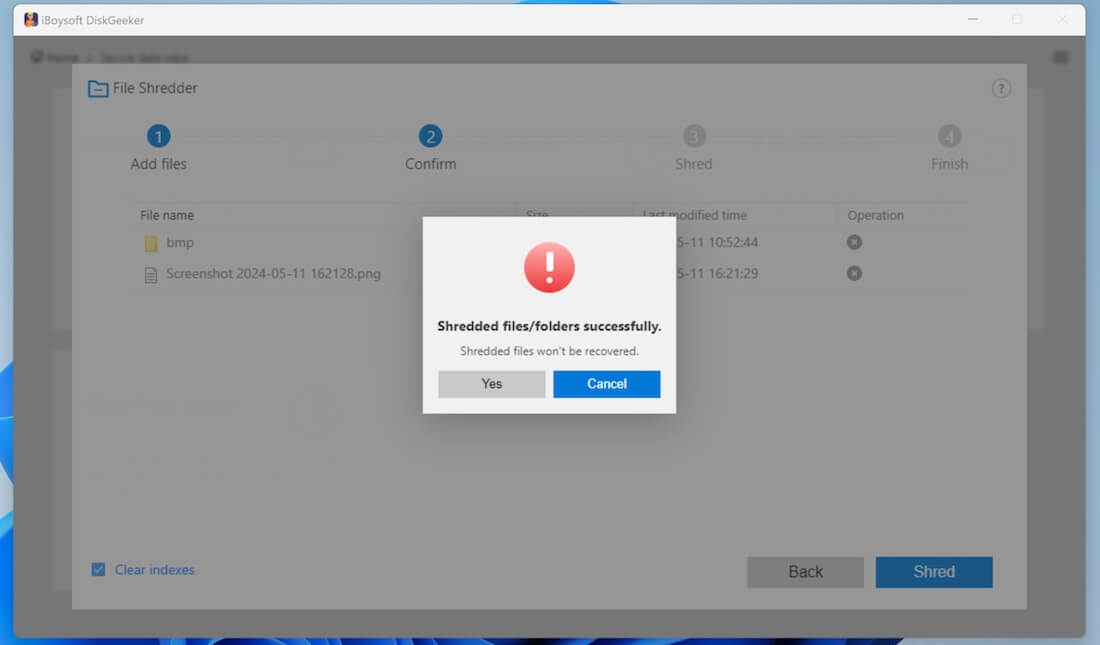
Step 4: Wait for the file or folder to be shredded.
Learn more about iBoysoft DiskGeeker for Windows's Secure Data Wipe
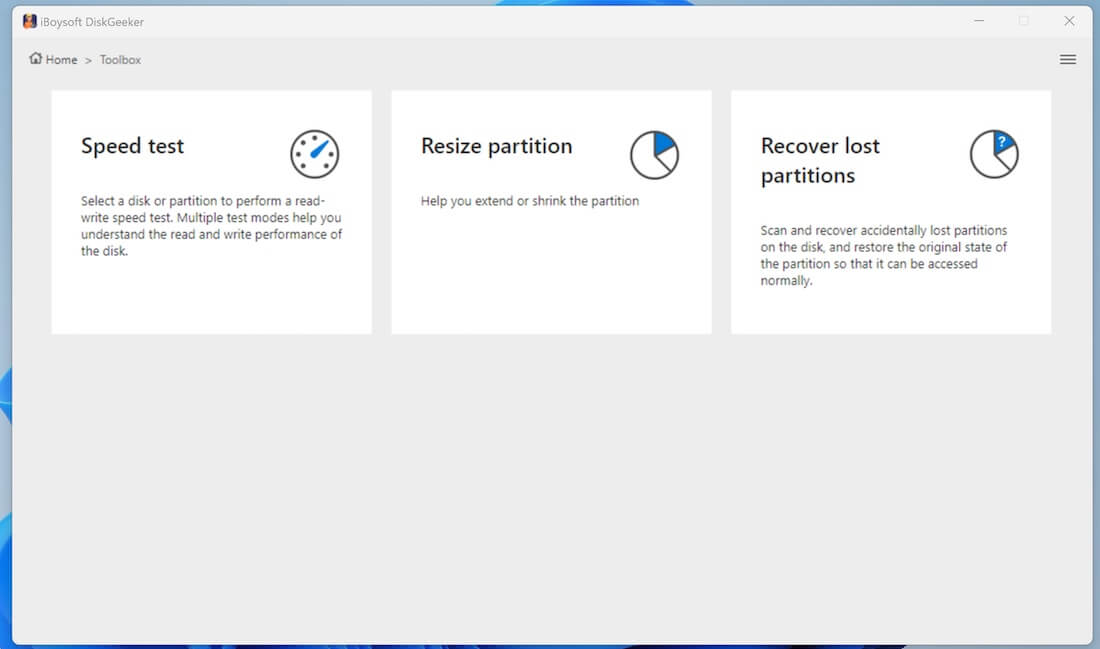
How to Test a Partition or Disk Speed?
This Windows drive manager supports testing the read and write speed of a system partition, non-system partition, and whole disk via direct reading and writing hard disk sector and reading and writing files through the file system.
Step 1: Click "Speed test" in the Toolbox module. Also, you can click "Toolbox" > "Speed test."
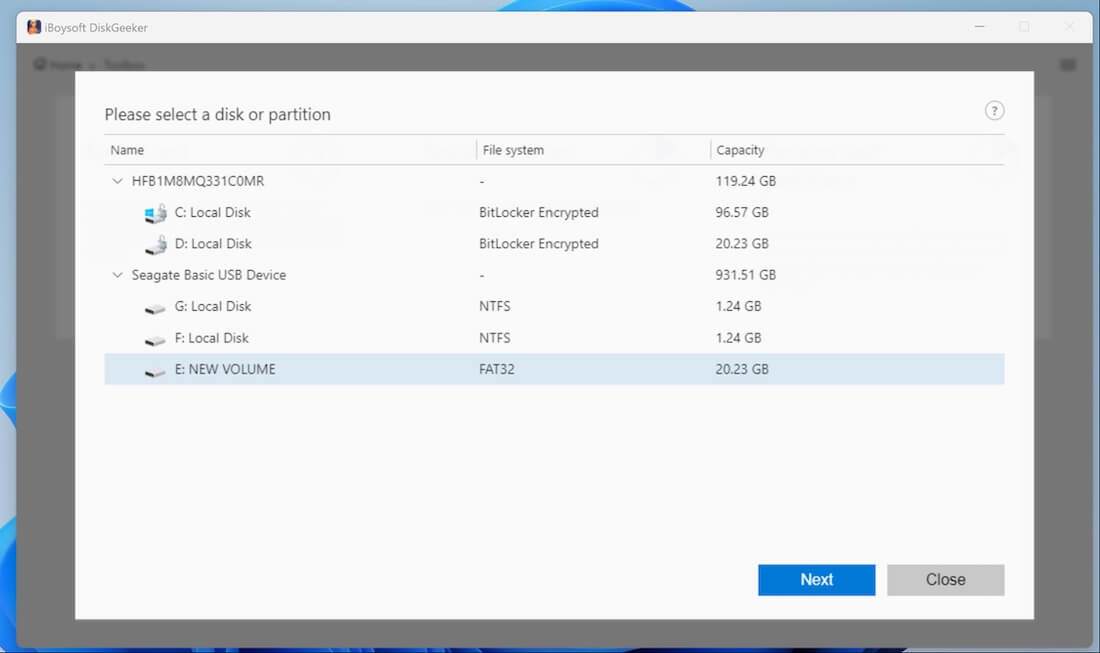
Step 2: Select a partition or whole disk you want to test and click "Next."
Note: System partition is special as you consistently write data onto it since your PC boots up. Thus, the way to test the speed of a system partition is through reading and writing files through the file system, and the available space on the system partition should be over 10 GB. During the speed test, 5 GB of data will be written to the system partition and once the test is completed, it will be immediately deleted.
Step 3: Choose a speed test mode you want.
There are four speed-test modes for partitions and entire disks.
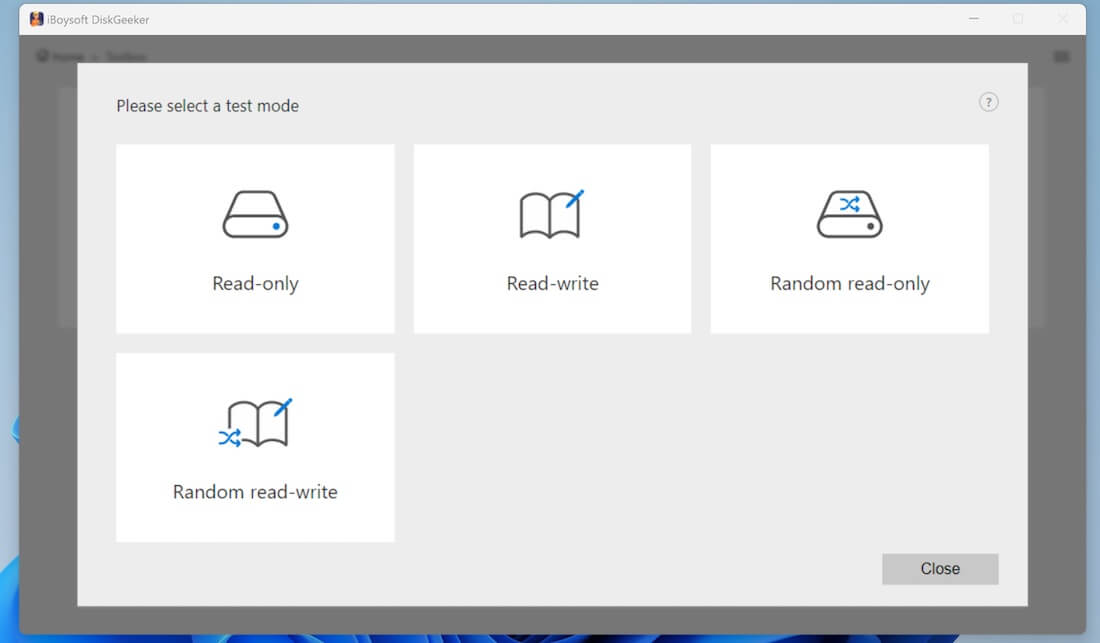
Read-only: Read data on the test area of a partition or disk from the beginning to the end. It takes little on the disk's seek time.
Read-write: Read and write data on a test area of a partition or disk from start to end. It spends little on the disk's seek time.
Random read-only: Randomly read data on a partition or entire disk. It takes a relatively long time on the disk's seek time.
Random read-write: Randomly read and write data on a partition or entire disk. It takes a relatively long on the hard drive's seek time.
Note:
1. Only read-write and random read-write modes are available for a system partition.
2. Only read-only and random read-only modes are available for BitLocker-encrypted partitions.
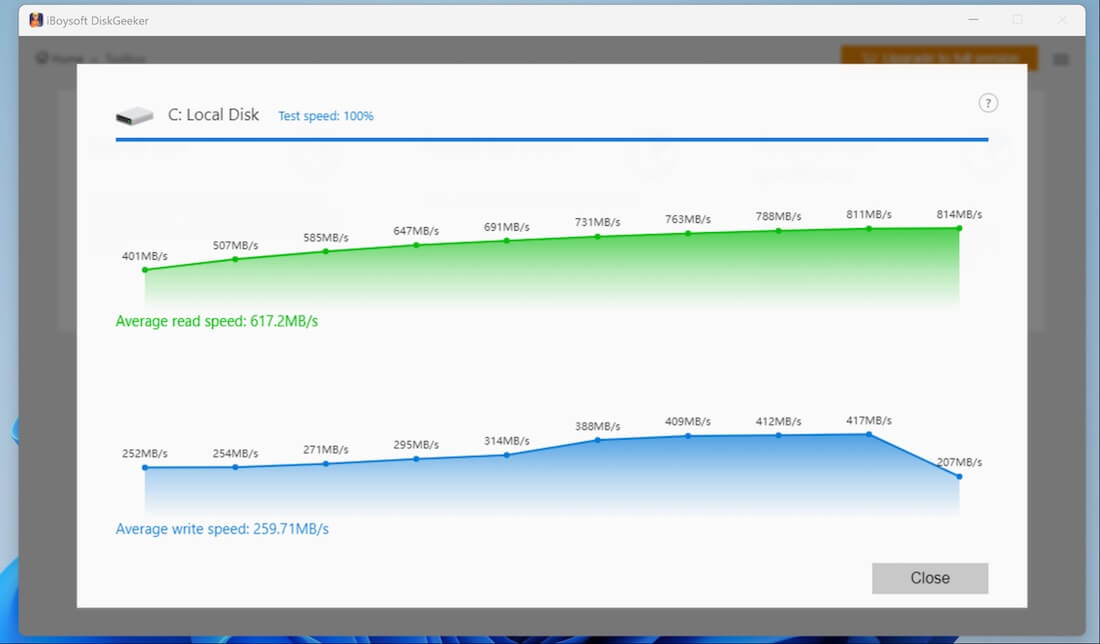
Step 4: Wait for the speed test to end.
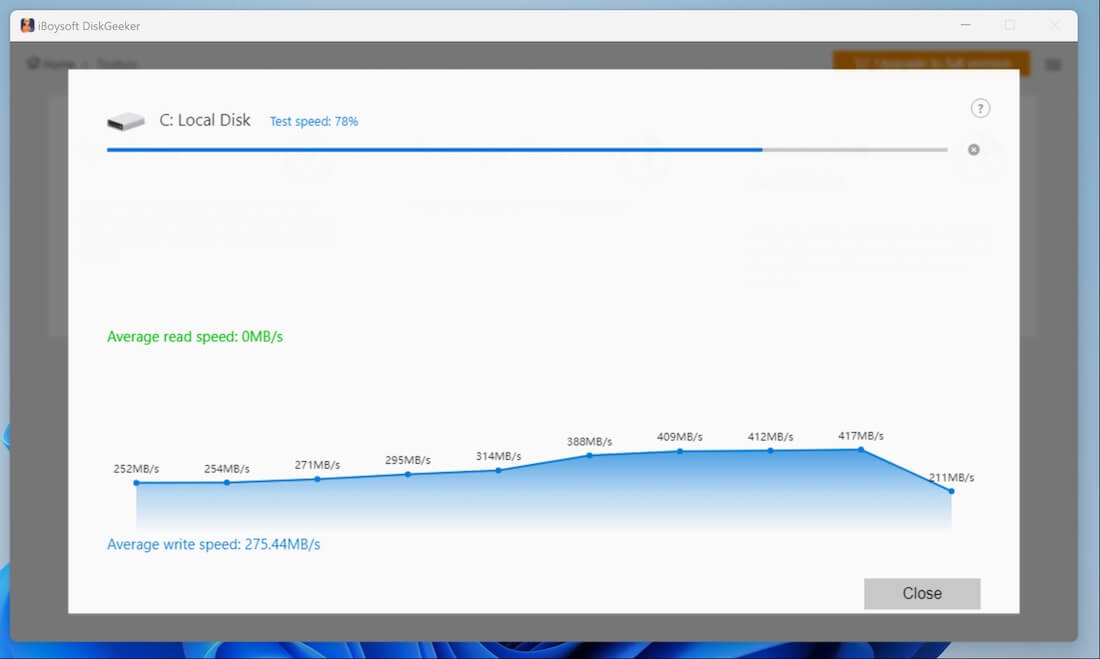
If you choose "Read-write" or "Random read-write," iBoysoft DiskGeeker will test the write speed of the partition or disk first, then the read speed.
Step 5: View the speed test results.
The speed test results are visually displayed in the form of a graph, and you can see the read and write speeds clearly.
Learn more about iBoysoft DiskGeeker for Windows's Disk Speed Test
How to Resize a Partition?
This disk manager allows you to resize an NTFS partition, including shrinking and extending it on a Windows computer, except for a BitLocker encrypted partition.
Step 1: Click "Resize partition" in the Toolbox module. Also, you can click "Toolbox" > "Resize partition."
Step 2: Select an NTFS partition you want to resize and click "Resize partition."
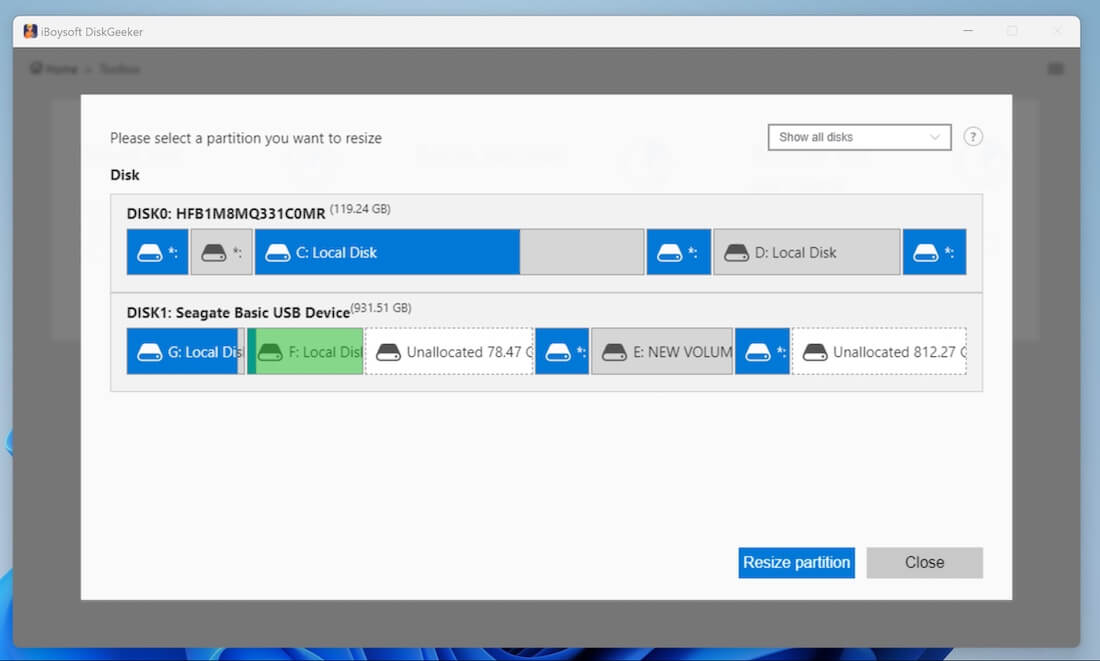
Step 3: Check the partition information.
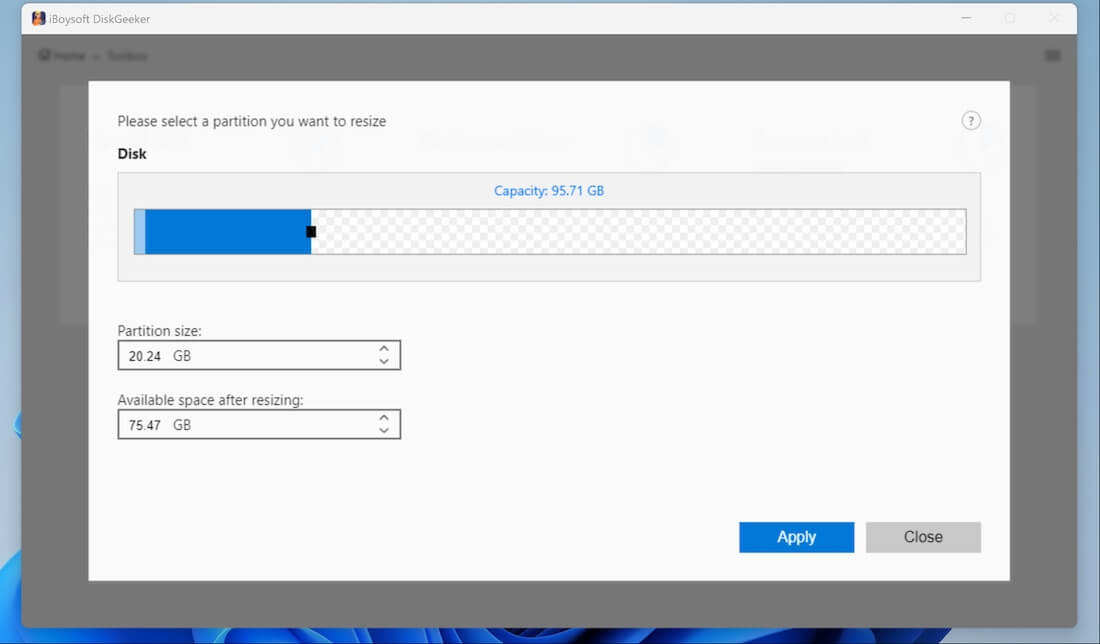
The dark blue area represents the current range that can be shrunk and the white (transparent) area represents the current range that can be extended.
If it only shows the dark blue area, it represents that the partition can only be shrunk.
If it only shows the white (transparent) area, it means that the partition can only be extended.
Step 4: Adjust the partition size according to your needs.
Hover over the black square at the end of the dark blue part, hold down the left button of the mouse, and drag the mouse to the left direction to shrink the partition or drag it to the right direction to expand the partition.
As you drag, the partition size below and the available space after resizing will also change, and you can see the specific value after shrinking and extending.
Partition size: The current partition size, and you can click the arrow to shrink or extend the partition size to a desired one.
Available space after resizing: The partition's available space after an adjustment.
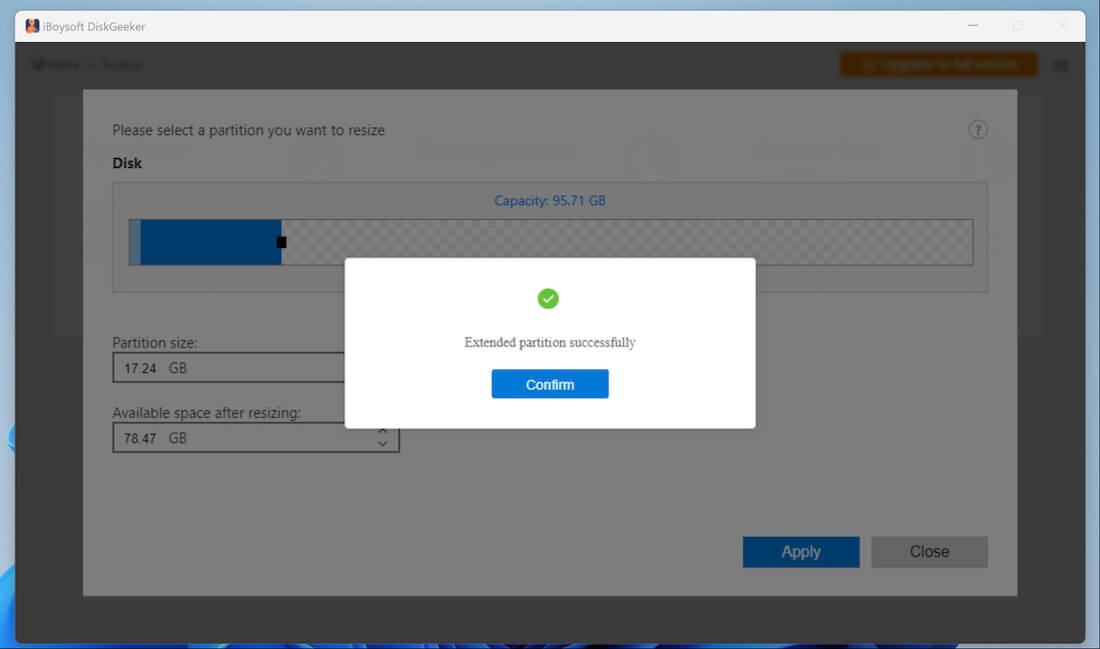
Step 5: Click "Apply" to start resizing the partition.
Learn more about iBoysoft DiskGeeker for Windows's Partition Resize
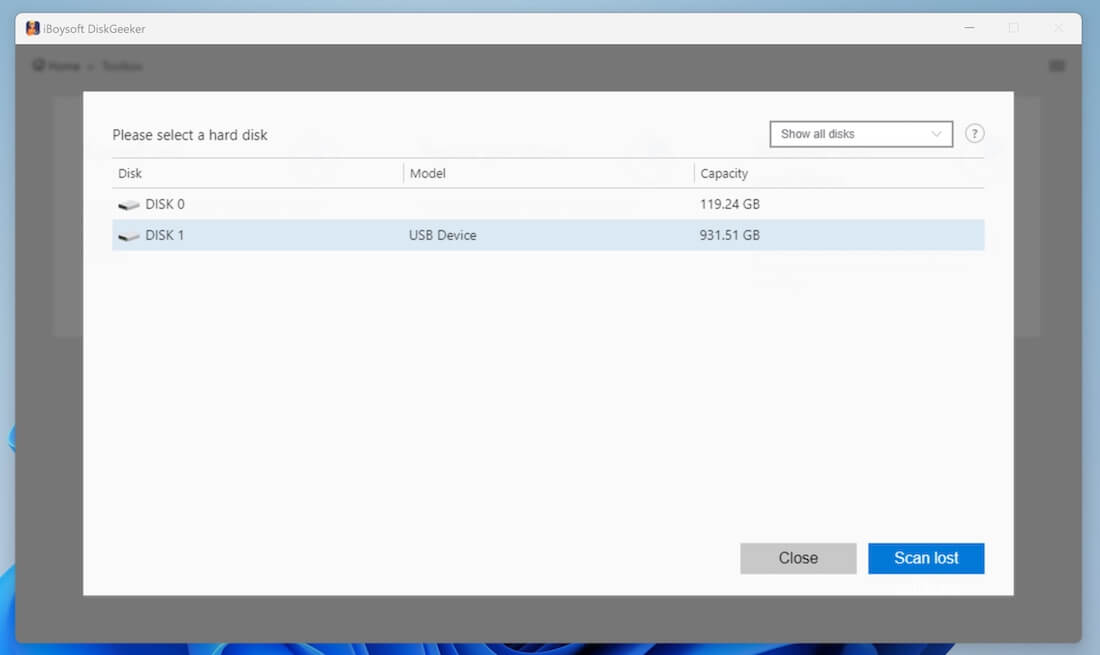
How to Recover a Lost Partition?
Find the lost or accidentally deleted partitions from a hard drive and restore them to be accessible and healthy partitions on a PC.
Note: If a partition became RAW before loss or deletion, it is still a RAW partition after recovery.
Step 1: Click "Recover lost partitions" from the Toolbox module, or you can click "Toolbox" > "Recover lost partitions."
Step 2: Select the target disk and click "Scan lost."
Step 3: Wait for your desired lost partition to be found.
If it finds your desired lost partitions before the scanning process fully completes, click "Skip" to terminate the process. Or, you can wait for the process to finish.
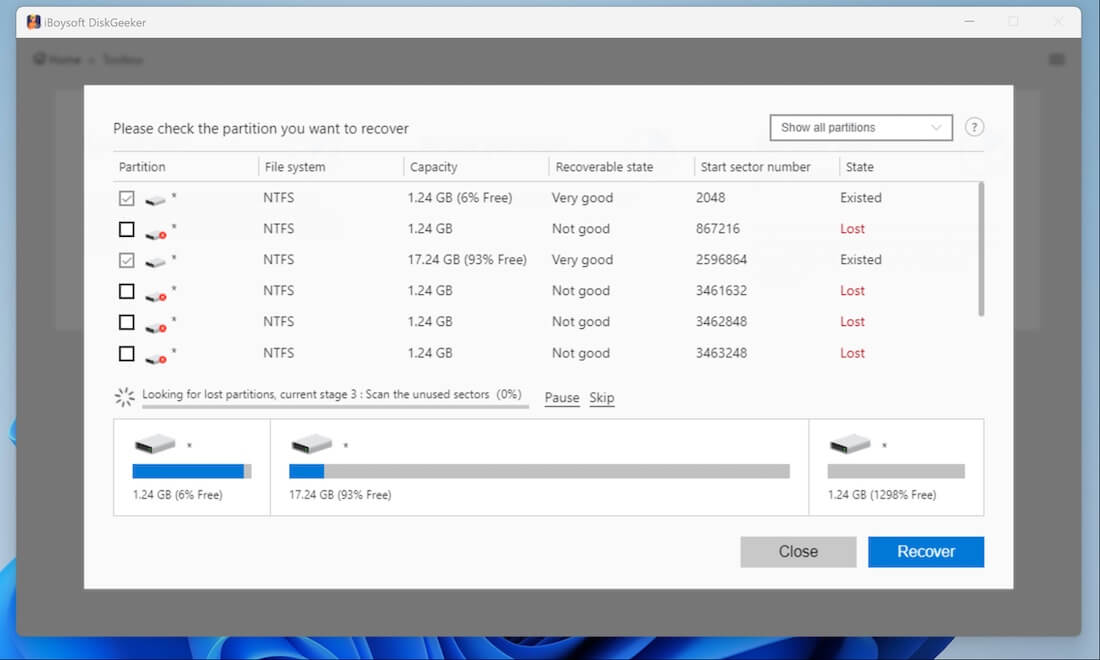
Step 4: Choose the lost partition you want and click "Recover" to restore it.

You can only select the lost partitions for recovery.
A message will alert you if the disk where the lost partitions are located is read-only.
The recovered partition is remained in RAW if it was a RAW before loss or deletion. You can try to use iBoysoft Data Recovery for Windows to fix the RAW partition and make it accessible again.
Learn more about iBoysoft DiskGeeker for Windows's Lost Partition Recovery
FAQ
1. What should I do if my license key fails to activate iBoysoft DiskGeeker for Windows?
Restart iBoysoft DiskGeeker for Windows or restart your PC to check if you can activate the application. If not, please send your details to [email protected] for further analysis.
2. Can I recover my data after securely wiping it?
No, the securely wiped data cannot be recovered in any way.
3. Will the process continue in the background if I close the main interface of iBoysoft DiskGeeker for Windows?
No, if you close the window of iBoysoft DiskGeeker for Windows, your ongoing process will stop.