
Written by
Yuri ZhangSummary: Whether you're using Windows 7, 8, 10, or 11, there are methods to check how much storage you have, and how much is being used or remains available. The bottom line is, iBoysoft DiskGeeker offers more advancement and convenience as disk space analyzer.
Monitoring your disk space is indispensable for maintaining system performance and ensuring there's enough room for your files and applications, especially as they accumulate over time.
You can not only check the total hard disk space but also see its details in this article. Therefore decide which part occupies the most space for better planning and deletion. According to a recent survey, iBoysoft DiskGeeker rises as a handy tool.
How to check the storage (disk space) in Windows 11/10/8/7
The first step in managing your storage is understanding how much disk space you have and how it's being used. Windows provides multiple ways to check the size of your drives, including SSDs (internal or external).
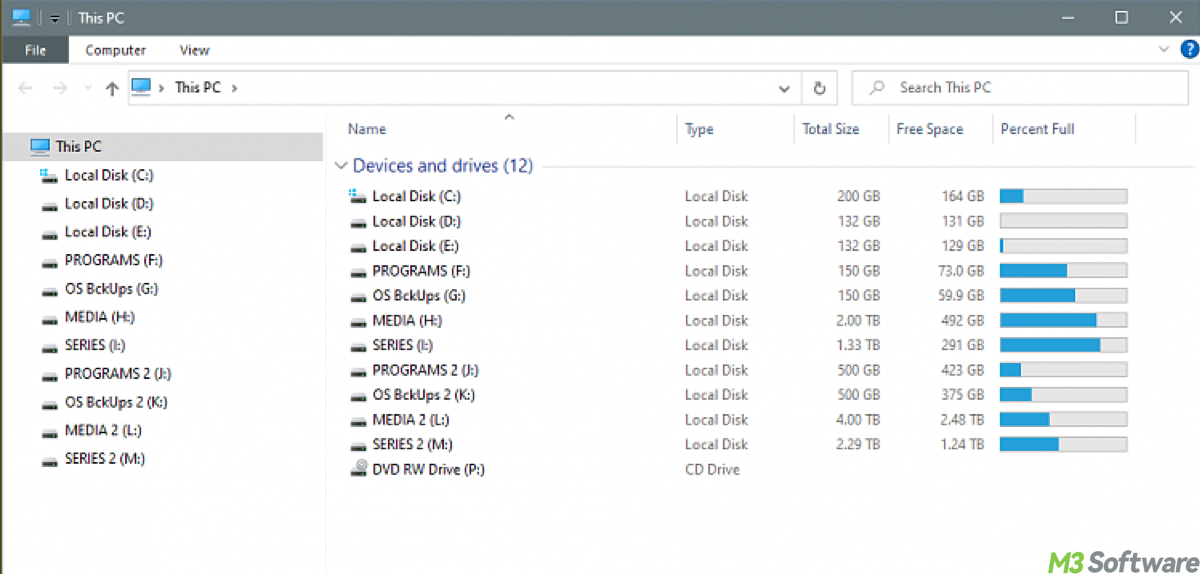
Method 1: Using File Explorer
File Explorer is the easiest and most intuitive way to view storage usage on all versions of Windows.
- Open File Explorer (press Win + E).
- Navigate to This PC (or "Computer" on older versions), and you'll see all your drives listed along with their total size, used space, and available free space. This section shows all the drives connected to your system including internal and external drives.
- Under Devices and Drives, you will see your drives listed along with: Total size (e.g., 500 GB, 1 TB). Used space. Free space.
Right-click any drive and select Properties for a more detailed breakdown of used and free space.
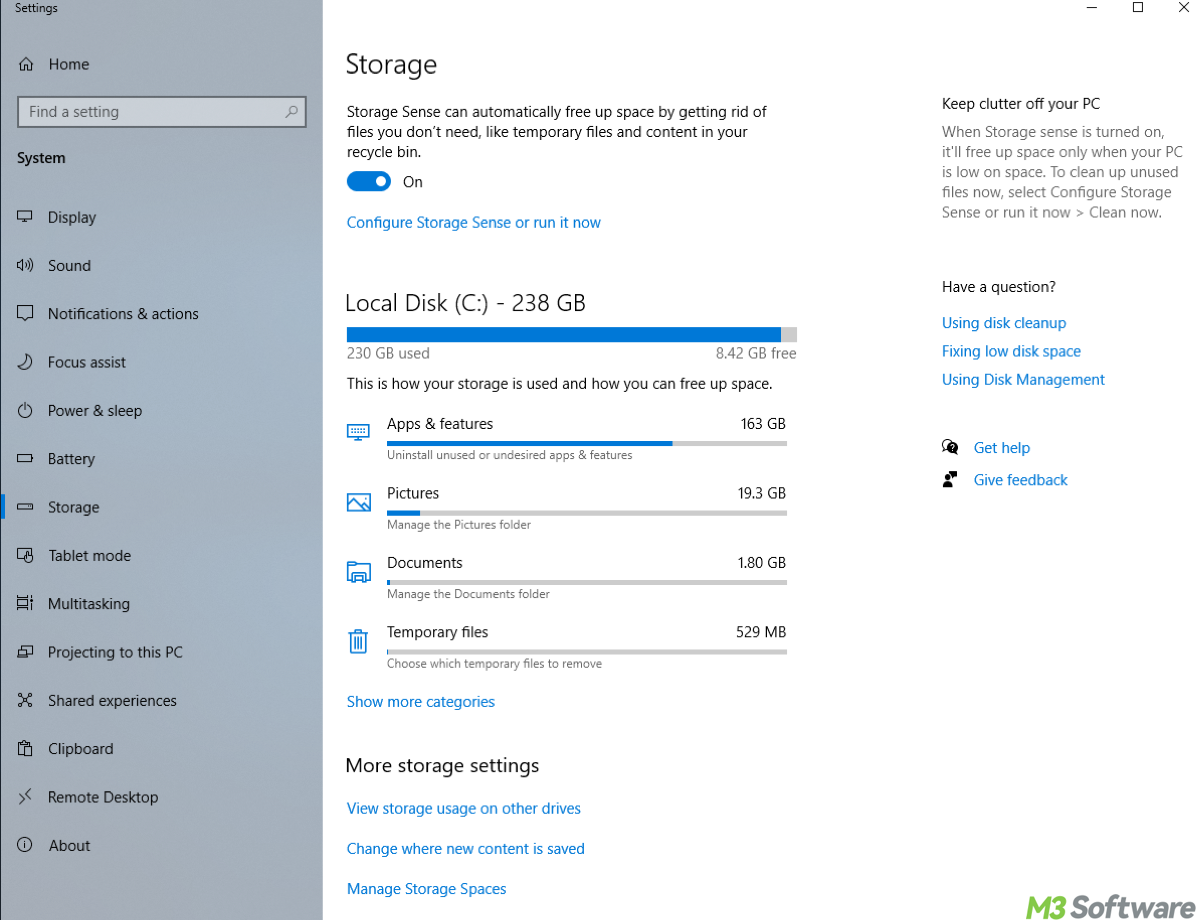
Method 2: Using Settings (Windows 10/11)
In Windows 10 and Windows 11, you can get a detailed view of your storage usage in the Settings app.
- Press Win + I to open Settings, then go to System > Storage. Here, you can see a graphical representation of storage usage, including breakdowns for different categories (apps, temporary files, etc.).
- You'll see a summary of your storage, with the C: drive listed, and a graphical breakdown of space usage by category (e.g., Apps, System files, Temporary files, Documents).
- Click on any category to see further details and to manage your storage (e.g., deleting temporary files or uninstalling apps).
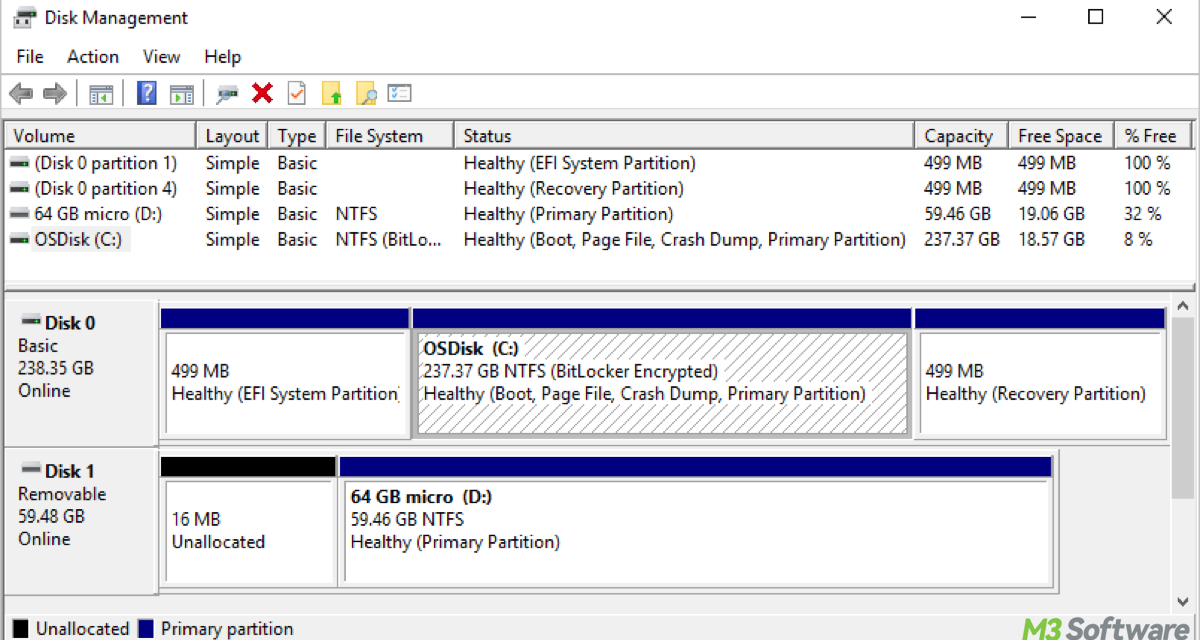
Method 3: Using Disk Management (Windows 7/8/10/11)
For a more advanced look at how your storage is divided into partitions, you can use Disk Management which is built-in Windows. This way you can view all connected drives, including their total size, partitions, used/free space.
- Right-click the Start button and select Disk Management, (or press Win + X and select Disk Management from the menu).
- Disk Management will display all your connected storage devices (internal and external). You'll see: Drive Letters. Total capacity. Partition layout (e.g., Primary Partition, System Reserved). Used and Free Space.
This method is ideal if you want to see how your drives are partitioned or if you need to resize partitions or manage multiple disks, and works across all versions of Windows.
Share this article with substantial matter.
Method 4: Using Command Prompt (All versions of Windows)
Command Prompt is a powerful tool that can provide disk information in a straightforward, text-based format. It also applies to both internal SSDs/HDDs (the main system drive) and external drives (like external SSDs or USB drives).
- Press Win + R, type cmd, and press Enter, (or search for Command Prompt in the Start menu and run as administrator).
- Type the following command and hit Enter:wmic logicaldisk get caption, size
- This command will display the drive letter (e.g., C:), and the total size of each disk in bytes.
- The result will show the size in bytes, so you may need to convert it to GB. You can do this manually or use a calculator: divide the byte value by 1,073,741,824 (since 1 GB = 1,073,741,824 bytes).
Method 5: Using PowerShell (All versions of Windows)
If you prefer PowerShell, you can use it to gather storage details in a more structured and customizable format.
- Search for PowerShell in the Start menu, right-click it, and select Run as Administrator.
- In PowerShell, type the following command and press Enter:Get-PSDrive -PSProvider FileSystem
- This will list all file system drives along with their used space, free space, and total capacity in a more readable format.
- You also need to convert/calculate the results if you want them in GB. (1 GB = 1,073,741,824 bytes)
Disk space analyzer - iBoysoft DiskGeeker (best method)
As its name suggests, DiskGeeker is a master to manage disks. We can check total hard disk space with this blue-ribbon tool, The PC's space will be clear at a glance with its visual mode and non-visual mode, giving us a straightforward channel to arrange files or storage orderly and neatly.
Tutorial to analyze space usage of OS partition, user folder, a specific folder
Step 1: Download and launch iBoysoft DiskGeeker by clicking the green button below.
Step 2: You will be in "Space analyzer" module, select a space analysis feature you want.
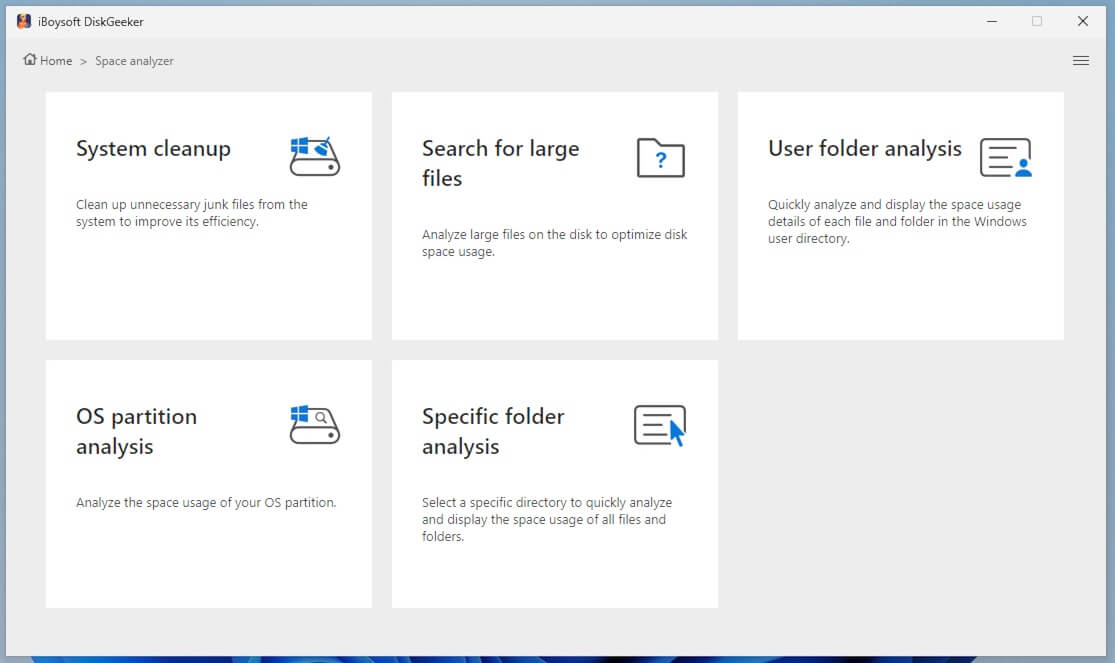
- User folder analysis: Analyze the storage usage of the current user folder.
- OS partition analysis: Analyze the storage usage of the system partition.
- Specific folder analysis: Analyze the storage usage of any folder you choose.
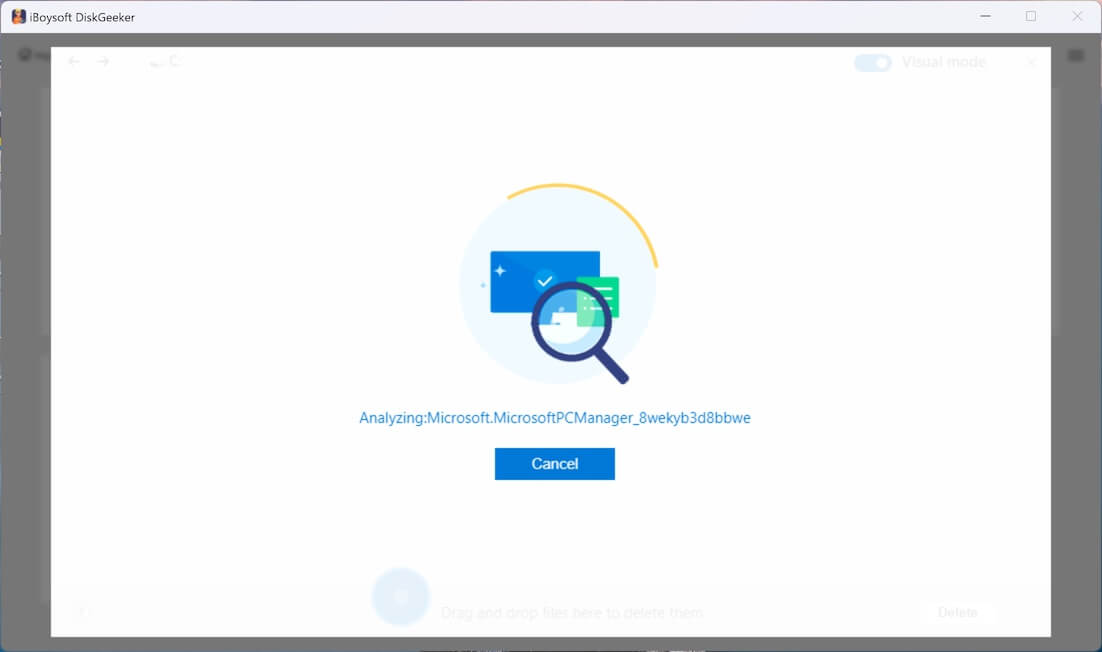
Step 3: iBoysoft DiskGeeker for Windows will automatically analyze the files in the selected location.
(It will take a relatively long period to scan the files in OS partition and user folder as it stores a huge amount of your data.)
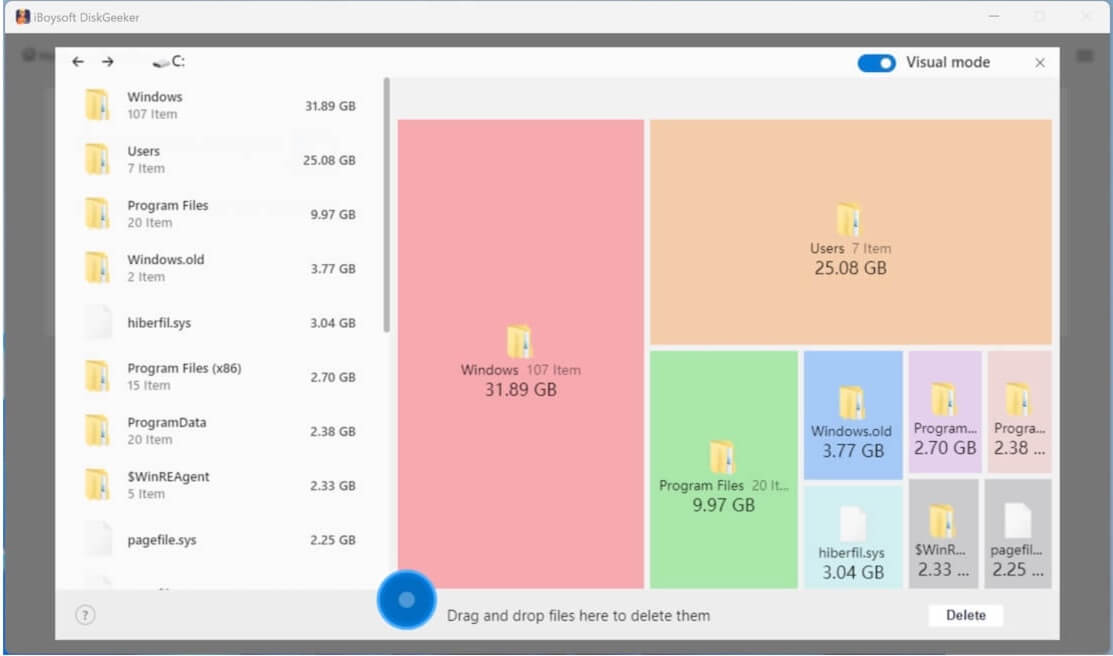
Step 4: Check the scanned results by clicking the listed folders.
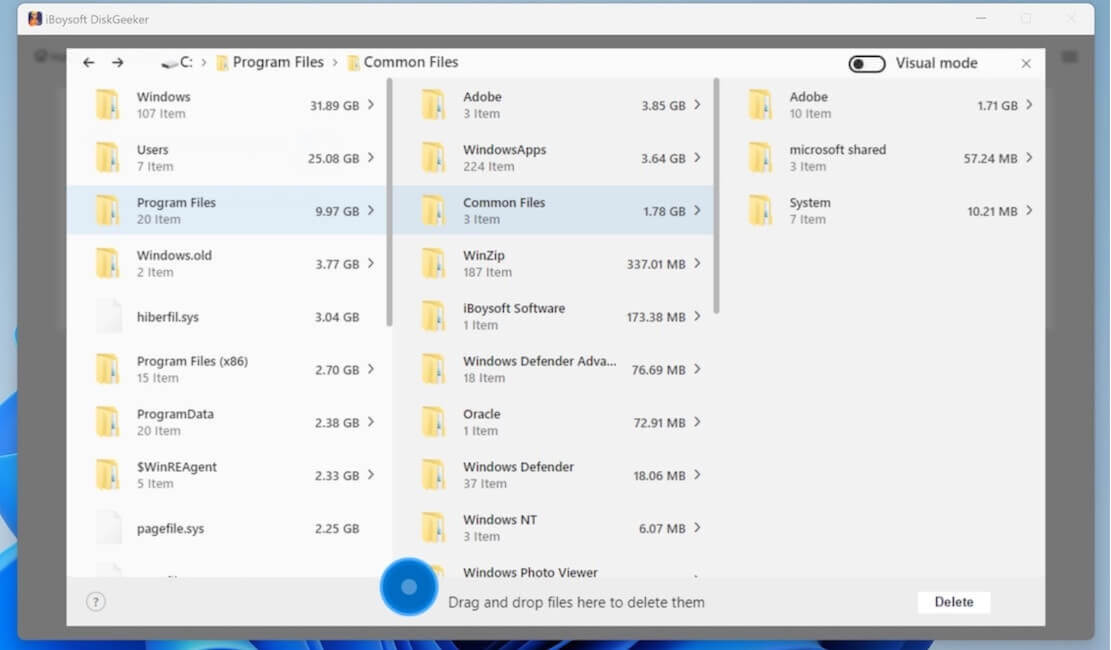
The scanned results can be displayed in two modes: Visual mode and Non-visual mode.
(In visual mode, the left and right views are the same level directories, and the right view is a visual presentation of the files in the left view. Turn off the Visual mode button in the upper right corner, you can only see the text table of contents.)
(In non-visual mode, the software displays the preceding and following levels of directories of the current path (a total of three levels of directories). When there are less than three levels of directory structure, it displays all path structures.)
Step 5: Select your unwanted files and drag and drop them to the Trash Bin at the bottom (a blue circle).
This is to collect all the files you prepare to delete, the Trash Bin will show the total size of these files.
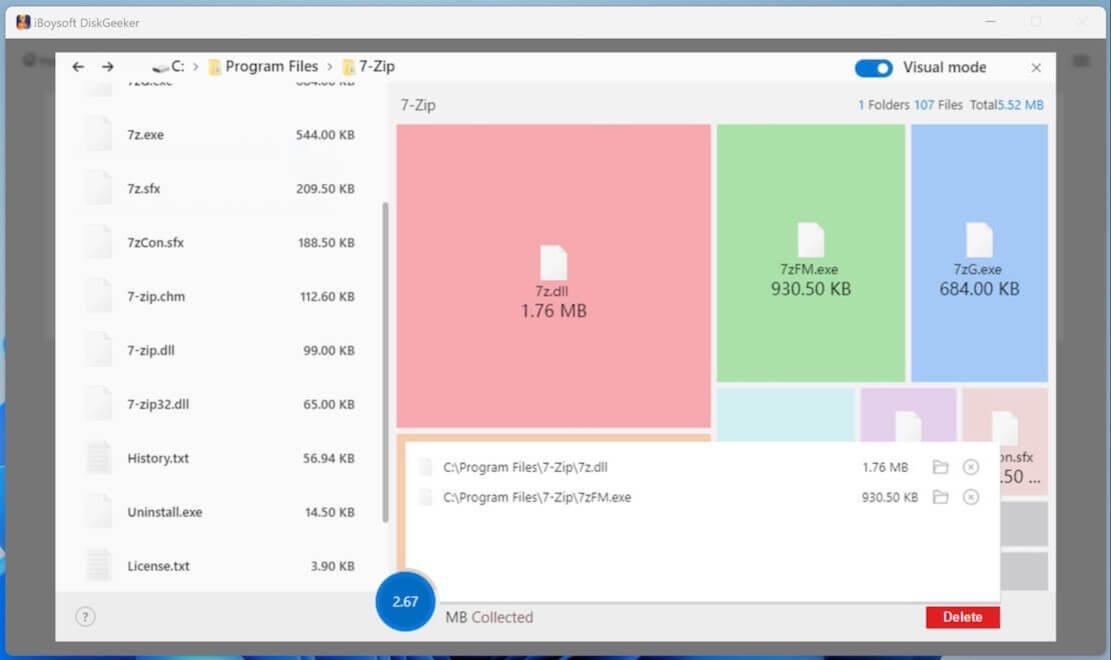
(If you regret moving a certain file to the blue Trash Bin, you can click on the Trash Bin and then click the remove/Cross button next to the file to move it out from there.)
Step 6: Click "Delete" to permanently remove the files you put in the blue Trash Bin.
Tip 1: A prompt will appear if the deletion is successful. Remember to refresh that folder to show the latest state. Usually, a read-only file and file being used cannot be deleted.
Tip 2: The process of checking the total disk space and the size of an SSD in Windows is quite similar. iBoysoft DiskGeeker allows you to view detailed storage info for your SSD if you're dealing with complex storage issues or need advanced management features beyond what Windows provides.
Share this incredible tool and explore its other rich functions.
How to free up disk space on Windows after knowing storage
After checking your storage, you may notice that your disk is nearing full capacity. Freeing up disk space is essential for ensuring smooth system performance. Here are the key methods:
- Disk Cleanup built in Windows
- Storage Sense (Windows 10/11)
- Uninstall unnecessary apps and programs
- Empty the Recycle Bin
- Move large files with iBoysoft DiskGeeker
- Delete or move system restore points from System Properties > System Protection
See more detail by reading 7 Ways to Free up Disk Space on Windows
Conclusion
Managing your disk space effectively is crucial for optimal system performance. Regularly checking your storage and freeing up unnecessary files can prevent slowdowns and ensure your system remains responsive. Whether you're dealing with an internal SSD or an external drive, the methods described above—from built-in tools like Disk Management and Storage Sense to software like iBoysoft DiskGeeker—are all effective ways to maintain ample free space on your Windows computer.
Related articles
Kill Stubborn Processes on Windows 7/8/10/11 with Confidence
Cloning a BitLocker-Encrypted Drive: How to Do It Right
Duplicating a Directory/Folder/File Mightier Than Usual
Share this if you think these guides are apt!