
Written by
Yuri ZhangTo ensure smooth computer performance, managing disk space is key. Windows 10 and 11 promotes a feature Storage Sense, a built-in utility that automatically clears temporary files, system files, and Recycle Bin items so as to free up space.
But sometimes we prefer more control over when and how our storage is managed. If you find that Storage Sense is turning on by default or receiving constant storage notifications, you may want to disable them. Let's delve into how to turn off Storage Sense, stop storage notifications, and even disable the Storage Service entirely.
Why Storage Sense turns on automatically
The Storage Sense feature might turn on automatically for several reasons:
- When your system detects that disk space is running low, Windows may automatically enable Storage Sense to free up space by removing unnecessary files.
- After a major system update, Windows may enable Storage Sense to assist with disk cleanup and space management.
- Some versions of Windows come with Storage Sense enabled by default. This is primarily aimed at preventing users from encountering issues due to full storage.
- You might have unintentionally turned on Storage Sense while exploring the settings or someone else using the computer may have enabled it.
Share these insights and continue reading the essence of this post.
How to turn off Storage Sense in Windows 11/10
If you need to turn on Storage Sense, refer How to enable Storage Sense for all Windows users. If you prefer to manage your disk space manually and don't want Windows to handle it automatically, you can disable it with the following steps:
- Press Windows + I to open Settings.
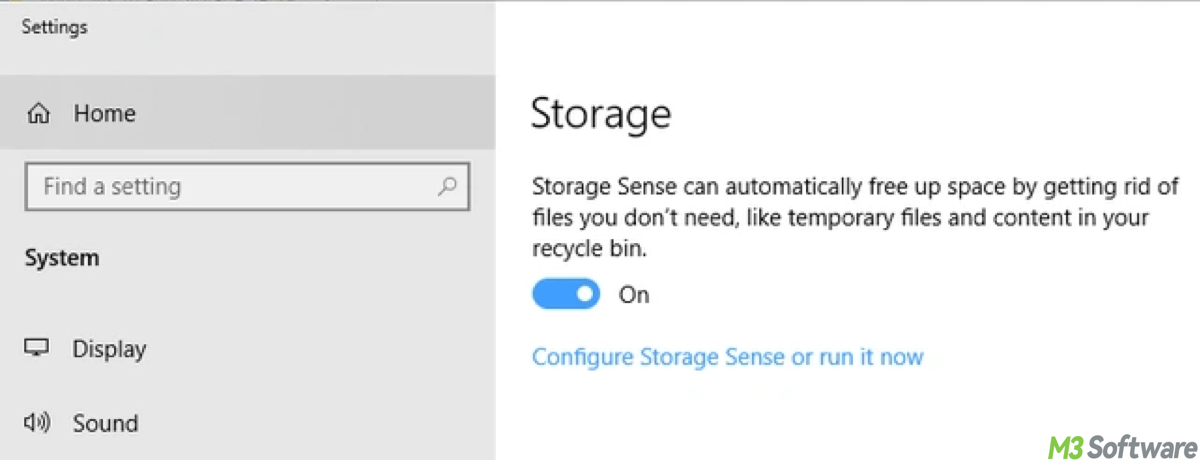
- Go to System > Storage.
- Scroll down and click Configure Storage Sense or run it now (for Windows 10)/Storage Sense (for Windows 11).
- Toggle the Storage Sense setting to Off.
By doing this, you stop Windows from automatically cleaning up your disk space without your consent.
Turning off Storage notifications in Windows 11/10
Windows will notify you when your disk space is running low or when Storage Sense has cleaned up files. If you don't find these notifications useful, you can disable them.
- Press Windows + I to open Settings.
- Navigate to System > Storage.
- Scroll down and click Change how we free up space automatically (for Win10)/ Storage Management (for Win11).
- Uncheck or toggle Show me storage notifications.
This stops Windows from alerting you about disk space or the cleanup process.
Disabling the Storage Service completely
For those who want to completely disable the Storage Service (which manages Storage Sense and other storage-related tasks), follow these steps in two ways:
1. Disable via Services:
Note that this may stop all automatic storage management and optimization features.
- Press Windows + R to open the Run dialog.
- Type services.msc and hit Enter to open the Services window.
- Scroll down to find the Storage Service.
- Right-click it, select Properties, and set the Startup type to Disabled.
- Click Stop to halt the service immediately.
2. Disable via Command Prompt:
Disabling the Storage Service prevents features like Storage Sense and automatic disk cleanup from functioning.
- Open Command Prompt (Admin) by pressing Windows + X and selecting Command Prompt (Admin).
- To disable the service, type the following command:sc config storageservice start= disabled
- To stop the service immediately, use:sc stop storageservice
Final thought
Storage Sense turns on automatically due to low disk space, updates, or defaults. You can turn it off by Settings, Services, and Command Prompt. Disable storage notifications are beneficial for a cleaner user experience. Whether you like your storage sense is on or off, iBoysoft DiskGeeker for Windows is always a trouble-free channel to analyze your devices folder and clean them once for good.
Related articles:
Cloud storage vs. external SSD or SD storage
How to find downloaded files in Windows
How to check total hard disk space in Windows
Spread this when others don't know any better!