
Written by
Wilsey YoungWhen the BitLocker is enabled and you open the BitLocker Drive Encryption management page, you can see the “Suspend protection” and “Turn off BitLocker” options right next to the BitLocker drive icon.
You may wonder what the difference is between suspending protection and turning off BitLocker, and you may also be curious about when the protection suspending is needed. This post briefly explains the BitLocker management option “Suspend protection” and tells you how to suspend BitLocker via Control Panel, Command Prompt, and PowerShell.
You can click the buttons below to share this post!
What does “suspend BitLocker encryption” mean?
Suspending BitLocker refers to the "Suspend protection" option on the BitLocker Drive Encryption page. The option allows you to temporarily pause the encryption protection without decrypting the contents. Suspending BitLocker means that while the drive remains encrypted, the protection is disabled, allowing access without requiring a password or BitLocker recovery key.
Suspending BitLocker protection can be useful during the following situations:
- Frequent system changes: Frequent and significant system changes, such as hardware modifications or BIOS/UEFI updates, might trigger BitLocker to ask for the recovery key. In this case, you can suspend BitLocker before all the active changes are done.
- Boot configuration changes: Changes in the boot configuration, such as changing the boot order or dual-booting another operating system, can prompt BitLocker to request the password or recovery key.
- Suspicious activity: BitLocker may prompt for the recovery key if it detects any suspicious activity or potential tampering with the BitLocker encrypted drive. If you intend to make any changes to the system and drive on your own initiative, you can temporarily suspend BitLocker to prevent excessive interruption from BitLocker.
- Operating system issues: Some Windows updates, especially those that affect the boot process or system files, may cause BitLocker to prompt for the recovery key.
How to suspend BitLocker in Windows?
Here we provide 3 ways to suspend BitLocker in Windows: Control Panel, Command Prompt(cmd), and PowerShell.
Suspend BitLocker via the Control Panel
Control Panel is a system tool that provides a centralized interface for users to view and change system settings, so you can manage your BitLocker encrypted drive through the Control Panel.
- Press the “Windows+S” keys or click the magnifying glass next to the Start button to open the Windows search bar.
- Type “Control Panel” in the search bar and click the result to open.
- Select “System and Security” and click the “BitLocker Drive Encryption.”
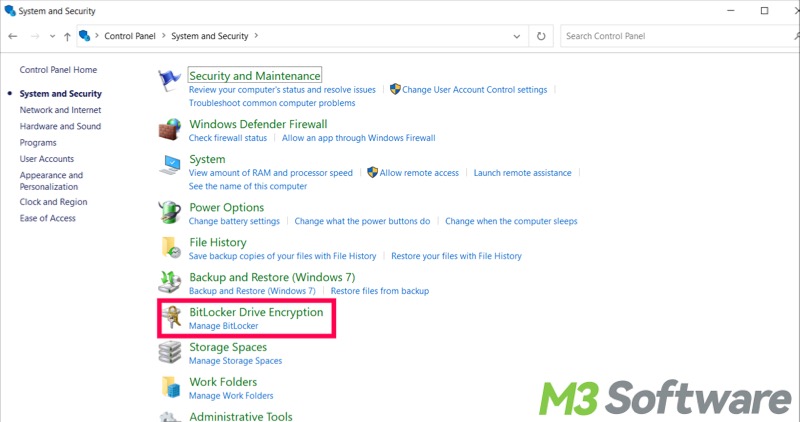
- Click the “Suspend protection” option beside the BitLocker drive icon.

You can directly type "Manage BitLocker" in the search bar and click the result to open the BitLocker Drive Encryption page.
Suspend BitLocker cmd (Command Prompt)
The Command Prompt is a command-line interpreter application that allows you to execute the corresponding command to suspend the BitLocker, and here's how:
- Type “cmd” in the Windows search bar and select “Run as administrator.”
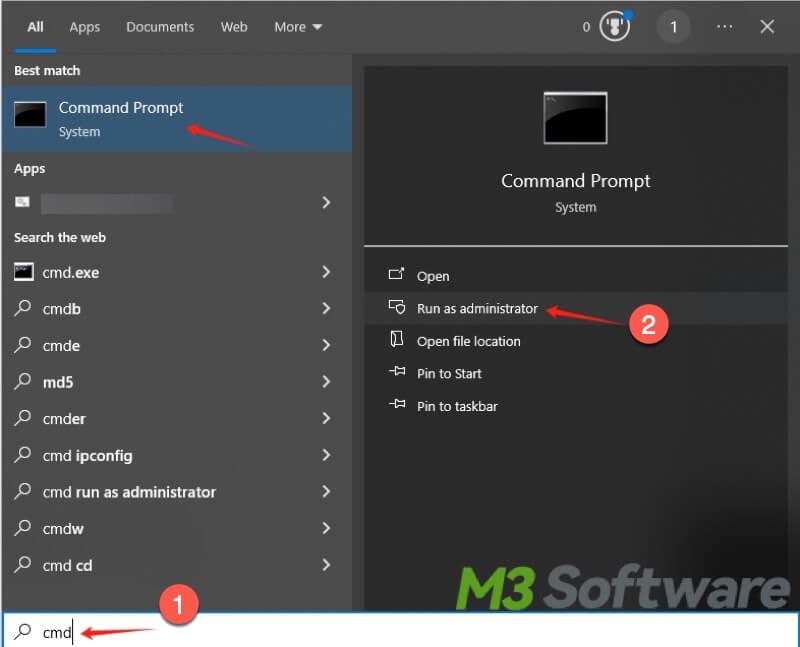
- Copy and paste the following command and hit the “Enter” key on your keyboard. You should replace the letter X with the actual letter of your BitLocker encrypted drive, as shown in the picture below:
manage-bde –protectors –disable X: -rebootCount 0
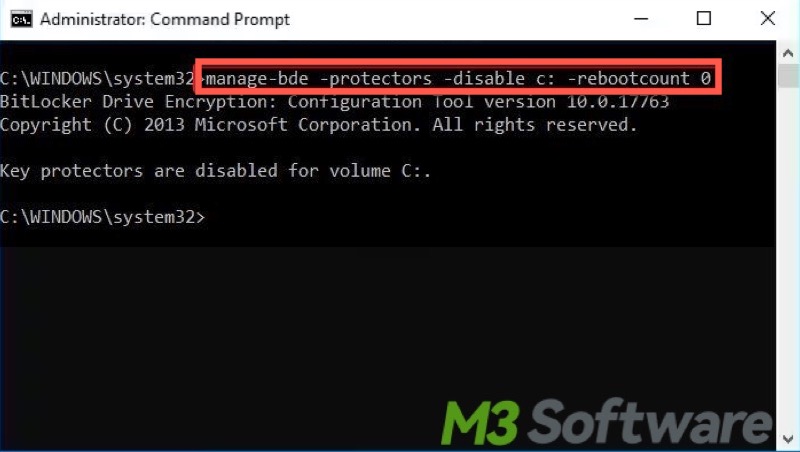
You can resume the BitLocker protection by running the command below:
manage-bde –protectors -enable X:
Suspend BitLocker PowerShell
Windows PowerShell helps you control and automate the administration of the Windows operating system and applications that run on Windows, you can suspend BitLocker after following the steps below:
- Right-click on the “Start” button at the left bottom and choose “Windows PowerShell (Admin).”
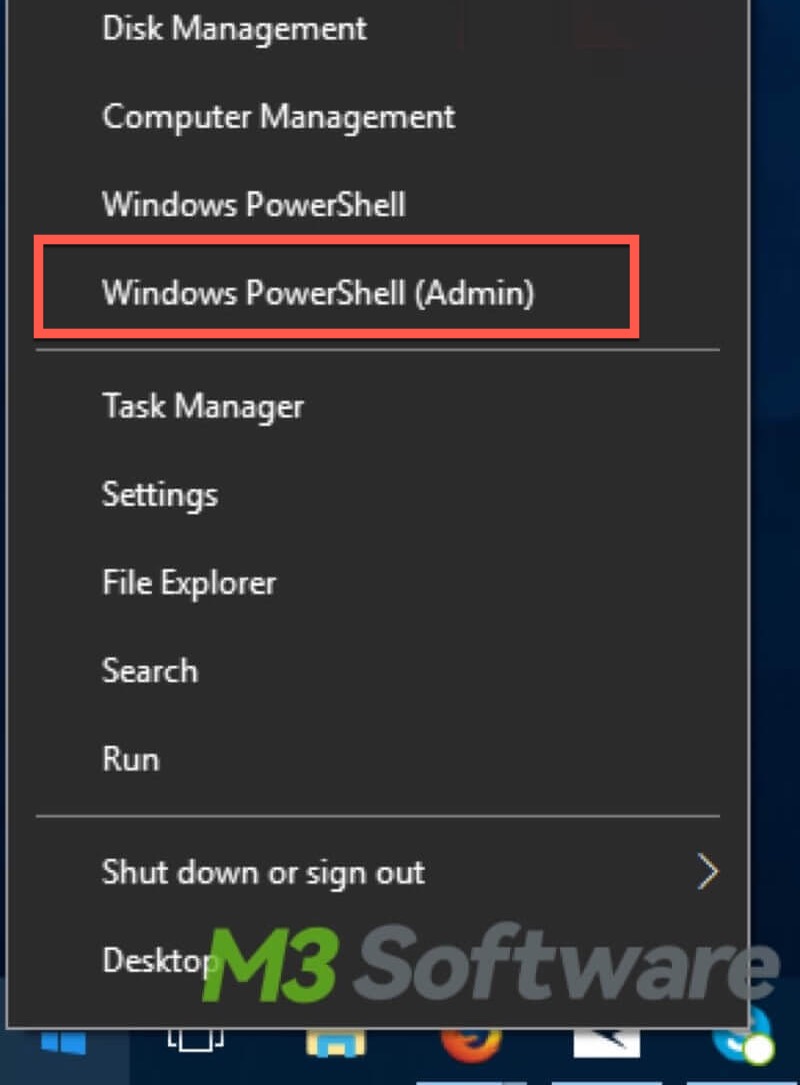
- Copy and paste the command below and hit the “Enter” key on your keyboard. Note: Replace the letter X in the command with the drive letter, as picture shown below:
Suspend-BitLocker -MountPoint “X:” -RebootCount 0

You can use the following command to resume protection:
Resume-BitLocker -MountPoint “C:”
Conclusion
Suspending the BitLocker makes it more convenient for you to make significant changes to the computer system, boot configuration, Windows updates, etc. It would be best to resume the protection after you make the changes to your PC, thus making the BitLocker encryption more reliable.
Is this post helpful? You can share it with your friends!