
Written by
Yuri ZhangSummary: This post grasps comprehensive approaches about how to clear cache on Windows 10 or 11. Meanwhile, iBoysoft DiskGeeker saves efforts by clearing junk files with space analysis and fast cleanup.
If you encounter accidental or incidental problems like a data error or an image error, recovering computer usage, by all means, is the top priority. At this time, a clean cache is efficient in solving problems.
Of course, you can choose to refresh or restart the computer, or another repair solution, now let's stick to the cache clearing because it's not time-consuming and easy to operate.
What is the point of clearing cache in Windows?
Common types of caches you might clear in Windows include temporary files, Windows update cache, and browser cache. Cached files can accumulate over time, taking up significant amounts of disk space. Clearing them can help free up this space when the system drive is getting full.
If you have made changes to your system, such as updates, software installations, or configuration changes, clearing the cache ensures that old, outdated files do not conflict with the new changes. Cached data can include personal information and browsing history. Clearing them can help protect your privacy.
Sometimes, cached files can become corrupted, leading to slower system performance. They can cause various system issues like application errors, crashes, or unusual system behavior. Clearing the cache can help resolve these issues. Cleaning registry entries after uninstalling software helps, too.
Share this to help others gain extended knowledge.
Using Disk Cleanup to clear cache in Windows 10 or 11
Disk Cleanup is a built-in utility in Windows 10 and Windows 11 that helps you free up space on your hard drive by deleting temporary files, system cache, and other unnecessary files. Here's how you can use Disk Cleanup to clear cache in both versions of Windows:
- Press the Windows key on your keyboard /the Windows icon in the bottom-left corner of your screen to open the Start menu.
- Type "Disk Cleanup" and press Enter.
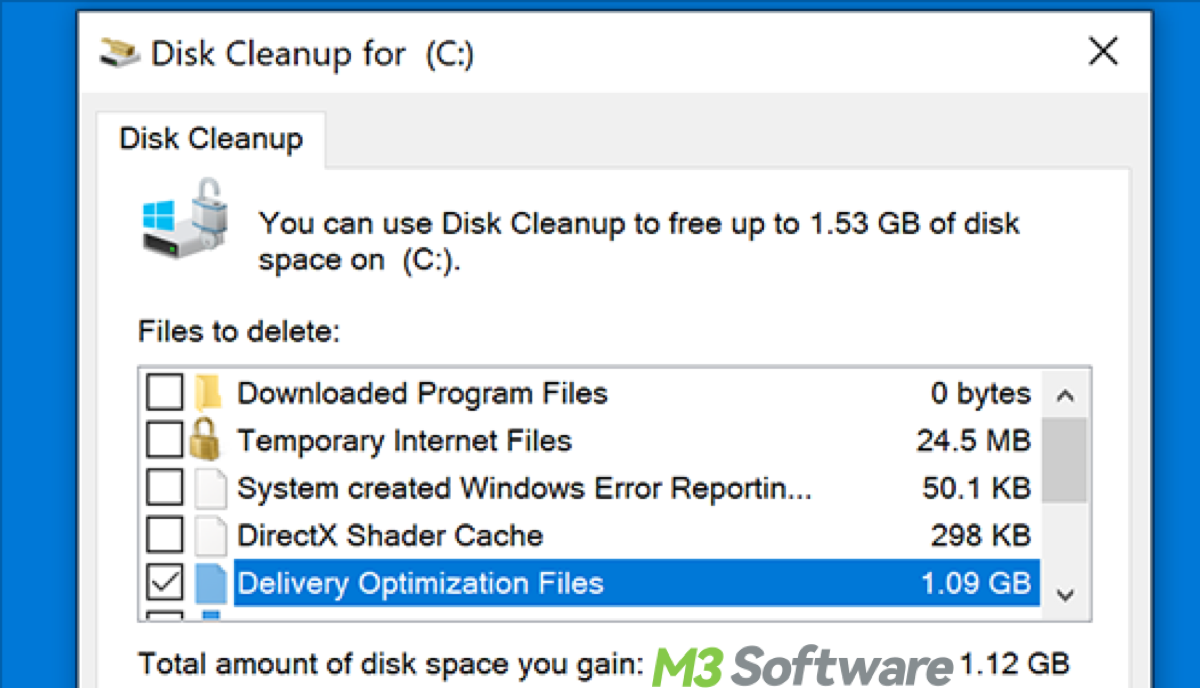
- Select the drive you want to clean up (usually the C: drive) and click OK.
- Disk Cleanup will calculate how much space you can free up. Once it's done, check the boxes next to the types of files you want to delete (e.g., Temporary files, Recycle Bin, etc.). You can also choose to delete the Thumbnail cache here.
- Click OK, and then click Delete Files to confirm.
Examples to clear browser cache
Some applications, especially web browsers and productivity software, store cache files locally. You can often clear this cache within the application settings or preferences menu. If you're experiencing issues with a specific browser, clearing its cache might help. Each browser has its own process for doing this.
How to clear cache on Windows Google Chrome:
- Open Google Chrome.
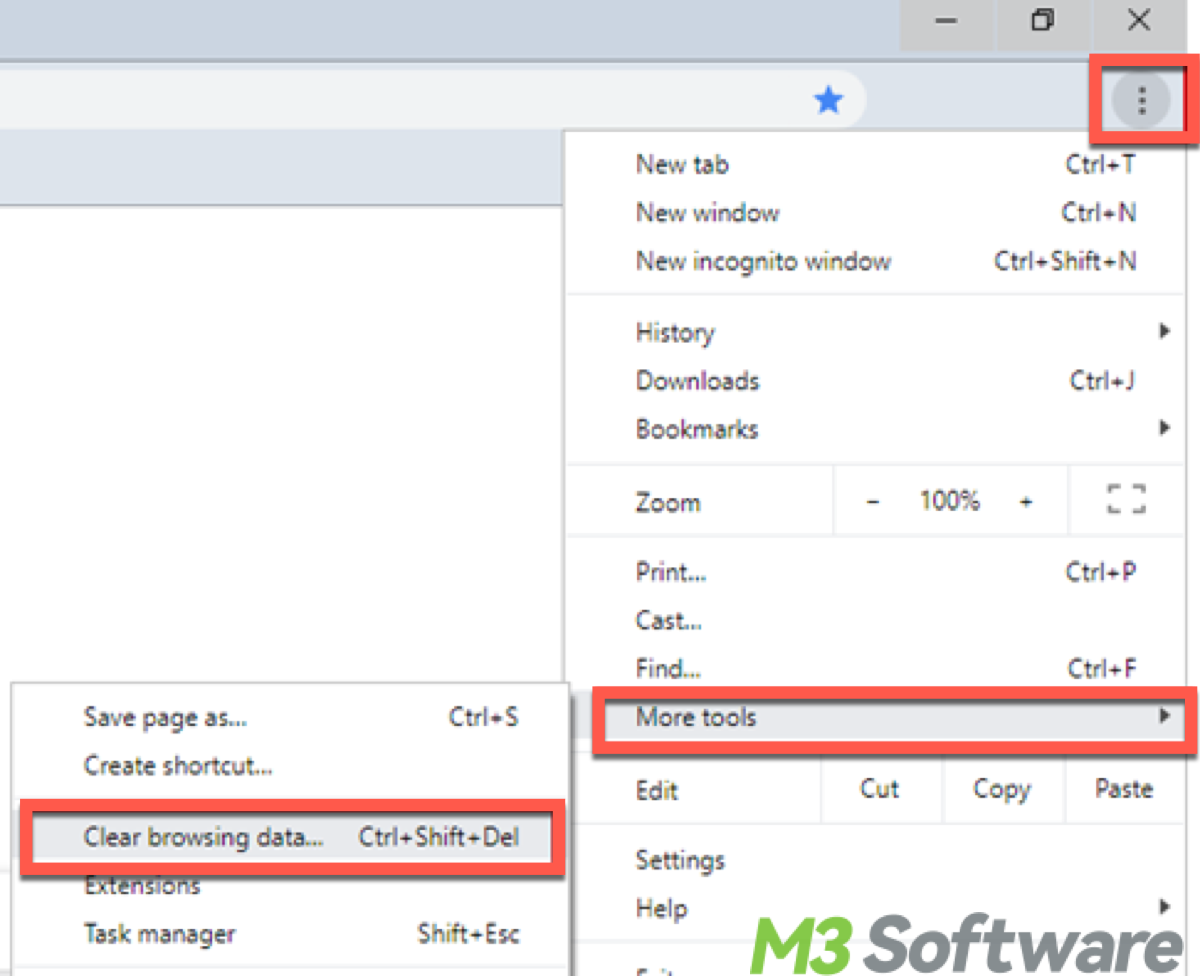
- Click the three-dot menu (top-right corner).
- Hover over "More tools" and select "Clear browsing data...". Alternatively, you can press Ctrl + Shift + Delete.
- In the dialog box, choose the time range. To clear everything, select "All time".
- Check the "Cached images and files" box. You can also select other types of data you want to clear.
- Click "Clear data".
How to clear cache on Windows Firefox:
- Open Firefox
- Click the three-line menu (top-right corner) and select "Settings". Alternatively, press Alt + T and select "Options".
- Go to the "Privacy & Security" panel.
- In the "Cookies and Site Data" section, click "Clear Data...".
- Check the "Cached Web Content" box.
- Click "Clear".
How to clear cache on Windows Microsoft Edge:
- Open Microsoft Edge.
- Click the three-dot menu (top-right corner).
- Select "Settings".
- Go to "Privacy, search, and services".
- Under "Clear browsing data", click "Choose what to clear". Alternatively, press Ctrl + Shift + Delete.
- Choose the time range. Select "All time" to clear everything.
- Check the "Cached images and files" box.
- Click "Clear now".
How to clear the Windows Store cache
Clearing the Windows Store cache can help resolve issues with downloading or updating apps.
Method 1: Using WSReset command
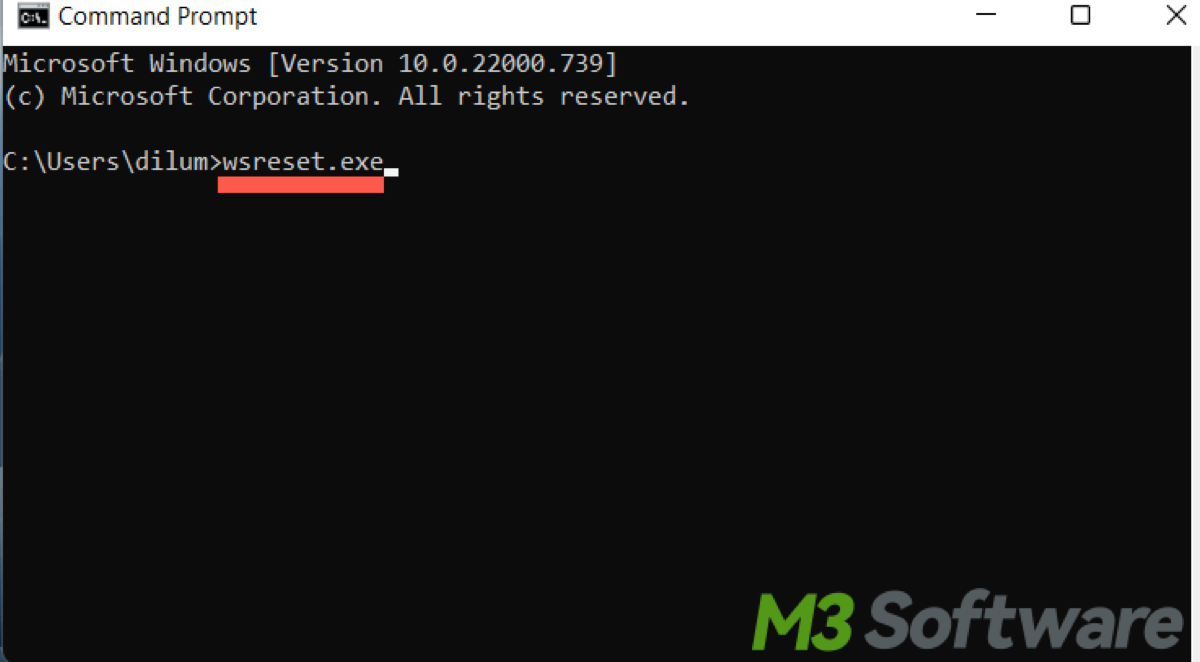
- Press Windows + R to open the Run dialog box.
- Type wsreset.exe and press Enter or click "OK".
- Wait for the Process to complete, a blank Command Prompt window will open, and after a few moments, it will close automatically. The Windows Store will then open. This indicates that the cache has been cleared.
Method 2: Manually deleting cache files in File Explorer
If the WSReset method doesn't work, you can manually delete the cache files.
- Open File Explorer.
- Click the "View" tab.
- Check the "Hidden items" box to show hidden files.
- Go to C:\Users\<YourUsername>\AppData\Local\Packages\Microsoft.WindowsStore_8wekyb3d8bbwe\LocalCache.
- Select all files and folders in the LocalCache directory and delete them.
Method 3: Using Windows Settings
- Press Windows + I to open the Settings app.
- Click on "Apps".
- Scroll down and find "Microsoft Store" in the list of installed apps.
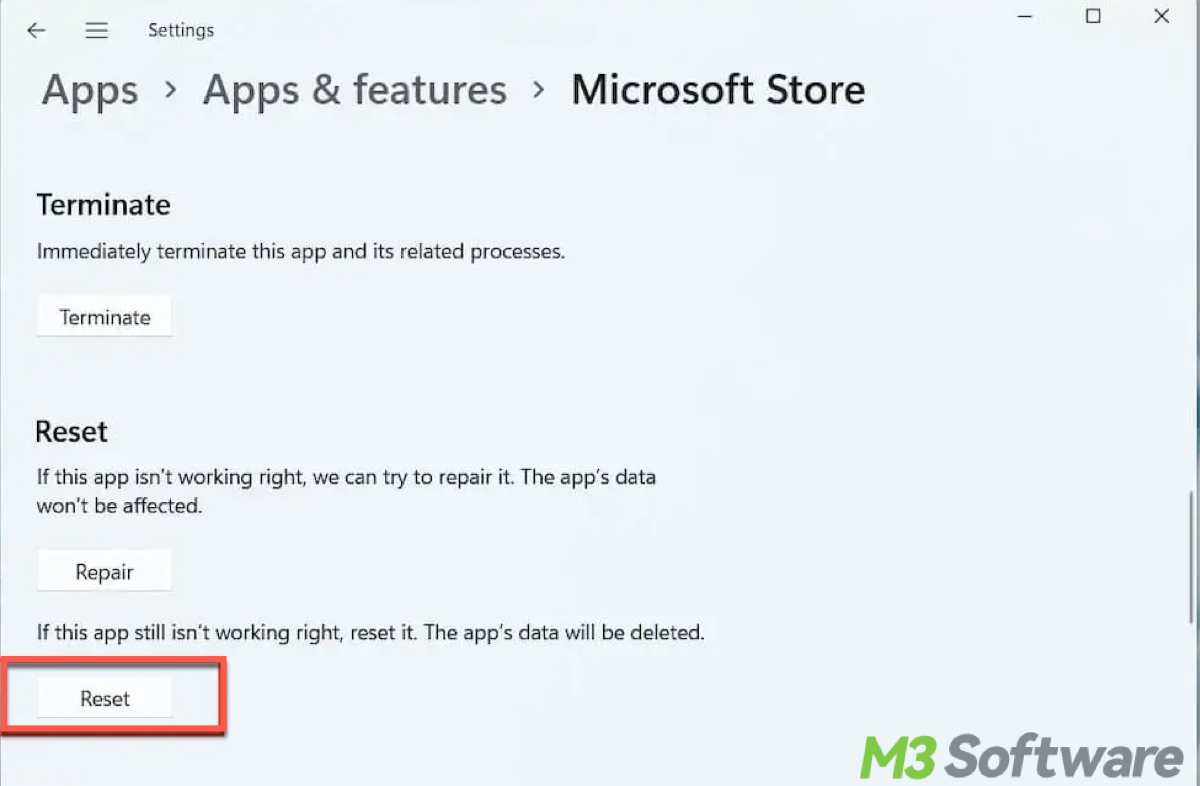
- Click on "Microsoft Store" and then click on "Advanced options".
- Scroll down and click the "Reset" button. Confirm the action. This will reset the Microsoft Store app and clear its cache.
Share this with those who are confronted with PC problems.
How to clear thumbnail cache
The thumbnail cache stores miniature previews of your images, videos, and documents to speed up the loading process in File Explorer. You may find the method is the same thing of a kind with slight differences in options, just explore more by yourself if you are tired of the guidance. To clear it:
Method 1: Using Run dialog
Press the Windows key + R to open the Run dialog. Then type "cleanmgr" and press Enter. Select the drive where your Windows installation is located (usually C:) and click OK. Check the box next to "Thumbnails" and any other types of files you want to delete, then click OK and confirm.
Method 2: Manually deleting cache files in File Explorer
Manually delete the thumbnail cache by opening File Explorer. Then click the "View" tab and check the "Hidden items" box to show hidden files.
Then go to C:\Users<YourUsername>\AppData\Local\Microsoft\Windows\Explorer. Select all files that start with thumbcache_ and delete them. (These files include thumbcache_16.db, thumbcache_32.db, thumbcache_96.db, thumbcache_256.db, thumbcache_1024.db, and thumbcache_idx.db.)
Note: Similarly, you can delete temporary files manually from the following directories:
C:\Windows\Temp
C:\Users<YourUsername>\AppData\Local\Temp
Method 3: Using Settings (Windows 11)
Press Windows + I to open the Settings app. Then go to "System" and then "Storage". And click on "Temporary files". Check the box for "Thumbnails". Lastly click "Remove files" to delete the thumbnail cache.
How to clear caches on Windows with cmd (Command Prompt)
Using Command Prompt for this task can be more efficient and quicker, especially for advanced users who are comfortable with command-line operations.
- Press Windows + X and select "Windows Terminal (Admin)" or "Command Prompt (Admin)". Alternatively, press Windows + S, type "cmd", right-click "Command Prompt" from the search results, and select "Run as administrator".
- Type the following command and press Enter.
- To clear temporary files, use following command and press Enter:del /q/f/s %TEMP%\*
- To clear DNS cache, use following command and press Enter:ipconfig /flushdns
- To clear Windows Store cache, use following command and press Enter:wsreset.exe
- To prefetch cache, use following command and press Enter:del /q/f/s %SystemRoot%\Prefetch\*
Note: DNS (Domain Name System) cache is a temporary storage of information about previous DNS lookups by a computer or network device
To clear Windows update cache with cmd
It is a little bit different to clear the Windows update cache with the step to stop the Windows update service first:
- Press Windows + X and select "Command Prompt (Admin)".
- Type the following command and press Enter to stop Windows update service:net stop wuauserv
- Type the following command and press Enter to delete the update cache:del /q/f/s %windir%\SoftwareDistribution\Download\*
- Type the following command and press Enter to start the Windows update service:net start wuauserv
To clear thumbnail cache with cmd:
- Press Windows + X and select "Command Prompt (Admin)".
- Type the following command and press Enter to stop File Explorer:taskkill /f /im explorer.exe
- Type the following command and press Enter to delete thumbnail cache:del /f /s /q /a %LocalAppData%\Microsoft\Windows\Explorer\thumbcache_*.db
- Type the following command and press Enter to restart File Explorer:start explorer.exe
Clearing Windows search cache with cmd
Windows Search maintains a cache of indexed files to speed up search results. You can clear this cache using Command Prompt:
- Press Windows key + X and select "Command Prompt (Admin)".
- Type the following command and press Enter. This command will stop the Windows Search service:net stop Windows Search
- Navigate to the directory containing the search cache files:cd %programdata%\Microsoft\Search\Data\Applications\Windows
- Delete all files and folders in the directory:rmdir /s /q .
- Restart the Windows Search service by typing:net start wsearch
How to clear the system file cache
Windows maintains a cache of system files to improve performance. You can clear this cache using the Command Prompt: Press the Windows key + X and select "Command Prompt (Admin)". And type "sfc /scannow" and press Enter to run the System File Checker. This tool will scan for and repair corrupted system files, effectively clearing the system file cache.
Please note that clearing the system file cache can be useful in certain scenarios but is not always necessary for regular use. If your system is running smoothly and you have sufficient disk space, you may not need to clear the cache frequently.
Tips: There are several third-party cleanup tools available for Windows that can help you clear cache and temporary files more efficiently. Some popular options include CCleaner, CleanMyPC, and Wise Disk Cleaner. These tools often provide more advanced features and can automate the cleanup process.
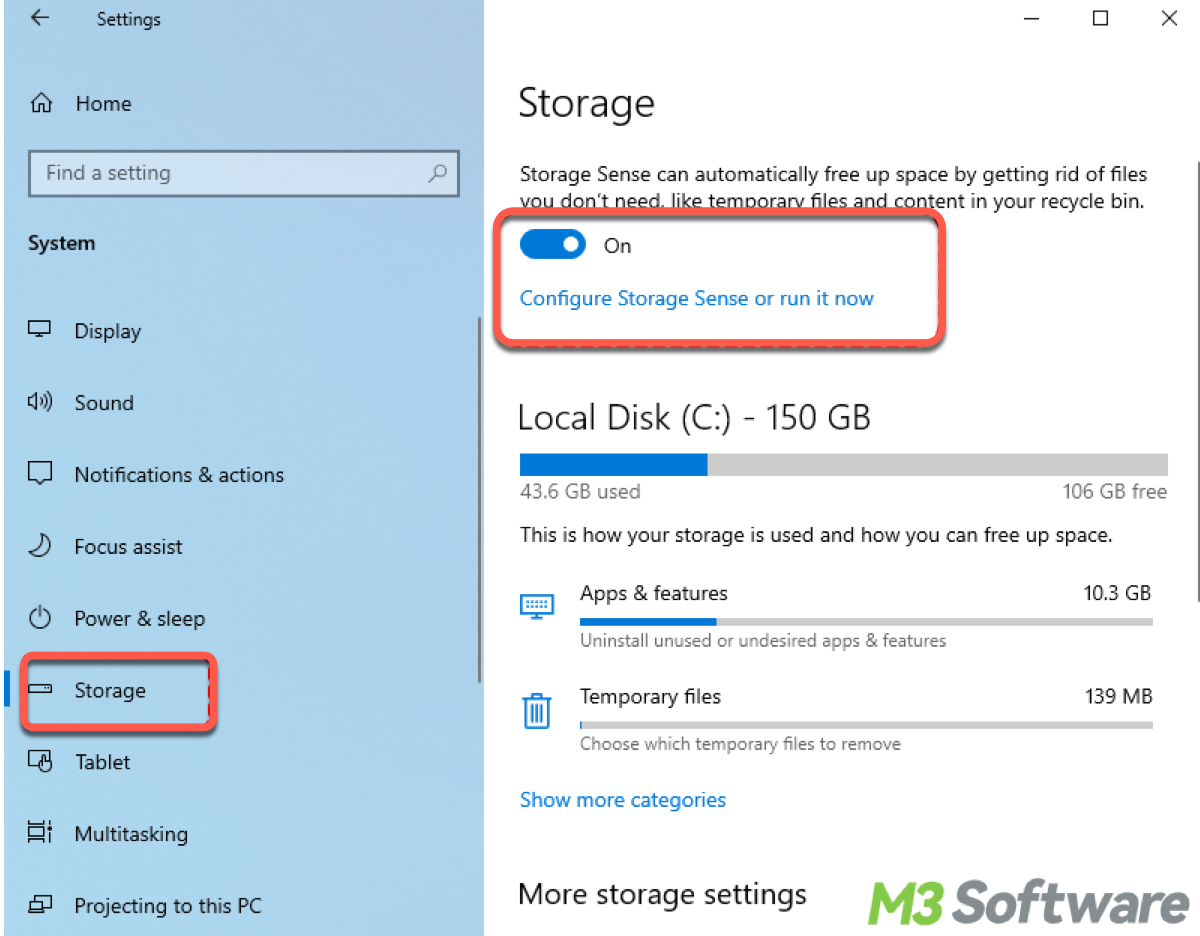
Using Storage Sense to clear cache
Windows 10 includes a feature called Storage Sense that automatically frees up disk space by deleting unnecessary files, including temporary files and items in the Recycle Bin.
Here you can choose how often Storage Sense runs and which types of files it deletes.
- Press Win + I to open the Settings app.
- Click on "System" and then "Storage" from the left sidebar.
- Toggle on "Storage Sense" to enable it.
- Click on Configure Storage Sense or run it now.
- Choose how often Storage Sense runs and select what types of temporary files to delete.
- Scroll down to the Free up space now section.
- Click on Clean now.
What is the difference between how to Clear Cache on Windows 10 and Windows 11?
Windows 11 introduces enhancements to Storage Sense, including a more streamlined interface and additional options for managing storage. Users can easily configure Storage Sense to automatically free up disk space by deleting temporary files, old versions of Windows, and other unnecessary files. These enhancements make it easier for users to maintain their system's storage health.
Windows 11 introduces improvements to Windows Update, including faster updates and a more seamless update experience. While the process for clearing the Windows Update cache might be similar between Windows 10 and Windows 11, any specific changes or enhancements introduced in Windows 11 would apply to this process.
Final thought
Still have a problem with stuck or error issues on certain pages in Windows, use iBoysoft DiskGeeker for Windows, this software can analyze your disk or drive space, and display the large or trivial space-occupied files for your convenient trash cache clearing. The download button is as follows:
It is inevitable to encounter various problems in loading, have you ever come across that the internet is slow and websites take forever to load? Time to take so long to load is always a cumbersome problem. Besides clearing cache, also read How to Fix Computer Running Slow on Windows 10 Effortlessly for further information.
Go ahead, share, and comment to enhance your know-how about PC cache clearing.