
Written by
Jessica SheeSummary: This article guides you through how to get around the BitLocker recovery screen on your Surface tablet. You will also learn how to find the BitLocker Recovery key, disable the BitLocker recovery screen on Surface, and reset Surface Pro without the Recovery Key.
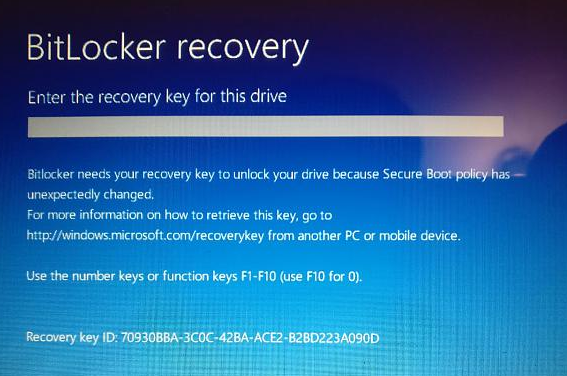
When you start up your Windows Surface tablet, it shows a blue screen asking you to enter the BitLocker Recovery key for this drive. Even after you enter the BitLocker Recovery key for the Surface's boot drive, you are locked out of the Surface tablet again the next time you boot it up.
This article will address this Surface stuck on BitLocker recovery screen issue and walk you through disabling BitLocker on your Surface tablet.
Why does Surface keep asking for the BitLocker recovery key?
Here are some common reasons why Microsoft Surface keeps asking BitLocker recovery key every time you boot up the device.
- Hardware Changes or Malfunctions: BitLocker is sensitive to changes in the computer's hardware. If you make significant hardware changes to your Surface device, such as replacing the motherboard or other key components, BitLocker may enter recovery mode to ensure the security of your data.
- BIOS/UEFI Updates: Upgrading the device's BIOS or UEFI firmware can sometimes trigger BitLocker recovery mode.
- Computer Security Settings Changes: For example, you have changed the drive boot order in BIOS settings, or you have disabled or cleared the TPM.
- 30-Day Account Restriction: When all the security info that you previously added to your account is removed and replaced with new info, your Microsoft account is put into a restricted state for 30 days. The pending changes may invoke BitLocker recovery mode to protect your data.
- Multiple Wrong Login Attempts: If you forget your login password or PIN and have several consecutive unsuccessful login attempts, you will be prompted to enter the recovery key to access your device as an authentication method.
- Security Incidents: In the event of a security breach, malware infection, or other problems that compromise the system's integrity., BitLocker may enter recovery mode to protect your data.
How to get around the BitLocker recovery screen on a Surface tablet
If you remember what you did before the appearance of the BitLocker recovery screen, revert that change to bypass the blue screen boot loop. If you don't remember, try the following steps to get past the BitLocker recovery screen on Surface Pro.
Step 1. Find the BitLocker recovery key on the Surface
There are 2 ways you can find the BitLocker recovery key for a Surface Pro tablet.
How to get a Surface BitLock recovery key with Key ID from a Microsoft Account:
When your Surface Pro 3 or later is first turned on and you choose to log in with a Microsoft account, BitLocker is enabled by default. The recovery key is generated and uploaded to the OneDrive of your Microsoft account. The recovery key won't be deleted without an explicit user command. So you can use an Internet-enabled device and log into your Microsoft account to find the BitLocker recovery key.
1. On your computer or mobile phone, open a web browser and type in this webpage URL: https://account.microsoft.com/devices/recoverykey.
2. Log into Microsoft with your Microsoft account used when the Surface was set up.
3. If you have more than one BitLocker-encrypted drive, you have to identify the Surface boot drive using the Key ID shown in the BitLocker Recovery screen and find the required BitLocker recovery key.

4. Type in the correct BitLocker recovery key and press Enter to unlock the BitLocker recovery.
How to find the Surface BitLocker recovery key using CMD:
If you can still log into your Surface Pro tablet as administrator, you can find and recover the BitLocker recovery key by using Command Prompt.
1. Search for CMD in the Start menu search box and open the Command Prompt as an administrator.
2. At the Command Prompt window, type the command and press Enter.
manage-bde -protectors C: -get
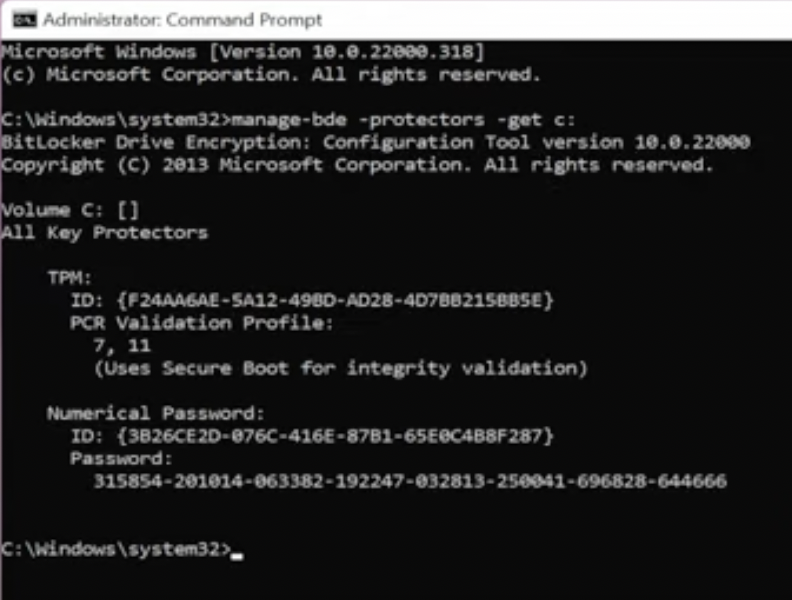
Note: C: is the startup volume. If you have multiple BitLocker-encrypted volumes on your startup drive and you don't know which volume is the startup volume, use "manage-bde -status" command to show the BitLocker recovery status and identify the volume letter.
You'll see the output screen. The 48-digit password is the BitLocker recovery key that is used to unlock your Surface when seeing the Surface BitLocker recovery screen.
Step 2. Disable Surface BitLocker recovery screen boot loop
You can use one of the following solutions to break out of the BitLocker recovery loop on Surface.
Solution 1. Turn off BitLocker on the boot drive
If you can get into your Surface tablet after entering the BitLocker recovery key, you can turn off the BitLocker encryption on the boot drive. In this way, BitLocker will not enter the recovery mode asking for the BitLocker recovery key.
1. Go to Start > Control Panel > BitLocker Drive Encryption.
2. Click on Turn off BitLocker to disable BitLocker drive encryption on the Surface boot drive.
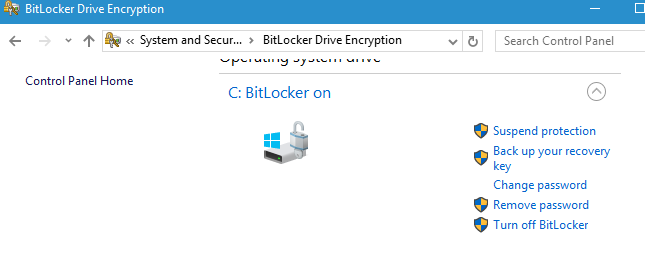
3. A dialog box window will open and click Turn off BitLocker to confirm.
4. Restart your Surface and check if the BitLocker recovery screen or loop persists.
Solution 2. Disable BitLocker protection from the boot drive
If you've entered the correct BitLocker recovery key multiple times, and are still unable to get past the BitLocker recovery screen, follow these steps.
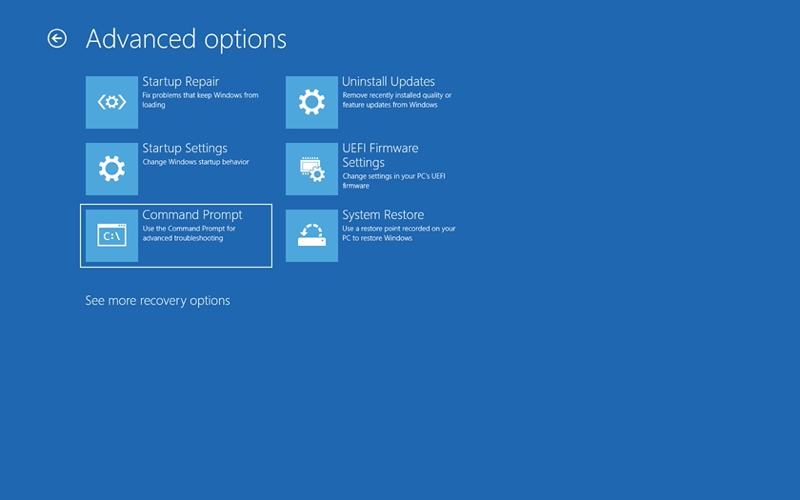
1. On the BitLocker recovery screen, press the Esc key from the keyboard for more recovery options on the Surface.
2. Click Skip this drive at the right lower corner.
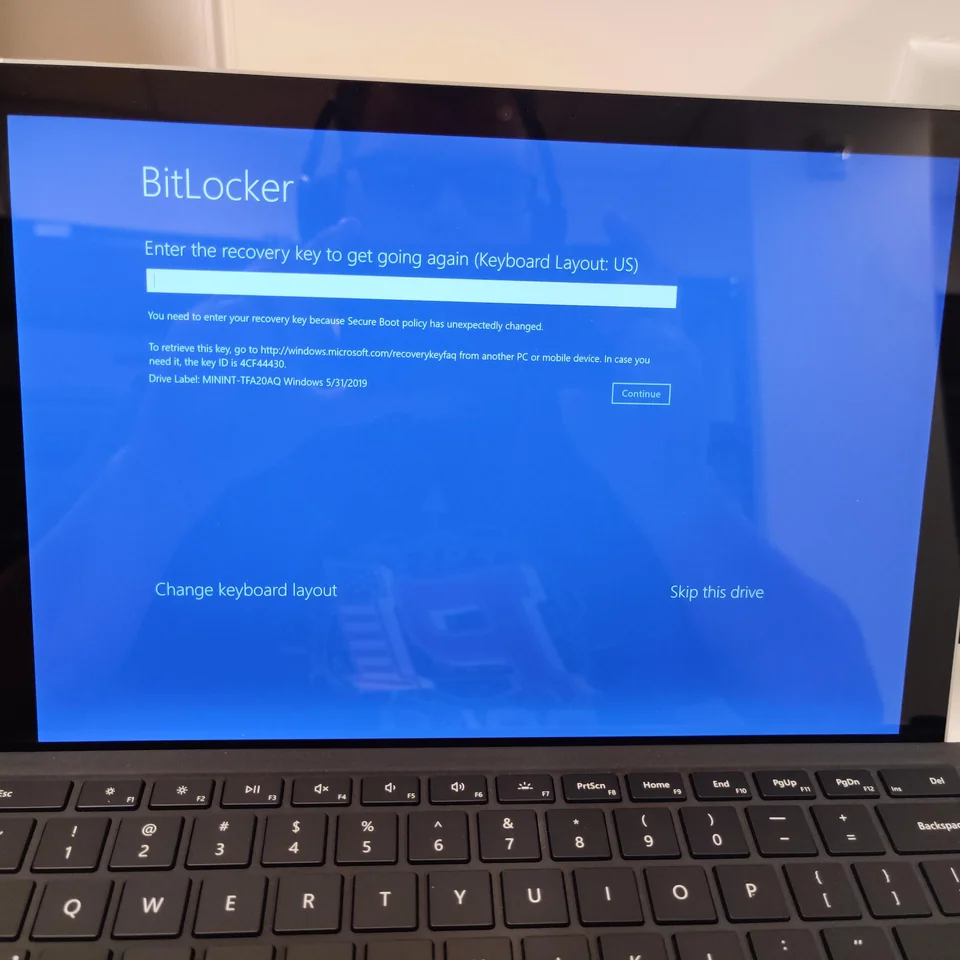
3. Select Troubleshoot > Advanced Options > Command Prompt.
4. Type the command and press Enter. This command will unlock your BitLocker drive.
manage-bde -unlock C: -rp 111111-222222-333333-444444-555555-666666-777777-888888
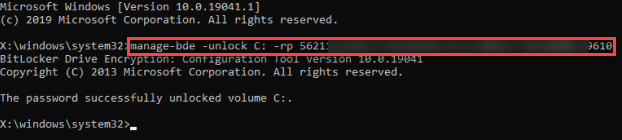
Note: C: is the BitLocker-encrypted boot partition. 111111-222222-333333-444444-555555-666666-777777-888888 is your 48-digit recovery key, typed in eight blocks of six digits with a hyphen separating each block.
5. Type the command and hit Enter. This command will disable BitLocker protectors permanently from the target drive.
manage-bde -protectors -disable C:
6. Exit the Command Prompt and restart the Surface to see if it can start normally without the BitLocker recovery blue screen.
Bypass the BitLocker recovery screen without the recovery key
If the recovery key is unavailable and your Surface device gets stuck on the BitLocker recovery screen, it is impossible to unlock BitLocker. In this case, you have to reset the Surface device by formatting the encrypted drive and reinstalling a fresh copy of Windows. It is important to note that resetting the Surface will wipe out everything on the device.
Use this most complete process of resetting Surface without the BitLocker recovery key.
How to reset Surface Pro without the BitLocker recovery key
Step 1. On a working computer, visit this webpage, select the device that you need a recovery image for, and download the recovery image for your Surface. Save the file in a location you will be able to find it.
Step 2. Prepare an empty USB flash drive with 32 GB capacity and format it with the FAT32 file system.
Step 3. Right-click on the recovery image that you downloaded and then select Extract and then Extract all. Select the USB drive you formatted earlier for the location and click Extract.
Step 4. Use the USB recovery drive to reset your Surface:
- Shut down your Surface showing the BitLocker recovery mode.
- Insert the USB recovery drive into the USB port.
- Press and hold the volume-down button while you press and release the power button.
- When the Microsoft or Surface logo appears, release the volume-down button.
- When prompted, select the language and keyboard layout you want.
- Select Recover from a drive or Troubleshoot > Recover from a drive. If prompted for a recovery key, select Skip this drive at the bottom of the screen.
- Choose either Just remove my files or Fully clean the drive.
- Select Recover and wait until the reset process completes.
Bonus: iBoysoft Data Recovery for Windows Surface/PC
iBoysoft Data Recovery WinPE bootable media is one of the few solutions that allows you to create a BitLocker recovery boot disk and recover data from a BitLocker-encrypted boot drive when you can't enter the Windows operating system. Then the boot disk lets you boot your Surface or PC and launch iBoysoft Data Recovery. You can use the BitLocker Recovery module to scan the boot drive and retrieve recoverable files.
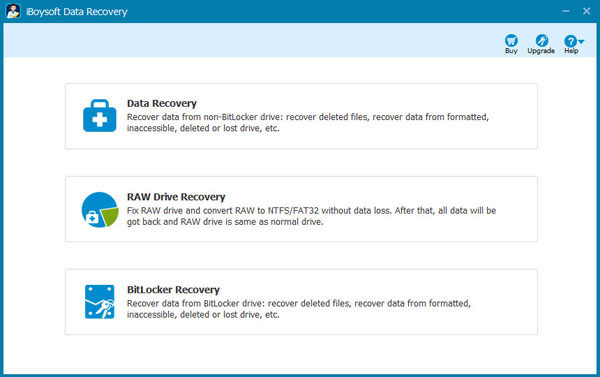
Besides, iBoysoft Data Recovery requires 48-digit recovery key to decrypt data from BitLocker encrypted boot drive.
Conclusion
There are different reasons why your Surface Pro is showing a BitLocker recovery screen each time it boots. This article offers steps and tips on how to bypass the BitLocker Recovery screen, whether you have your Surface Pro BitLocker recovery key or not.
If you've experienced data loss on your Surface tablet's BitLocker-encrypted drive, you can use iBoysoft BitLocker Recovery to recover your important files.
A
To obtain the BitLocker recovery key from a refurbished Microsoft Surface device, you may need to contact the previous owner who has the BitLocker recovery key saved. If you are unable to retrieve the recovery key, reset this refurbished Surface to completely remove BitLocker encryption.
A
You can unlock a BitLocker drive with the correct encryption password or the generated recovery key. If you don't have either of them, it is impossible to unlock a BitLocker drive. Microsoft will not create, provide, or retrieve a lost recovery key for you.
A
Microsoft offers three different methods to store and recover the BitLocker recovery key - save to your Microsoft account, save to a file, and print the recovery key. So if you have the external USB drive containing the BitLocker recovery key or the printed paper, you can recover your BitLocker recovery key without a Microsoft account.