
Written by
Yuri ZhangSummary: This post elaborates on what is Driver Verifier in Windows and how to use it exactly. m3datarecovery reveals more for your information.
Driver Verifier is an essential tool for maintaining system stability, especially when dealing with driver-related issues.
What is Driver Verifier?
Driver Verifier is a built-in utility in Windows that monitors the behavior of drivers and detects illegal function calls or actions that could lead to system instability. It subjects the drivers to various stress tests and simulation scenarios, ensuring that they adhere to best practices and function correctly under different conditions.
When Driver Verifier detects a problem, it triggers a system crash (commonly known as a Blue Screen of Death, or BSOD) with detailed information about the offending driver, allowing developers to pinpoint and fix the issue.
Importance of Driver Verifier
Drivers are essential components that facilitate communication between the operating system and hardware devices. Given their critical role, any flaw in a driver can lead to severe consequences, including system crashes, data loss, and security vulnerabilities.
By identifying and correcting faulty drivers, Driver Verifier helps ensure that systems run smoothly without unexpected crashes. Drivers with bugs or vulnerabilities can be exploited by malicious entities. Verifying drivers helps mitigate such risks by ensuring that drivers adhere to security standards.
For driver developers, Verifier provides a robust testing mechanism to catch and resolve issues during the development phase, leading to more reliable driver releases. For IT professionals and advanced users, Driver Verifier is an invaluable tool for diagnosing and resolving system stability issues caused by drivers.
How does Driver Verifier work?
Driver Verifier operates by performing a series of tests and checks on selected drivers, which is the simulation of stress conditions, code Integrity checks, memory leak detection, input/output operations, maintaining data integrity and preventing corruption.
How to use Driver Verifier
Enabling Driver Verifier is straightforward but should be done with caution due to its intensive nature. It can be enabled via the verifier command in the command prompt, followed by selecting the drivers to be tested. After a system reboot, Verifier starts monitoring the selected drivers. Users should be prepared for potential system crashes and have a plan to recover, such as booting into Safe Mode to disable Verifier if necessary.
Here's a step-by-step guide on how to enable and use Driver Verifier:
- Press Win + X and select Command Prompt (Admin) or Windows PowerShell (Admin).
- Type verifier and press Enter. This opens the Driver Verifier Manager.
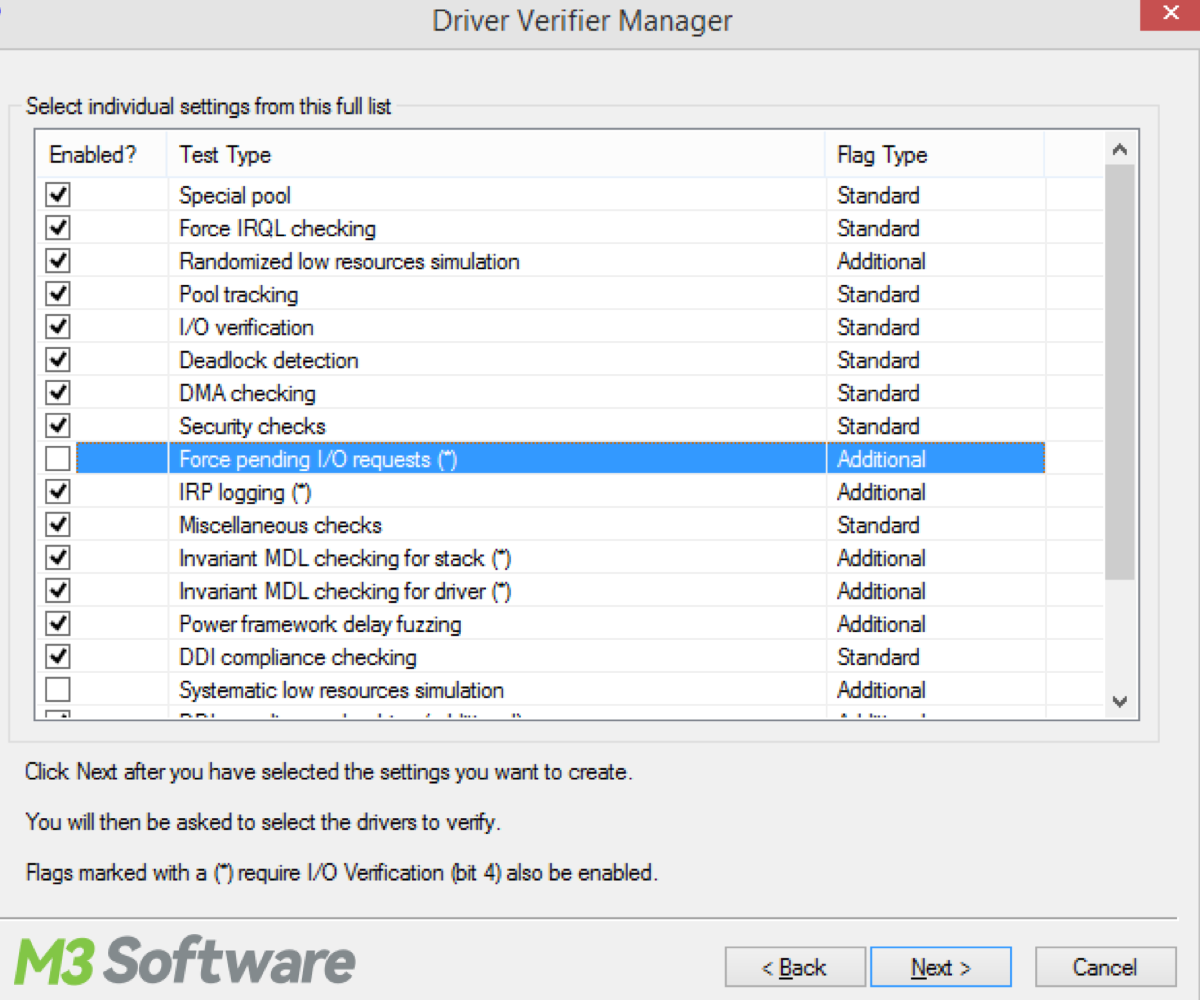
- In the Driver Verifier Manager, choose Create custom settings (for code developers) and click Next.
- Select all standard settings and click Next.
- Choose Select driver names from a list and click Next.
- Select the drivers you want to test. It's often best to start with third-party drivers, as they are more likely to have issues than Microsoft's built-in drivers.
- Click Finish and then restart your computer to begin monitoring the selected drivers.
Interpreting results and debugging
When the Driver Verifier detects an issue, it will likely cause a BSOD with a specific stop code related to the error detected. Here's how to interpret and debug the results:
BSOD stop code: The stop code will give you an idea of what kind of problem occurred (e.g., DRIVER_VERIFIER_DETECTED_VIOLATION).
Memory dump: The system creates a memory dump file (.dmp), which can be analyzed using tools like WinDbg (Windows Debugger) to pinpoint the exact cause of the crash.
Debugging tools: Use debugging tools to open the memory dump file and analyze the stack trace to find the problematic driver and the exact code causing the issue.
Disabling Driver Verifier
If Driver Verifier causes persistent crashes, you can disable it by booting into Safe Mode and using the following command:
- Open Command Prompt as Administrator.
- Type verifier /reset and press Enter.
- Restart your computer.
By following these steps, developers and advanced users can effectively use Driver Verifier to identify and resolve driver issues, leading to a more stable and reliable Windows system.
Spread this to remember technical knowledge.
How to fix Driver Verifier DMA Violation
A "DMA Violation" error, often referred to in the context of Driver Verifier as a "DMA Access Violation," occurs when the Direct Memory Access (DMA) functionality encounters an issue in Windows. DMA allows hardware devices to transfer data directly to and from memory without involving the CPU, which improves performance but also introduces the potential for errors if not managed properly.
Understanding DMA and DMA Violation errors
DMA (Direct Memory Access) is a feature that allows devices like graphics cards, network cards, and storage controllers to transfer data directly to and from system memory, bypassing the CPU to improve system performance.
A DMA Violation occurs when a driver attempts to access memory in an improper or unauthorized manner during DMA operations. This can lead to system instability, crashes (such as BSODs), and potentially data corruption.
When you enable Driver Verifier with specific tests like DMA Checking, it monitors DMA operations for potential violations.
If the Driver Verifier detects a DMA Access Violation, it typically triggers a Blue Screen of Death (BSOD) with an error message indicating the violation (e.g., DMA_VIOLATION).
Troubleshooting DMA Violation errors
Method 1: Update drivers and ensure all drivers, especially those related to hardware components like graphics cards, network adapters, and storage controllers, are up to date.
Method 2: Run hardware diagnostics to check for any issues with DMA controllers or other hardware components.
Method 3: Enable Driver Verifier with DMA checking enabled to monitor DMA operations and identify the specific driver causing the violation.
Method 4: Check for Windows Updates to ensure your operating system is fully updated, as Windows updates often include fixes and patches for driver and system stability.
Method 5: Perform memory tests to rule out any issues with system RAM that could potentially lead to DMA violations.
Steps to enable Driver Verifier for DMA checking
- Press Win + R, type verifier, and press Enter to open the Driver Verifier Manager.
- Choose Create custom settings (for code developers).
- Enable DMA Verification under Special Pool and other relevant checks.
- Choose the drivers you want to verify (preferably start with non-Microsoft drivers).
- Apply the settings and restart your computer to start monitoring DMA operations.
DMA Violation errors can be complex and challenging to diagnose, often requiring thorough testing and analysis of drivers and hardware components. By following systematic troubleshooting steps and leveraging tools like Driver Verifier, you can effectively resolve DMA Violation errors and restore system stability.
Share this to befriend others on social media.