How to fix "Drive not accessible, data error (cyclic redundancy check)" and recover lost data?
About data error (cyclic redundancy check)
Drive is not accessible, data error (cyclic redundancy check) is basically an error checking technique which is used for data verification. It detects accidental changes in the data. It is used by computers to specifically check the data stored in the hard drive.
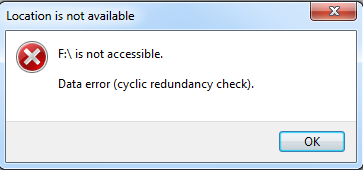
Drive is not accessible, data error (cyclic redundancy check) was thrown by the hard drive, the cause is likely data being incorrectly written to the hard drive. This can be caused by either the operating system being corrupt, or a power loss.
Drive is not accessible, data error (cyclic redundancy check) indicates that the operating system has found a drive with bad sectors, this is usually caused by hardware issue.
As far as we know, there is no program which can repair the hardware issue, so there is no way to fix "Drive not accessible, data error (cyclic redundancy check)" issue. However, data recovery is still possible, but data recovery still depends upon whether the damage to the hardware is serious or not.
To protect data security, we need to recover lost data from the drive which prompts "data error (cyclic redundancy check)" firstly, then check drive errors and see whether it can fix data error (cyclic redundancy check) or not.
1. Recover lost data from the drive which reported "data error (cyclic redundancy check)"
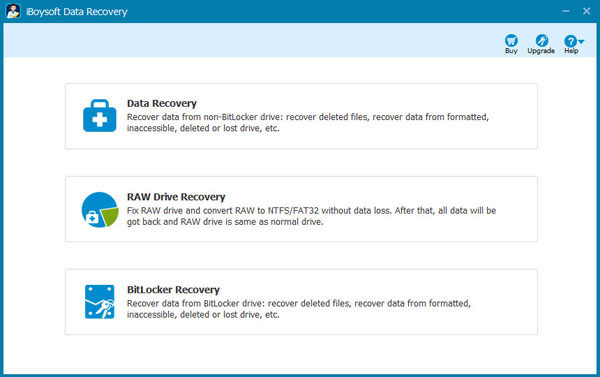
Solution 1: If your hard drive is logically corrupted rather than physically damaged, please download iBoysoft Data Recovery to recover lost data from the inaccessible drive which prompts "data error (cyclic redundancy check)".
iBoysoft Data Recovery is a professional data recovery software which can easily recover lost data from inaccessible drive which prompts "Drive is not accessible. Data error (cyclic redundancy check)" under Windows 10/8/7/Vista/XP and Windows Server 2016/2012/2008/2003.
Tutorial to recover lost data from inaccessible drive with data error (cyclic redundancy check):
Step 1: Download and install iBoysoft Data Recovery. After launching it, select Data Recovery module.
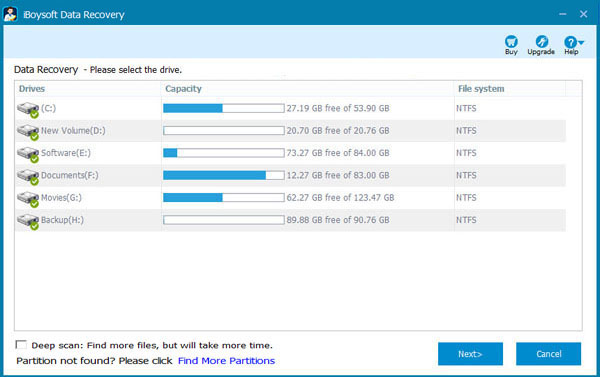
Step 2: Select the inaccessible drive which reports data error (cyclic redundancy check) and click Next to continue.
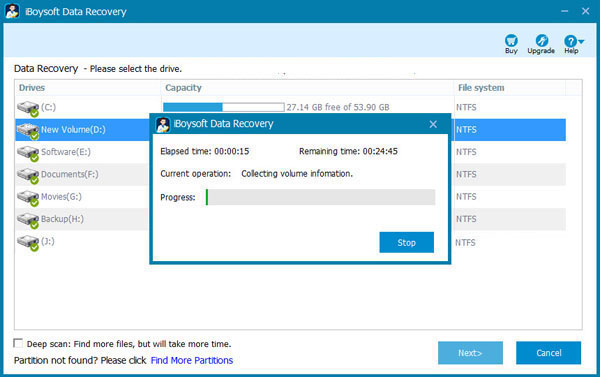
Step 3: iBoysoft Data Recovery is building virtual file system and finding lost data.
Step 4: Check the files in the inaccessible drive.
Solution 2: If your hard drive is physically damaged, please send it to a local data recovery service provider for data recovery.
2. Check drive errors and fix data error (cyclic redundancy check)
After data recovery, you may check the drive for any errors and bad sectors, and check if that fixes the data error (cyclic redundancy check).
Step 1: Right-click the drive that you want to check, and then click Properties.
Step 2: Click the Tools tab, and then, under Error-checking, click Check now. If you're prompted for an administrator password or confirmation, type the password or provide confirmation.
To automatically repair problems with files and folders that the scan detects, select Automatically fix file system errors. Otherwise, the disk check will report problems but not fix them.
To perform a thorough check, select Scan for and attempt recovery of bad sectors. This scan attempts to find and repair physical errors on the drive itself, and it can take much longer to complete.
To check for both file errors and physical errors, select both Automatically fix file system errors and Scan for and attempt recovery of bad sectors.
Step 3: Click Start.
Depending on the size of your drive, this might take several minutes. For best results, don't use your computer for any other tasks while it is checking for errors.
Note: If there are any bad sectors found during check disk, there could be data doss, so it is very important to recover lost data before checking drive errors.
Related articles: