Written by
Yuri ZhangSleep Mode in Windows 10 is a power-saving state that allows your computer to quickly resume full-power operation when you want to start working again. When your computer is in Sleep Mode, it saves your open documents and programs to memory (RAM) in a low-power state.
Sleep Mode is useful for temporarily pausing your work without shutting down your computer completely. After switching on the Sleep Mode and dabbling into the benefits of turning off Sleep Mode, let's delve into the specific guide on how to turn off Sleep Mode.
Why choose to turn off Sleep Mode
Disabling Sleep Mode ensures that your computer remains operational without interruption. This is useful for tasks that require continuous processing, such as downloading or rendering large files, running server applications, or performing system maintenance tasks that may be disrupted by sleep mode activation.
Sleep Mode can interfere with remote access to your computer. By keeping Sleep Mode off, you can maintain uninterrupted access to your system from remote locations, enabling tasks like remote desktop connections or accessing files over a network.
Sleep Mode can sometimes cause interruptions in ongoing tasks or processes, especially if it triggers unexpectedly. Turning it off ensures that your computer stays active and responsive at all times, preventing disruptions to your workflow or activities.
Although Sleep Mode is designed to save your work session to memory, unexpected power loss or system errors can still lead to data loss or corruption. Disabling Sleep Mode reduces the risk of losing unsaved data by keeping your system fully powered and operational.
Spread this knowledge to be informative.
How to turn off Sleep Mode with Control Panel
The Control Panel in Windows 10 serves as a centralized hub for adjusting system settings, managing devices, and customizing various aspects of the operating system.
- Click on the Start button in the bottom left corner of your screen, type "Control Panel" in the search bar, and press Enter. Alternatively, you can right-click on the Start button and select Control Panel from the menu.
- In the Control Panel window, click on "System and Security," then click on "Power Options."
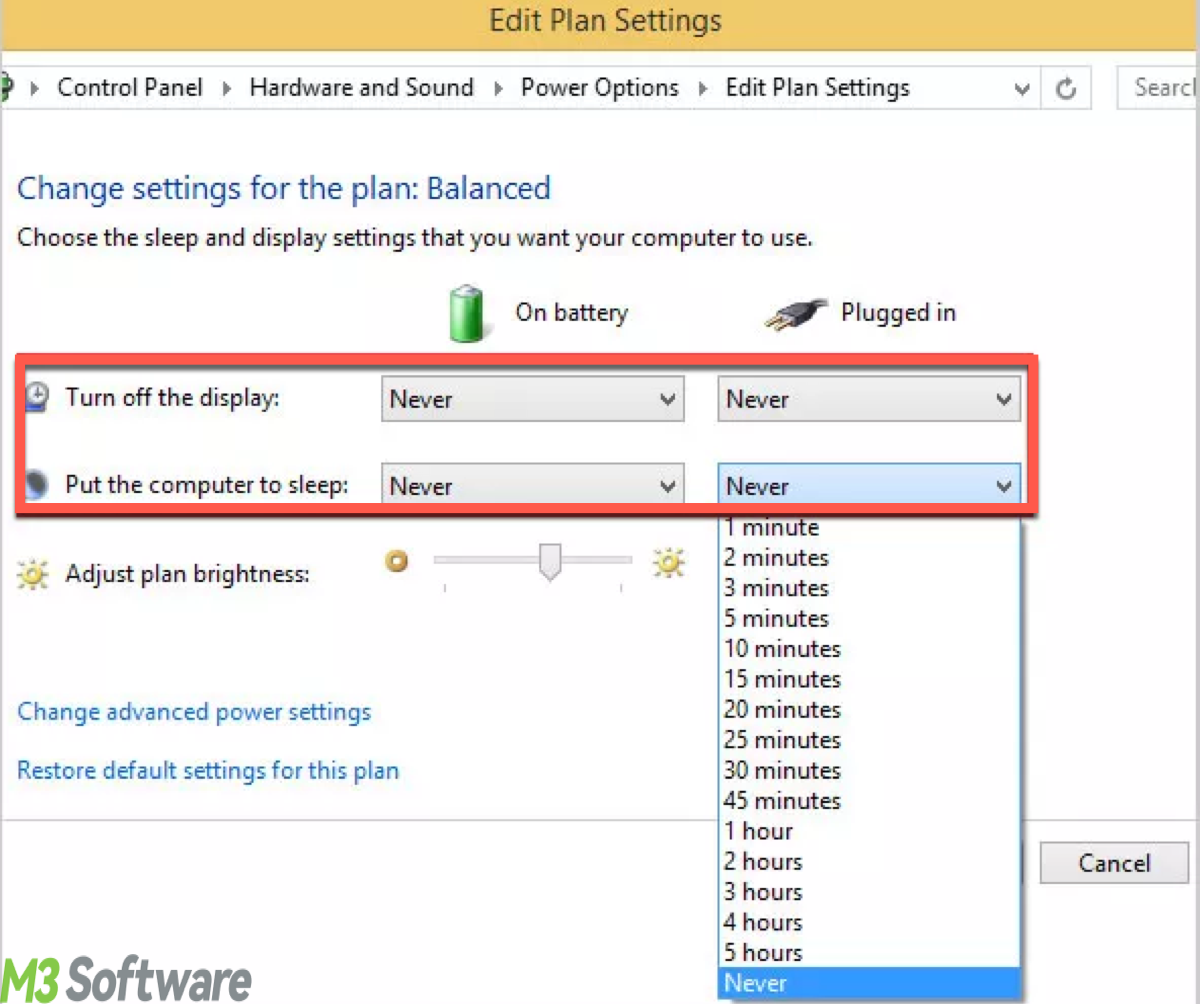
- In the Power Options window, you'll see a list of power plans. The one currently in use will have a radio button next to it. Click on "Change plan settings" next to the plan you're currently using.
- On the next screen, you'll see options for when to turn off the display and when to put the computer to sleep. These settings will vary based on your power plan. Click on "Change advanced power settings."
- In the Advanced settings window, scroll down until you find the "Sleep" option. Here, you can adjust the settings for when your computer goes to sleep. Expand the options under "Sleep" and set "Sleep after" to "Never" for both "On battery" and "Plugged in."
- After adjusting the sleep settings, click on the "Apply" button and then click "OK" to save the changes.

How to disable Sleep Mode with Settings App
The Settings app in Windows 10 also is a centralized hub for configuring system preferences, managing devices, and personalizing user experiences.
- Click on the Start button in the bottom left corner of your screen, then click on the gear icon above the Start button to open Settings.
- In the Settings window, click on "System."
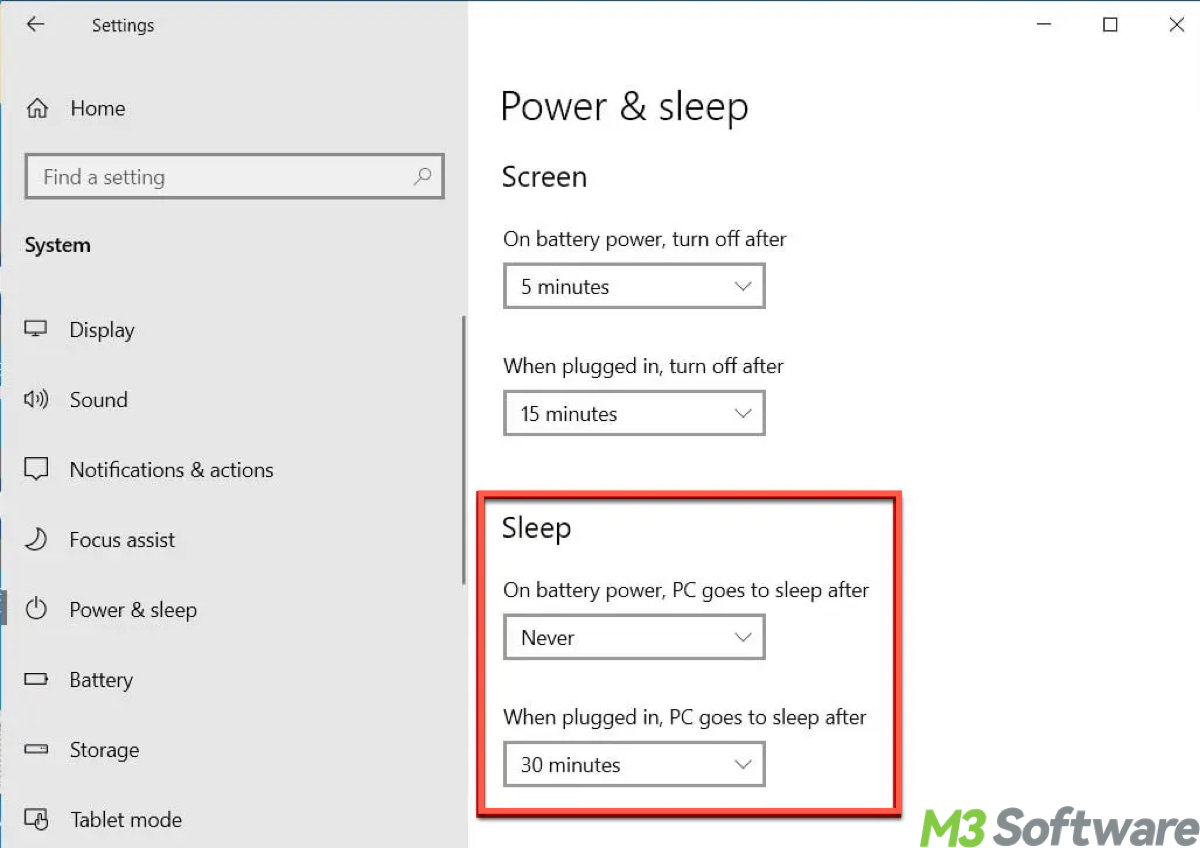
- In the System settings, click on "Power & sleep" on the left sidebar.
- Under the "Sleep" section, you'll see options for when your computer should go to sleep. Set both "On battery power, turn off after" and "When plugged in, turn off after" to "Never."
- Once you've made the changes, you can close the Settings window.
By following either of these methods, you can successfully turn off Sleep Mode in Windows 10. Remember that keeping your computer awake all the time can consume more power, so it's a good idea to only disable Sleep Mode if you have a specific reason to do so.

Tips: If you want to open Sleep Mode again, in both methods, instead of setting the sleep time to "Never," you'll set it to your desired duration. This will determine how long your computer stays inactive before entering Sleep Mode again. After making the changes, your computer will be in Sleep Mode according to the new settings.
Share this tutorial to be helpful.
Reminder to disable Sleep Mode
Disabling Sleep Mode means your computer will consume more power, leading to higher energy bills and increased impact. It is suggested to strike a balance between low-power states and full-power states.
Keeping your computer running constantly such as playing high-deficiency games or other consumptive software can lead to increased wear and tear on hardware components such as the CPU, hard drive, and cooling system. This may reduce the lifespan of your hardware and increase the likelihood of hardware failures over time. Sleep Mode can help save power and quick wake-up. All in all, just turn on or turn off the Sleep Mode in different scenarios tailored to your needs.
Share this easy guidance and leave your comment.
