Which is the best BitLocker alternative for Mac
BitLocker is a drive encryption feature that's highly integrated with the Windows operating system. It helps protect files from unauthorized access, some malware attacks, illegal exposure, etc.
However, BitLocker is only available for the Windows environment while not compatible with macOS and Mac OS X. If you are looking for a BitLocker alternative to help you encrypt files on Mac, this post will recommend you with the best BitLocker alternatives for Mac.
Maybe, you already have a BitLocker-encrypted drive and want to use it on your Mac. Thus, the BitLocker for Mac software: M3 BitLocker Loader for Mac is necessary for you. This software will help you unlock, read, write BitLocker-encrypted drives on your Mac.
FileVault 2 - Disk encryption
Like Microsoft's BitLocker Drive Encryption for their Windows OS, Apple has also developed their native drive encryption feature - FileVault 2 (FileVault full-disk encryption). This best BitLocker alternative for macOS utility can prevent unauthorized access from your disk with an encryption key.
FileVault 2 enables almost all data, including the temporary files, on a drive to be fully encrypted. But there are also some differences between FileVault 2 and BitLocker, like the algorithms for data encryption.
How to use FileVault 2 to encrypt Mac data
FileVault has been built into Mac OS X Lion and later. Once the FileVault is turned on, your Mac will always require your account password when logging into your Mac.
To set up FileVault 2, you must have an admin account.
- Step 1: Click the Apple icon and select System Preferences.
- Step 2: Choose Security & Privacy > FileVault.
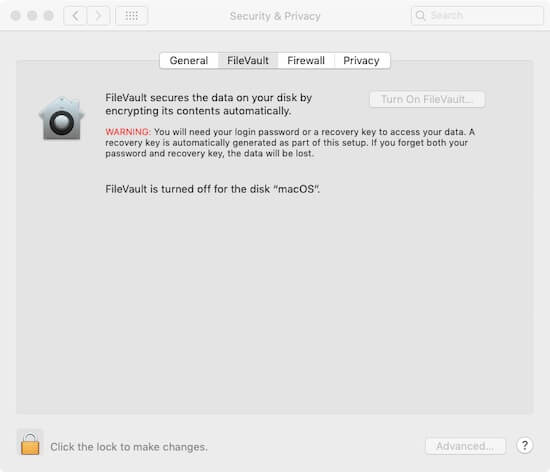
- Step 3: Click the lock on the left bottom corner of the pane and type the admin account if needed.
- Step 4: Click Turn On FileVault.
If your Mac has multiple accounts, you'll see a message that asks each user to enter their password before allowing their access to the drive. To do this, you should click Enable User and enter each user's password. - Step 5: Select the "Create a local recovery key..." option and write down the recovery key to some other place. Then, click Continue.
Or, you can select your iCloud account as your recovery option (For OS X 10.10 Yosemite or later).
The encryption process will take some time. You can adhere to other work with your Mac during the period. Once it finishes, restart your Mac. The startup disk will be encrypted during startup.
2. Disk Utility - Folder or drive encryption
Taking similar encryption algorithms like that of FileVault's, Disk Utility can also work as a folder or drive encryption tool for Mac users. It's also a BitLocker alternative for macOS.
How to use Disk Utility to encrypt a folder:
Usually, there are two types of folder encryptions: 128-bit AES encryption and 256-bit AES encryption. The latter will take more time to encrypt a folder but bring a higher level of security when compared to the former one.
- Step 1: Open Disk Utility on your Mac.
- Step 2: Select File > New Image > Image from Folder from the Apple menu bar
- Step 3: Choose your desired folder and click Choose.
- Step 4: Choose an AES encryption type on the Encryption: drop-menu.
- Step 5: Type a password and verify it. Then click Choose.
- Step 6: Select a location where you'll save the folder, set the Image Format as read/write (Or another format you like).
- Step 7: Type the required information on the pane and click Save.
Then, waiting for the folder to be encrypted and click Done.
How to use Disk Utility to encrypt an external hard drive:
If you have a new external hard drive and will use it to store important data, you can format the disk to APFS (Encrypted) or Mac OS Extended (Journaled, Encrypted). That will protect your data via encrypting the file system (APFS) or the data itself (HFS+).
You should know that formatting a drive will erase all content on it. If you have data on the drive, please back it up in advance.
- Step 1: Connect the drive to your Mac and open Disk Utility.
- Step 2: Select the drive and click Erase.
- Step 3: Choose an encrypted file system on the Format drop-down menu and select GUID Partition Map in the Scheme filed. Set a name for the drive if you'd like to.
- Step 4: Click Erase. Then, you'll get an encrypted empty drive.
3. Finder - removable media encryption
You are likely to ignore that Finder is also a BitLocker alternative for macOS. With Finder, you can encrypt and decrypt removable media on Mac models with macOS Mojave or later, such as USB Flash drives, memory cards, or other storage devices connected to your Mac.
Here's how to encrypt an external storage device with Finder:
- Step 1: Plug your external storage device into your Mac.
- Step 2: Open Finder and Control-click the disk icon at the left sidebar.
- Step 3: Select Encrypt [storage device name] on the shortcut menu.
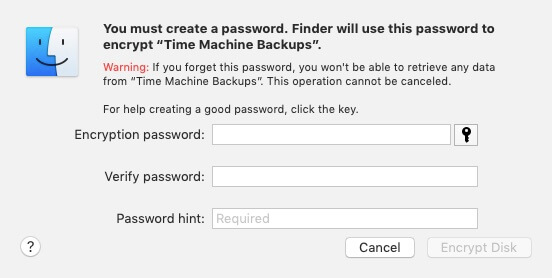
- Step 4: Set an encryption password and verify it. Then click Encrypt Disk.
You can also set a password hint to avoid forgetting the password.
4. VeraCrypt - files, folders, and entire hard drive encryption
VeraCrypt is an open-source and on-the-fly encryption software, a descendant of the discontinued TrueCrypt. As a BitLocker alternative for Mac, it is well-known and widely used among Mac users. Of course, it also can be used on Windows.
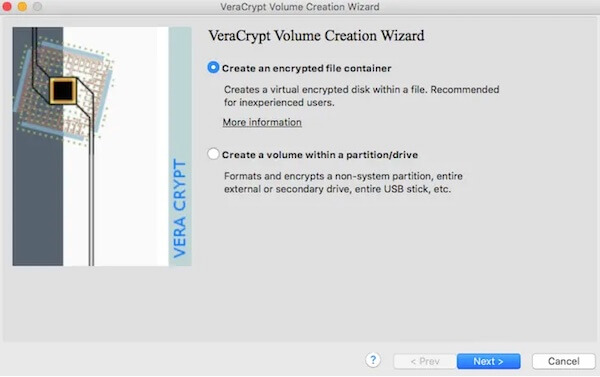
Unlike ordinary disk encryption software, it can create a virtual encrypted disk within a file. Moreover, VeraCrypt also supports encrypting a non-system partition, entire external or secondary drive, etc. VeraCrypt is available for the common encryption ciphers, such as AES, Serpent, Twofish.
To encrypt a volume on Mac with VeraCrypt, follow these steps:
- Step 1: Download, install, and open VeraCrypt on your Mac.
- Step 2: Select a slot and click the Create Volume button.
- Step 3: Select one of the options as below. Here we choose "create an encrypted file container".
- Step 4: Choose a volume type and location.
- Step 5: Select an encryption algorithm (AES is the industry standard) and set the volume size.
- Step 6: Set a password for the volume. Then, the volume will be encrypted.
How to read-write a BitLocker-encrypted drive on Mac
It is a hot topic among Mac users whether they can open a BitLocker-encrypted drive on Mac. The answer is yes. With the help of BitLocker for Mac software - M3 BitLocker Loader for Mac, reading and writing BitLocker-encrypted drive on Mac will come true.
M3 BitLocker Loader for Mac can can recognize BitLocker-encrypted drives and mount them as macOS-compatible drives. Then, you can view, write, edit, delete, or rename files on BitLocker-encrypted drives on Mac easily and fast.
Here's how to use BitLocker for Mac software: M3 BitLocker Loader for Mac:
- Step 1: Download, install and launch M3 BitLocker Loader for Mac on your Mac.
- Step 2: Insert a BitLocker encrypted drive to your Mac.
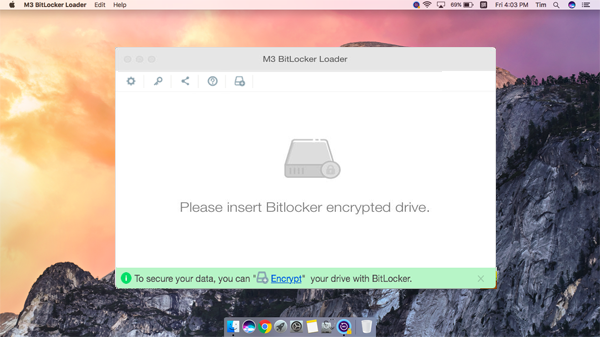
- Step 3: Select BitLocker encrypted drive you want to read on Mac and then click "Open" icon to continue.
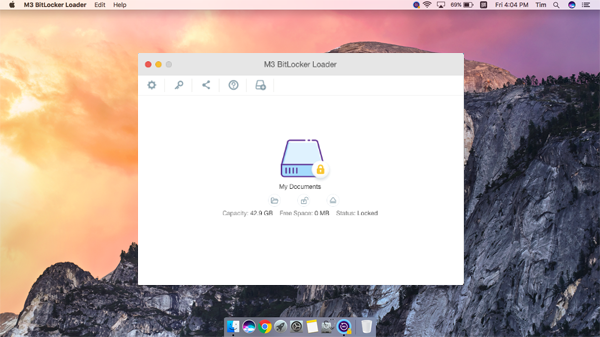
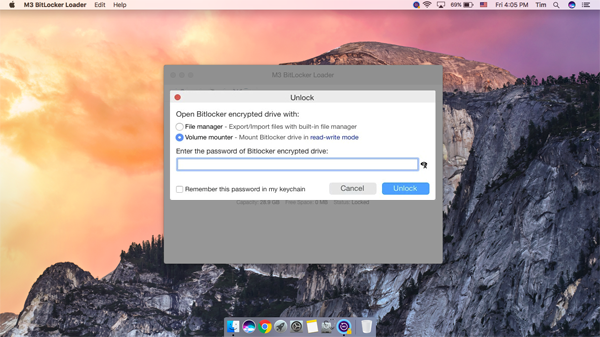
- Step 4: Enter the password (or 48-digit BitLocker recovery key) and click "Unlock" to unlock BitLocker encrypted drive.
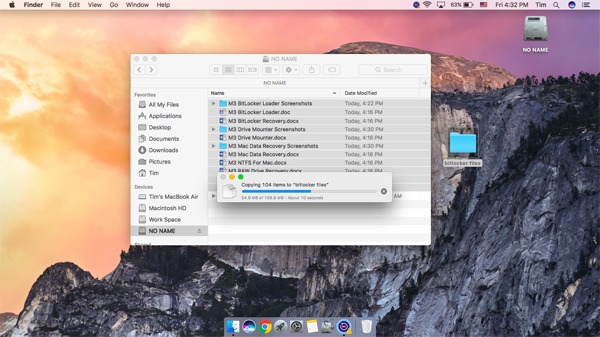
- Step 5: After mounting BitLocker encrypted drive in read-write mode, you can access your BitLocker-encrypted drive in Finder and edit files on the drive, like copying and pasting files from your Mac to the drive..
Final thoughts
Most of the BitLocker alternatives for Mac are only compatible with macOS. However, people in increasing numbers are cross-platform. So, seeking a BitLocker for Mac software is necessary and on the trend.
If you only have Mac machines, you can use FileVault 2, Disk Utility encryption, Finder that mentioned above. They are the best BitLocker alternatives for macOS.