Written by
Wilsey YoungSummary: This post tells you how to recover files lost during cut and paste, it also provides tips to prevent potential data loss on a computer. iBoysoft Data Recovery for Windows, a safe and professional data recovery tool, is highly recommended.
How to quickly move your files from one place to another on Windows? You might prefer “drag and drop”? According to a survey a long time ago, computer users feel more secure and reassured using combination keys or mouse clicks to cut and paste files from one location to another.
Nevertheless, as a computer user, you must have experienced the frustration of losing important files after the cut-and-paste operation. Sometimes, files during cut and paste may disappear for no reasons at all, and you find it really hard to get them back.
You can keep reading this article to learn how to recover files lost during cut and paste in Windows. You can free download reliable and professional iBoysoft Data Recovery for Windows to recover accidentally lost and deleted files easily.
You can click the buttons below to share this helpful article!
What causes data loss during cut and paste?
Listing the causes of data loss during cut and paste helps prevent such things from happening again, and you need to have a basic acquaintance with them before knowing how to recover files lost during cut and paste.
- The cut-and-paste operation is not completed: This is the most common reason for losing files during cut and paste. For instance, you cut the files and you forget to paste them.
- Sudden failure: If you encounter an unexpected Blue Screen of Death(BSOD) or sudden power failure, you may lose the file during cut and paste
- Incorrect ejection of storage device: If the storage device, such as a USB flash drive, is improperly ejected, the data may be lost during cut and paste.
- Interruption from virus or malware: If your computer suffers a certain virus infection or malware, your file is very likely to disappear during cut and paste.
- Hardware issues: The corrupted or damaged hardware, like a hard disk, may result in data loss during cut and paste.
How to recover files lost during cut and paste in Windows?
Some easy ways of restoring files lost during cut and paste need no further elaboration in this part, for example, checking cloud backup, OneDrive backup, checking Recycle Bin, and using the Search bar on Windows, etc.
Recover files lost during cut and paste via data recovery software
You can try using iBoysoft Data Recovery for Windows, a perfectly reliable and professional tool, to recover accidentally lost or deleted files from a variety of devices, and more than 1000 file formats and types are supported. Follow the steps below to recover files lost during cut and paste.
- Free download iBoysoft Data Recovery for Windows, then install and launch the software.
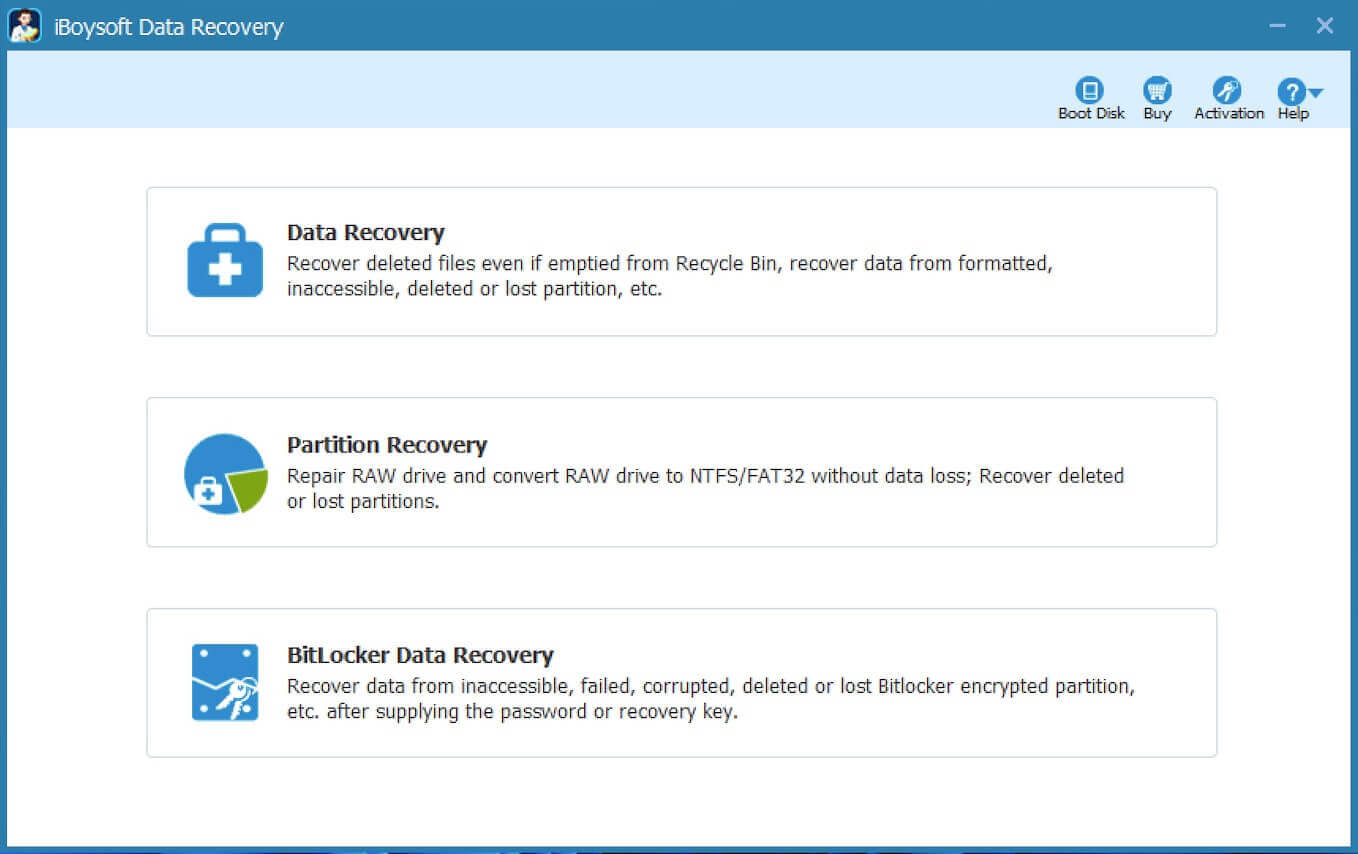
- Choose the “Data Recovery” module.
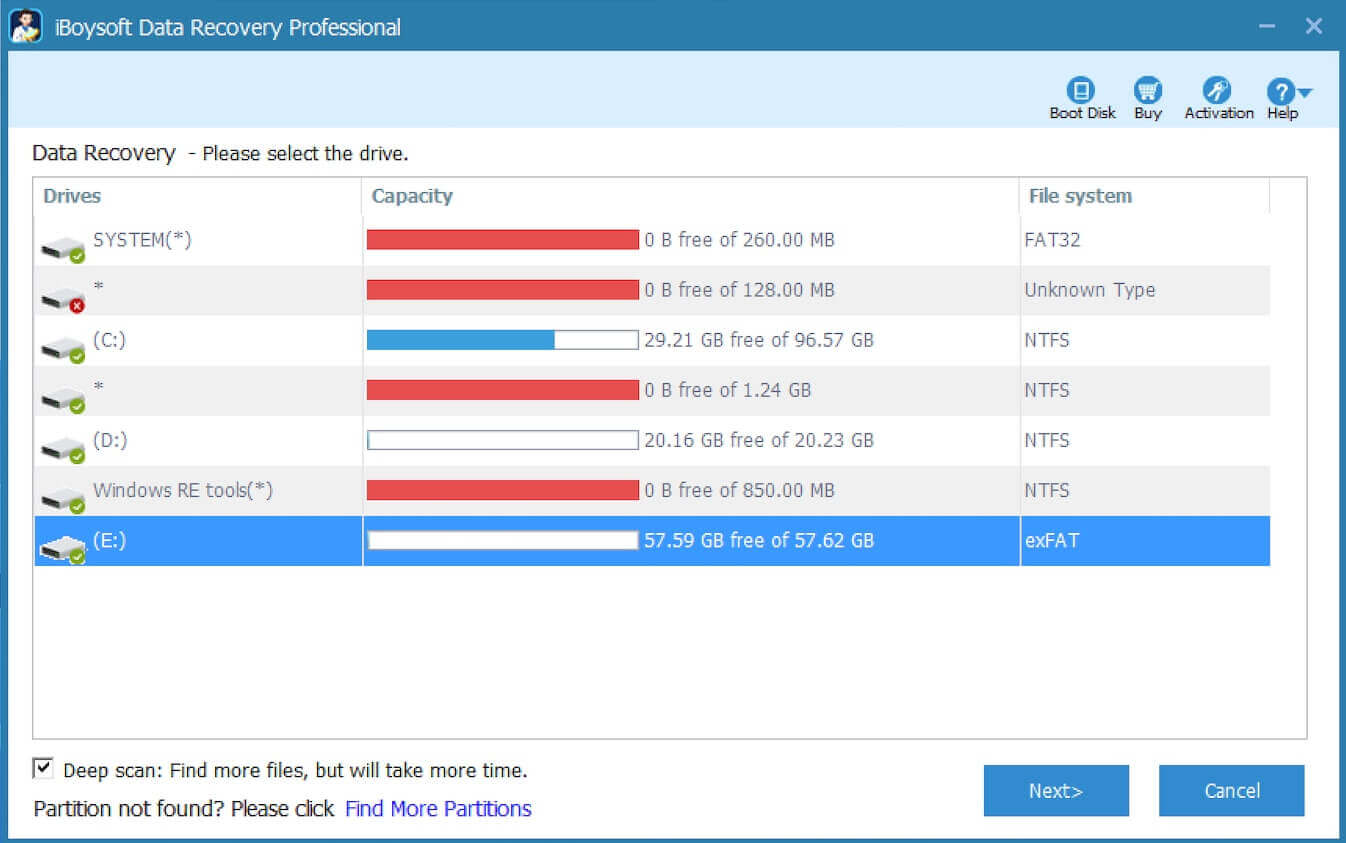
- Select the drive where you lost the files, and click “Next” to start the scanning.
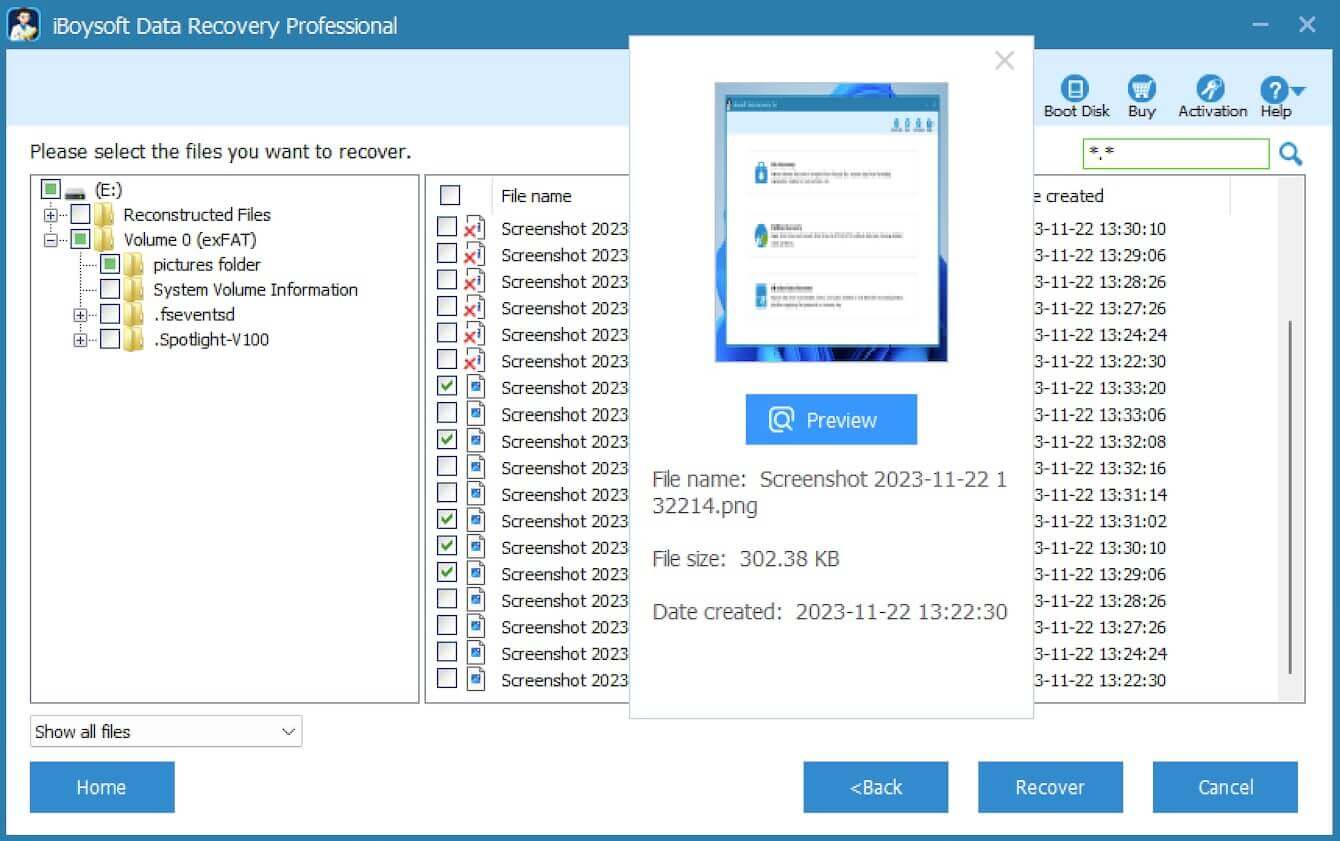
- You can filter the scanning results and preview recoverable files after the scanning completes. Tick the files you want and click the “Recover” button. You need to save the recovered files to a different drive.
You can share this post and tell your friends about how to recover files lost during cut and paste!
Recover files lost during cut and paste by showing hidden files
The possibility that the computer has your files hidden during the cut-and-paste process is quite small, but restoring the files by showing hidden files in the file explorer is worth a try.
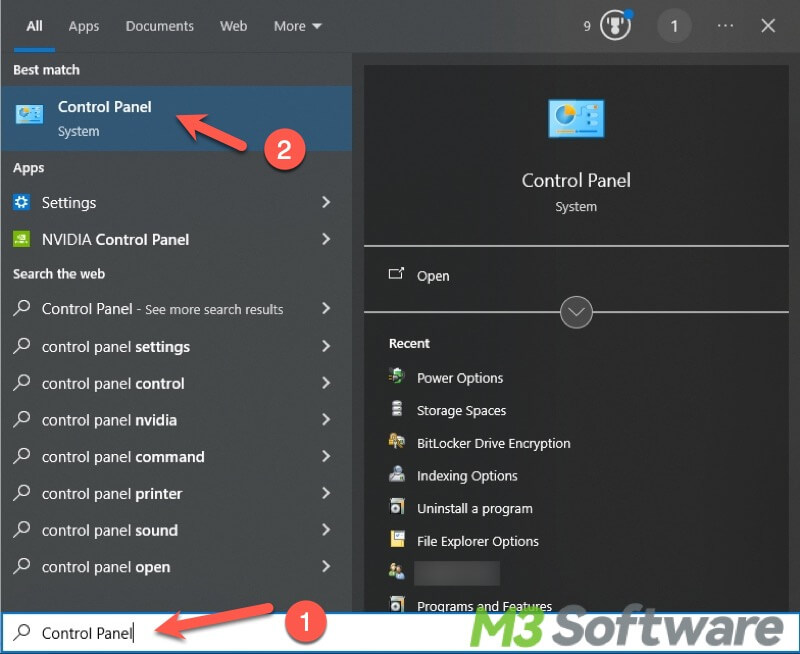
- Press “Win+S” to type “Control Panel” in the search bar and click it to open.
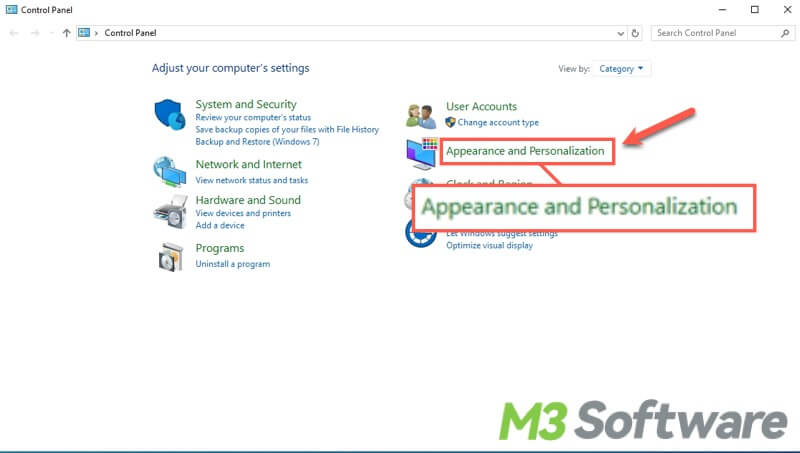
- Choose “Appearance and Personalization”.
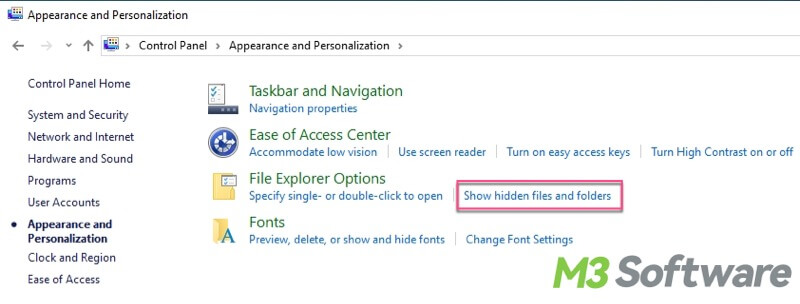
- Find “File Explorer Options” and click “Show hidden files and folders”.
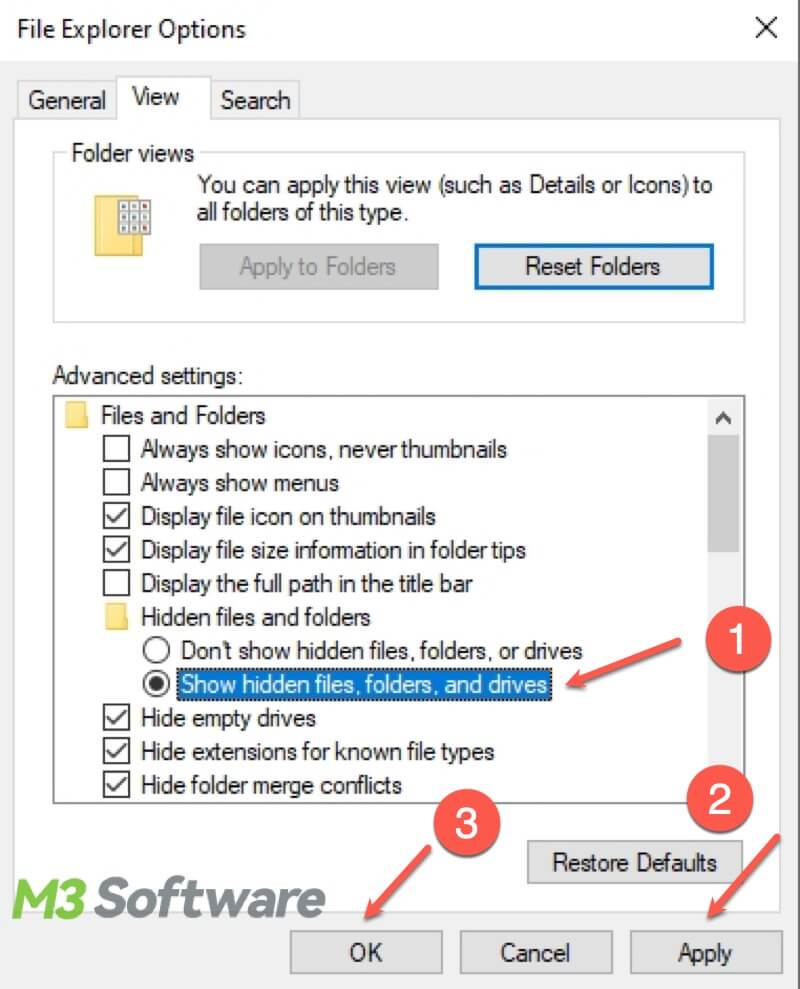
- Switch to the “View” tab and choose “Show hidden files, folders, and drives”. Then click “Apply” and “OK”.
- Go to the folder where the files were lost or where you intended to paste the files. You can check if the files reappear.
Recover files lost during cut and paste via temporary files
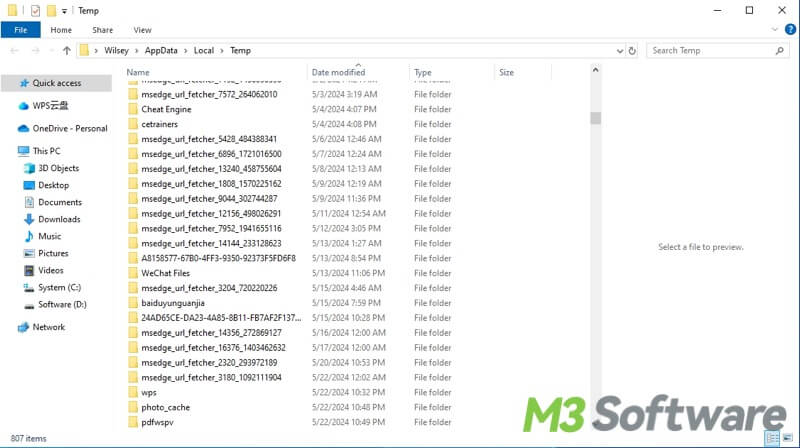
Temporary files represent the files created by a computer to temporarily store information, so you can try finding files lost during cut and paste in it.
- Press “Win+R” to open the Run dialog box, then type “%Temp” in it and press the “Enter” key.
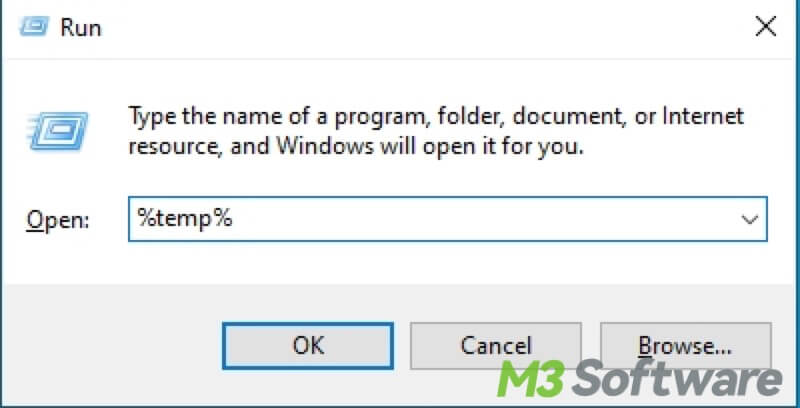
- You can view the folders and check if you can find the lost files.
Recover files lost during cut and paste via File History
File History is a convenient and inbuilt tool in Windows, and it could help you recover files lost during cut and paste. However, you need to check if the File History is enabled before data loss.
To check the status of File History, Open Settings>Update & Security>Choose Backup on the left side panel>Check if the “Automatically back up my files” is turned on. 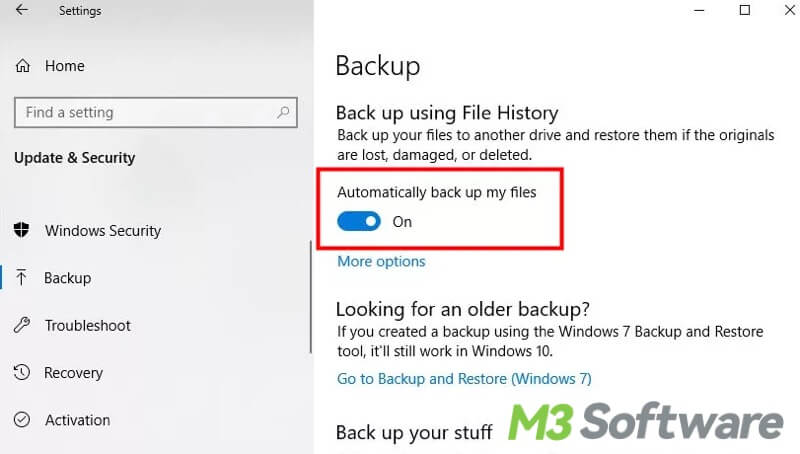
If the status is on, you can follow the steps below to recover files lost during cut and paste:
- Go to the folder where the files were lost.
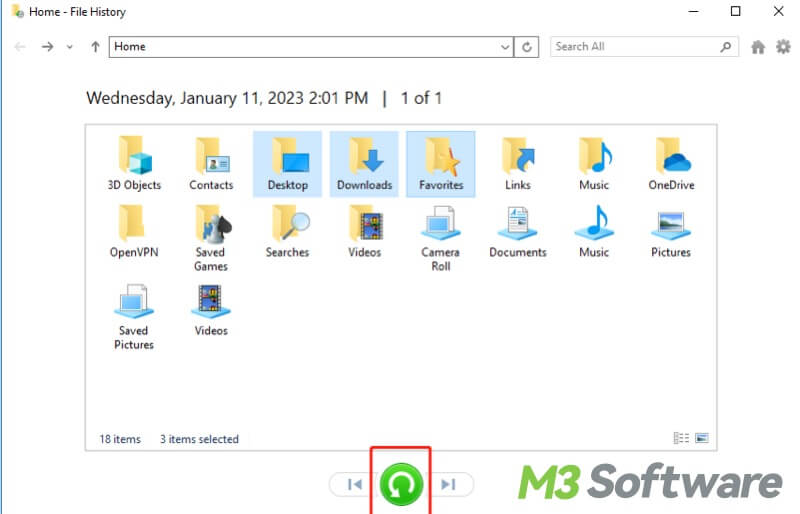
- Switch to the “Home” tab, and click “History”.
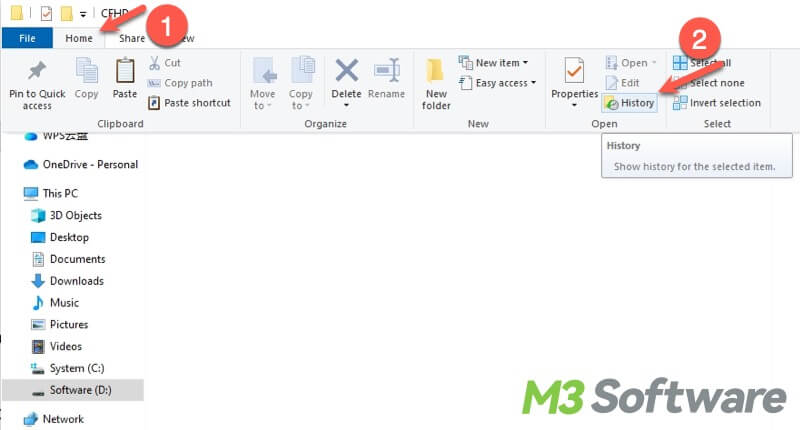
- Choose the file you want and click the green button to restore the file.
Recover files lost during cut and paste via Command Prompt(cmd)
Command Prompt(abbreviated as cmd) is a command-line interface program. If your file somehow disappears, you can use the attrib command to check if the file was hidden by inadvertent operation or virus infection.
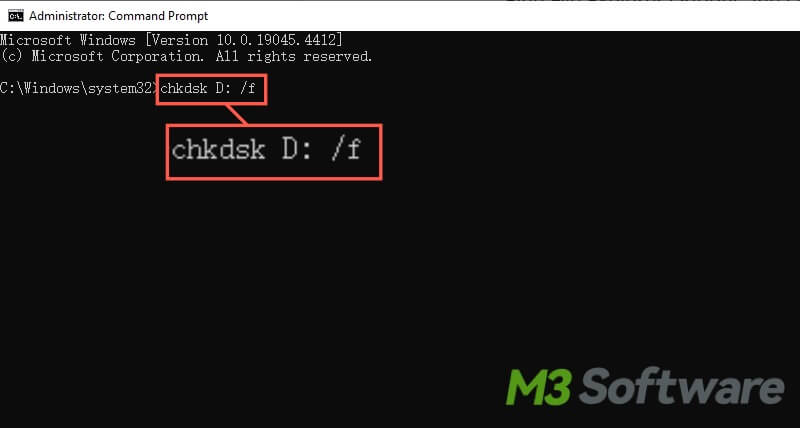
You should run “chkdsk /f” command first to implement a disk check and rewrite the directory of folders to match what's actually on the drive. It fixes the file system information so that it directs you to the right path.
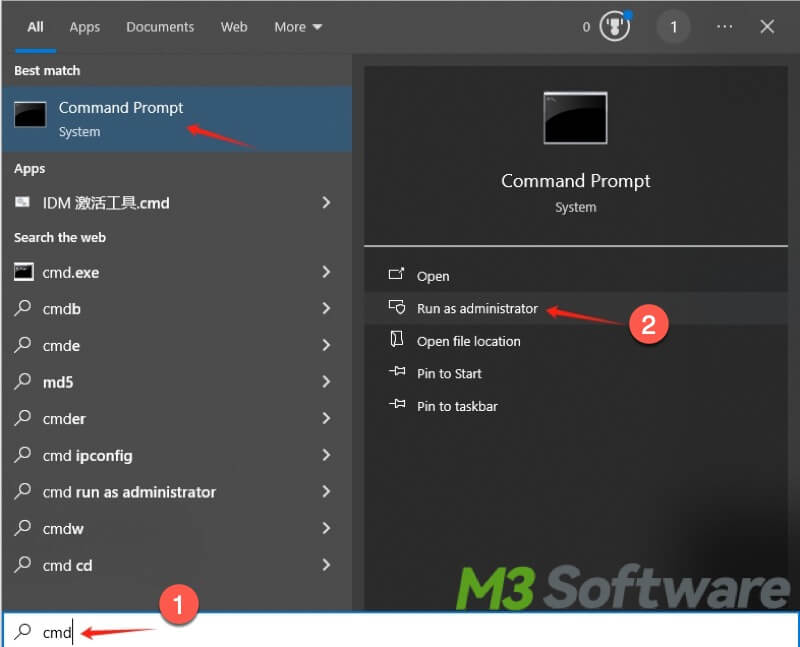
- Press “Win+S” to type “cmd” in the search bar and choose “Run as administrator”.
- Type “chkdsk Drive Letter: /f” in the window and press the “Enter” key(note: you have to replace the drive letter with the actual letter of the drive where you lost the file, for example, you want to check drive D, you should input “chkdsk D: /f”).
Now, you can execute “attrib” command to show hidden files and folders.
- Input attrib -h -r -s /s /d Drive Letter\*.* and press the Enter key(Replace Drive Letter with the actual letter or drive).
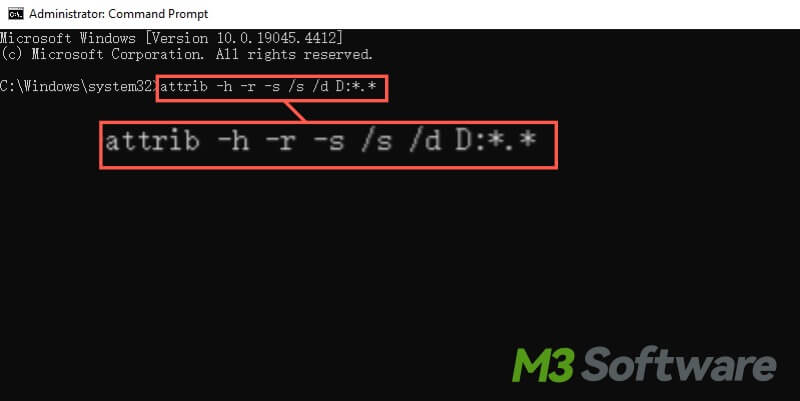
- Check if the file is recovered once the command completes.
Recover files lost during cut and paste via System Restore
System Restore on Windows allows you to revert the operating system to a previous state and undo the changes you've made to the computer, so you can try using System Restore to recover files lost during cut and paste.
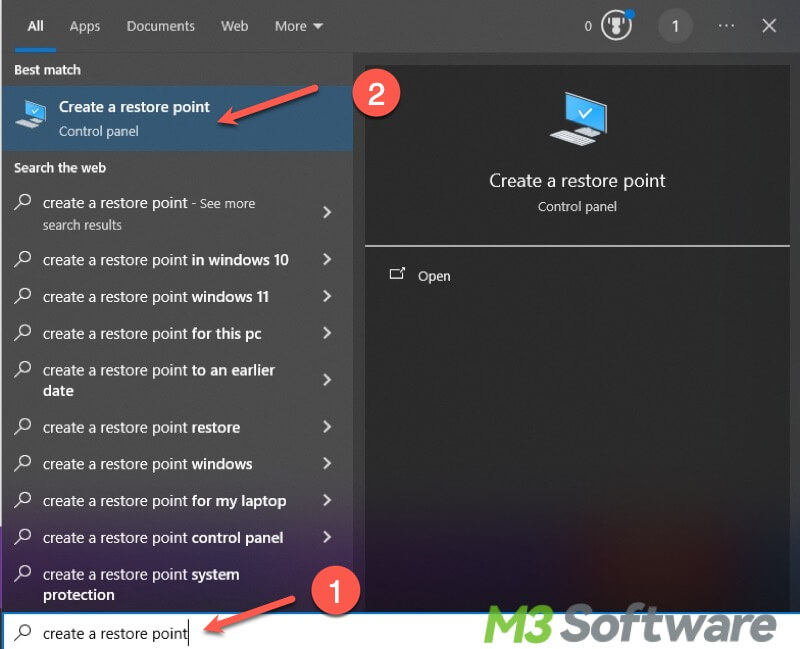
- Press “Win+S” to type “Create a restore point” in the search bar and click it to open.
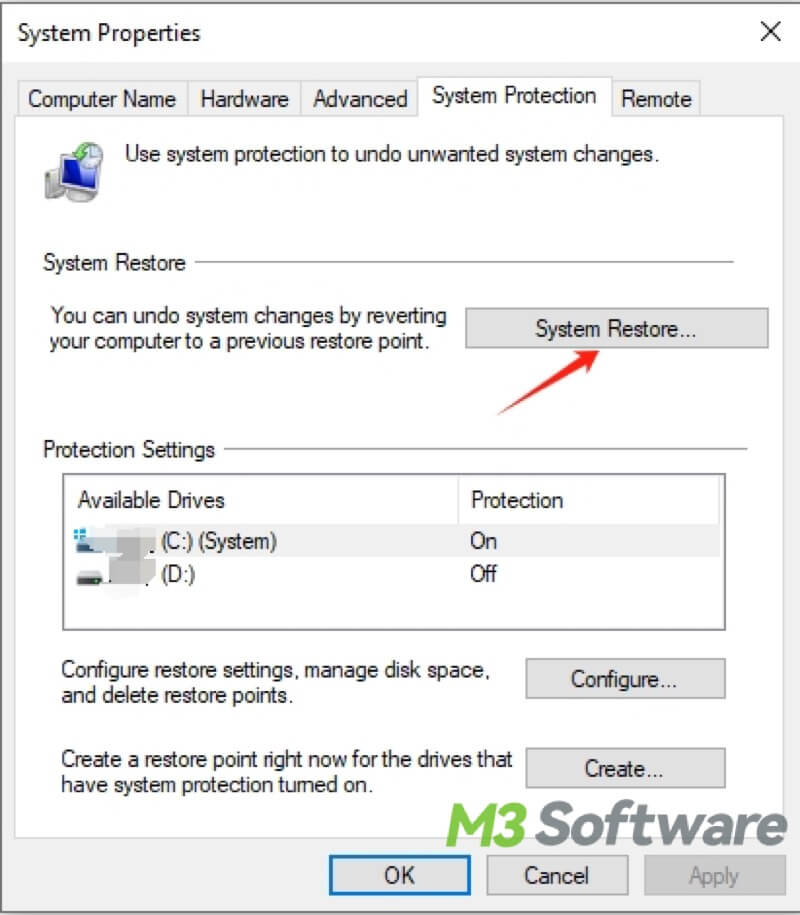
- Choose “System Restore”.
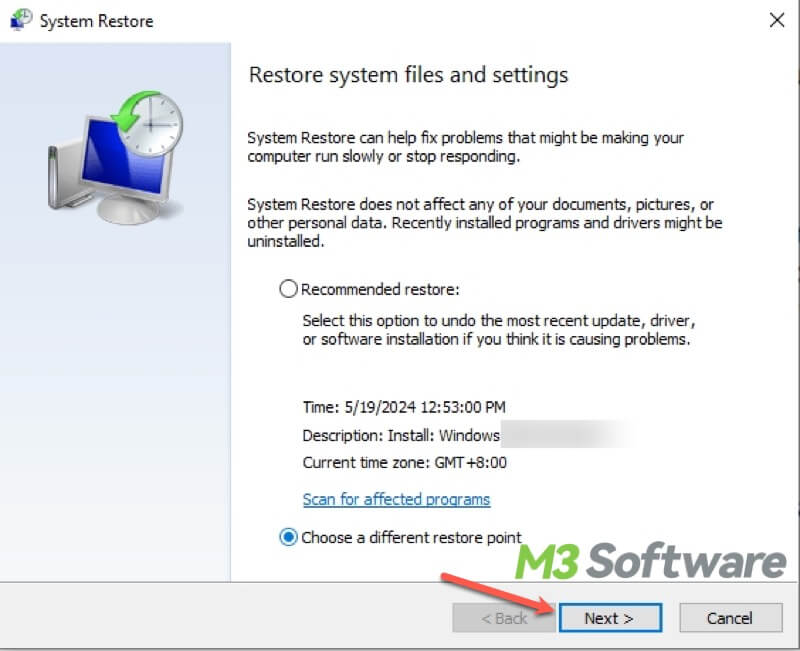
- Click “Next” in the popping-up window.
- Choose a restore point, the “Data and Time” before the data loss during cut and paste(you can click show more restore points to see more options).
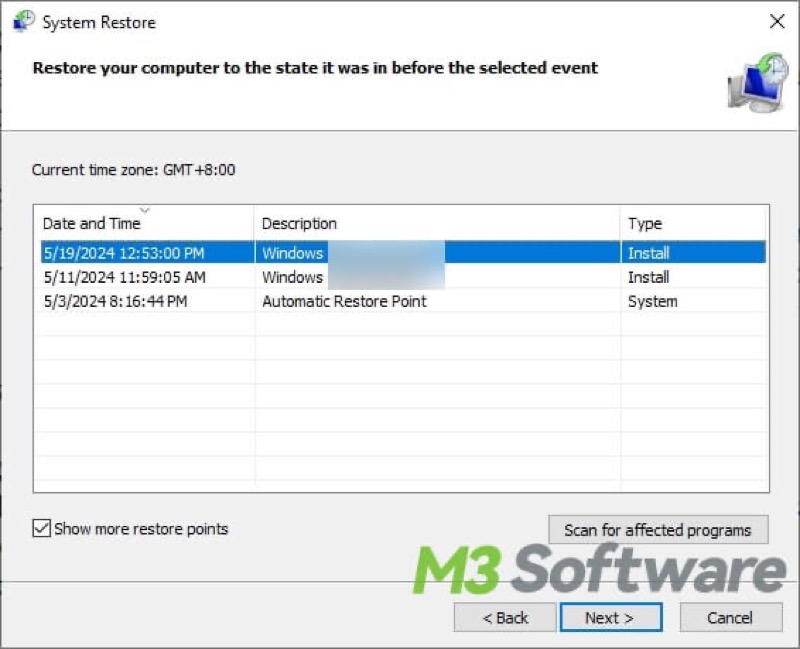
- Click “Next” to follow the wizard to complete System Restore. Check if your file is back after System Restore is completed.
Bonus Tips: How to prevent data loss caused by cut and paste operation?
The tips below can help prevent data loss due to cut-and-paste operations and many other circumstances.
- Copy and Paste is safer than Cut and Paste: Using Copy and Paste instead of Cut and Paste can effectively lower the risks of losing data.
- Regular data backup: Regularly backing up your data and files is the best way to prevent data loss in different scenarios. You can complete the backup via removable storage devices, Cloud backup, and creating system restore points in Windows, etc. It is suggested to back up data in different ways.
- Ejecting external storage devices safely and properly: Data loss tends to happen if you forcibly eject the storage device from your computer, especially when you cut and paste files.
Conclusion:
You can try the "show hidden files" or the "attrib" command to confirm that the system does not hide the file. Suppose you've never turned on "Automatically back up my files" in Settings, or you don't have an appropriate restore point to perform. In that case, you can free download iBoysoft Data Recovery for Windows to recover files lost during cut and paste.
You can share the content above to help your friends who confront the same barrier!
